Creative Woodworks & crafts 2000-04, страница 55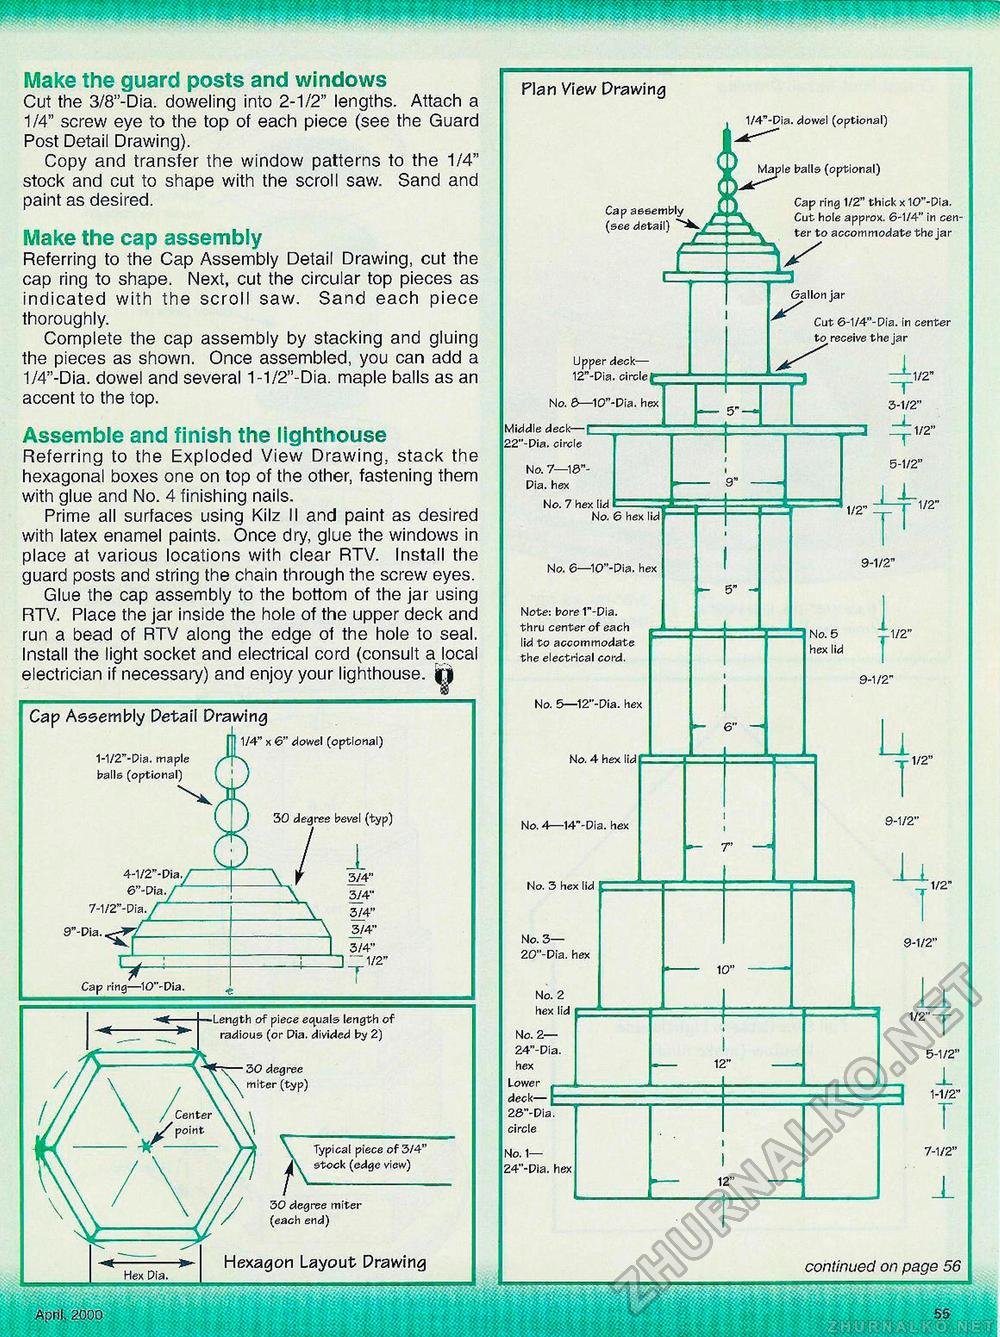
Make the guard posts and windows Cut the 3/8"-Dia. doweling into 2-1/2" lengths. Attach a 1/4" screw eye to the top of each piece (see the Guard Post Detail Drawing). Copy and transfer the window patterns to the 1/4" stock and cut to shape with the scroll saw. Sand and paint as desired. Make the cap assembly Referring to the Cap Assembly Detail Drawing, cut the cap ring to shape. Next, cut the circular top pieces as indicated with the scroll saw. Sand each piece thoroughly. Complete the cap assembly by stacking and gluing the pieces as shown. Once assembled, you can add a 1/4"-Dia. dowel and several 1-1/2"-Dia. maple balls as an accent to the top. Assemble and finish the lighthouse Referring to the Exploded View Drawing, stack the hexagonal boxes one on top of the other, fastening them with glue and No. 4 finishing nails. Prime all surfaces using Kilz II and paint as desired with latex enamel paints. Once dry, glue the windows in place at various locations with clear RTV. Install the guard posts and string the chain through the screw eyes. Glue the cap assembly to the bottom of the jar using RTV. Place the jar inside the hole of the upper deck and run a bead of RTV along the edge of the hole to seal. Install the light socket and electrical cord (consult a local electrician if necessary) and enjoy your lighthouse. Cap Assembly Detail Drawing 1-1/2"-Pia. maple balls (optional) 1/4" x &' dowel (optional) 30 degree bevel (typ) 4-1/2"-PL 3"-Pia./ 7-1/2"-Pi aJ_~ 9"-Pia Cap ring—10"-Dia ] 111/2" Length of piece equals length of radious (or Pia, divided by 2) 30 degree miter (typ) I Typical piece of 3/4" stock (edge view) 30 degree miter (each end) Hexagon Layout Drawing mmm^mt )00 . Plan View Drawing , 1/4"-Pia. dowel (optional) O Maple balls (optional) Cap assembly (see detail) Mapl Jk Cap ring 1/2" thick x 10"-Pia. Cut hole approx. 6-1/4" in center to accommodate the jar Cut 0-1/4"- Pia. in center to receive the jar Upper deck-12"-Pia. circle £ No. 6—10"-Pia. hex Middle deck—[ 22"-Pia. circle No. 6—10"-Pia. hex Note: bore 1"-Dia. thru center of each lid to accommodate the electrical cord. No. 5—12"-Pia. hex - 5" - 9-1/2" 7-1/2" continued on page 56 |


