Creative Woodworks & crafts 2001-01, страница 26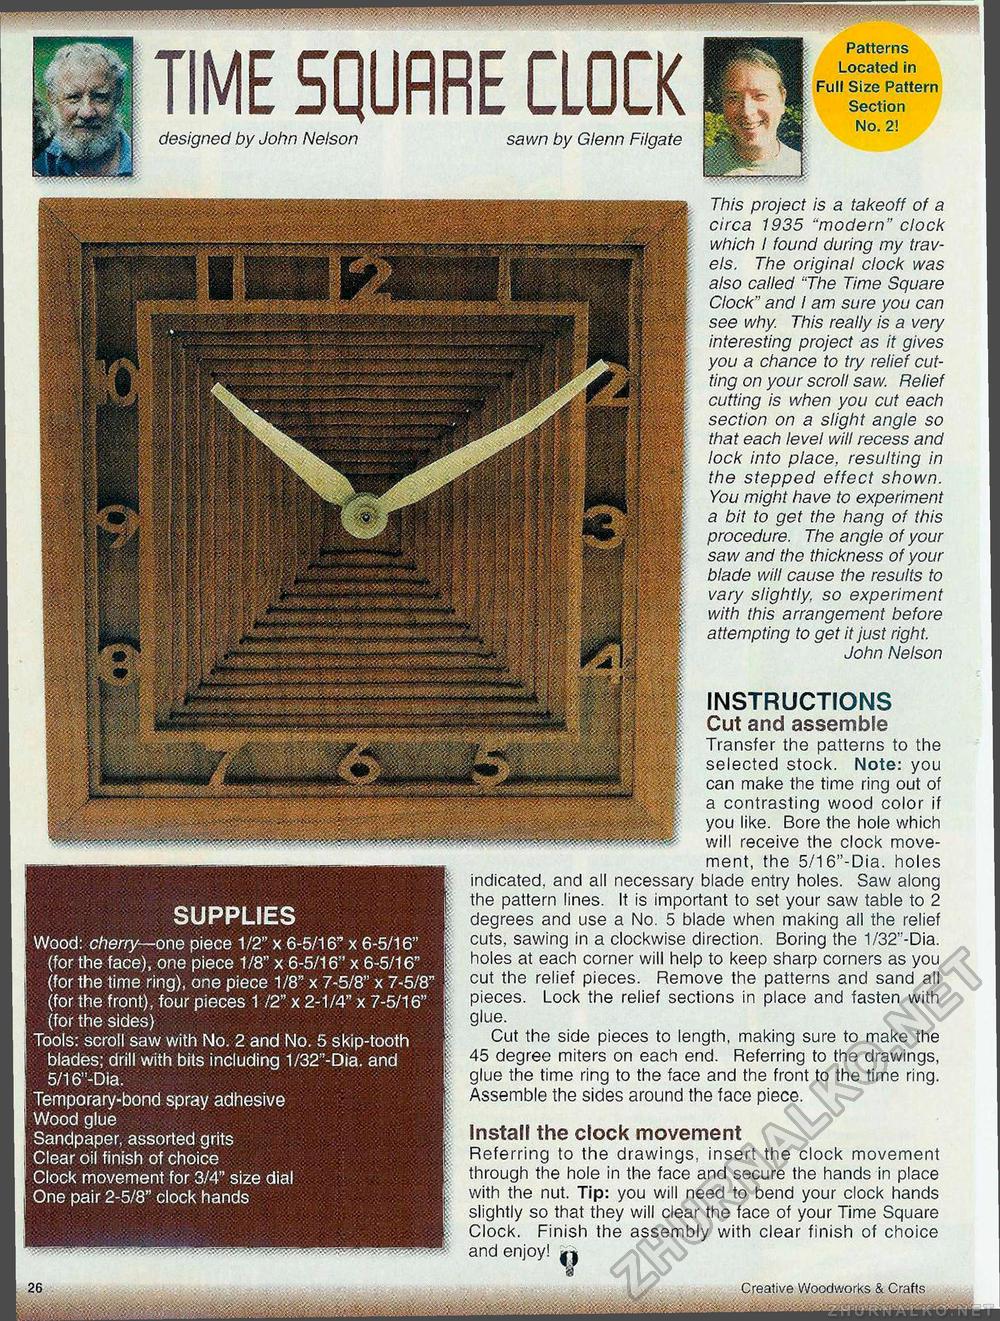
TIME 5QURRE CLOCKdesigned by John Nelson sawn by Glenn Filgate Patterns Located in Size Pattern Section No. 2! SUPPLIES Wood: cherry— one piece 1/2" x 6-5/16" x 6-5/16" (for the face), one piece 1/8" x 6-5/16" x 6-5/16" (for the time ring), one piece 1/8" x 7-5/8" x 7-5/8' (for the front), four pieces 1 /2" x 2-1/4" x 7-5/16" (for the sides) Tools: scroll saw with No. 2 and No. 5 skip-tooth blades; drill with bits including 1/32"-Dia. and 5/16"-Dia. Temporary-bond spray adhesive Wood glue Sandpaper, assorted grits Clear oil finish of choice Clock movement for 3/4" size dial One pair 2-5/8" clock hands This project is a takeoff of a circa 1935 "modern" clock which I found during my travels. The original clock was also called "The Time Square Clock" and I am sure you can see why. This really is a very interesting project as it gives you a chance to try relief cutting on your scroll saw. Relief cutting is when you cut each section on a slight angle so that each level will recess and lock into place, resulting in the stepped effect shown. You might have to experiment a bit to get the hang of this procedure. The angle of your saw and the thickness of your blade will cause the results to vary slightly, so experiment with this arrangement before attempting to get it just right. John Nelson INSTRUCTIONS Cut and assemble Transfer the patterns to the selected stock. Note: you can make the time ring out of a contrasting wood color if you like. Bore the hole which will receive the clock movement, the 5/16"-Dia. holes indicated, and all necessary blade entry holes. Saw along the pattern lines. It is important to set your saw table to 2 degrees and use a No. 5 blade when making all the relief cuts, sawing in a clockwise direction. Boring the 1/32"-Dia. holes at each corner will help to keep sharp corners as you cut the relief pieces. Remove the patterns and sand all pieces. Lock the relief sections in place and fasten with glue. Cut the side pieces to length, making sure to make the 45 degree miters on each end. Referring to the drawings, glue the time ring to the face and the front to the time ring. Assemble the sides around the face piece. Install the clock movement Referring to the drawings, insert the clock movement through the hole in the face and secure the hands in place with the nut. Tip: you will need to bend your clock hands slightly so that they will clear the face of your Time Square Clock. Finish the assembly with clear finish of choice and enjoy! » Creative Woodworks & Crafts - — - ■ ......— '...............— |


