Creative Woodworks & crafts 2001-01, страница 28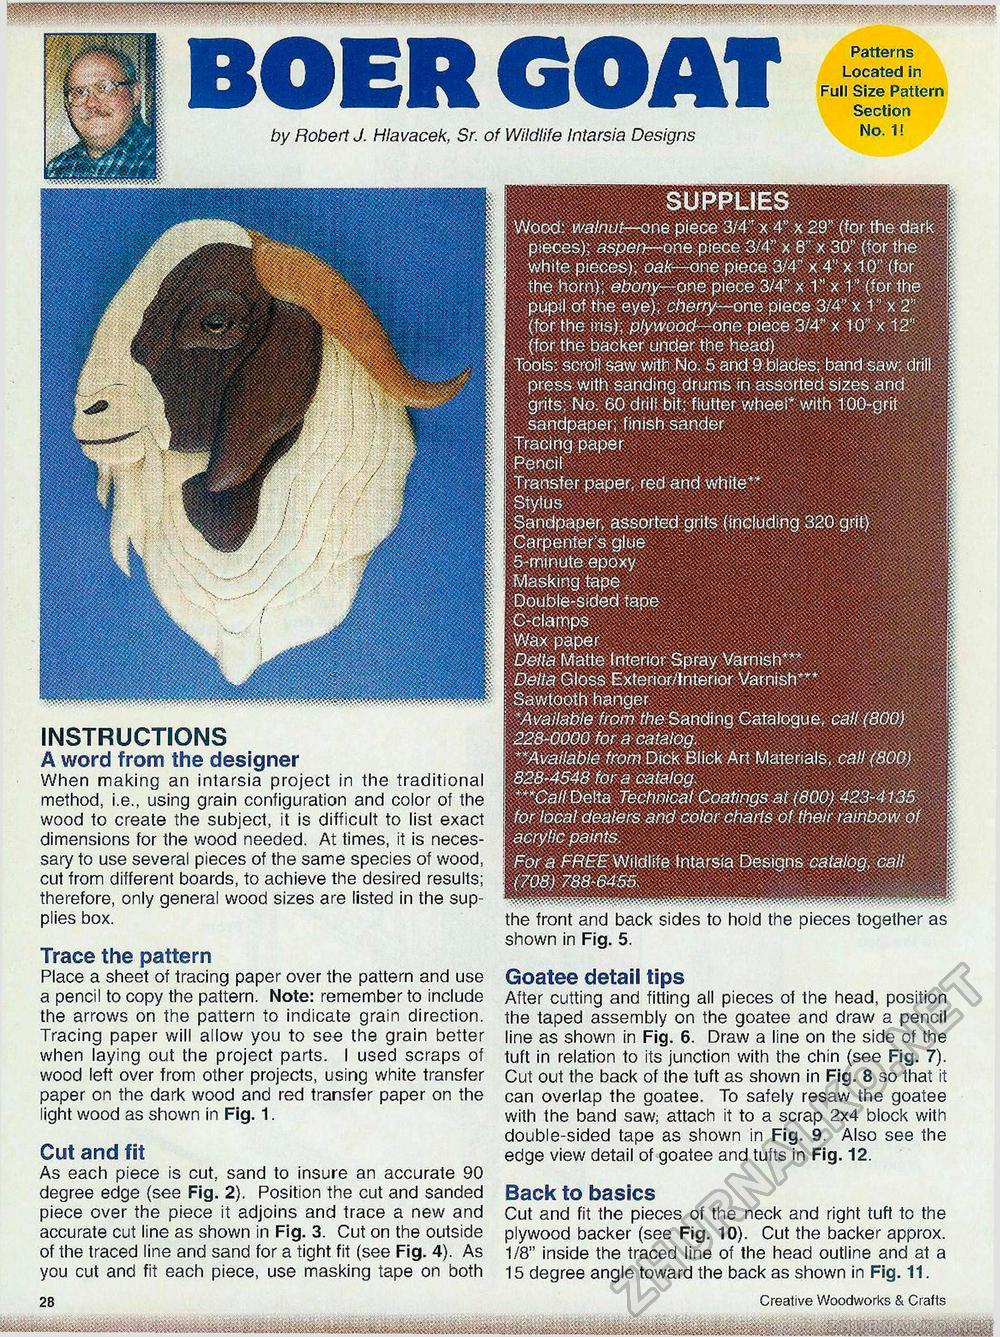
INSTRUCTIONS A word from the designer When making an intarsia project in the traditional method, i.e., using grain configuration and color of the wood to create the subject, it is difficult to list exact dimensions for the wood needed. At times, it is necessary to use several pieces of the same species of wood, cut from different boards, to achieve the desired results; therefore, only general wood sizes are listed in the supplies box. Trace the pattern Place a sheet of tracing paper over the pattern and use a pencil to copy the pattern. Note: remember to include the arrows on the pattern to indicate grain direction. Tracing paper will allow you to see the grain better when laying out the project parts. I used scraps of wood left over from other projects, using white transfer paper on the dark wood and red transfer paper on the light wood as shown in Fig. 1. Cut and fit As each piece is cut, sand to insure an accurate 90 degree edge {see Fig. 2). Position the cut and sanded piece over the piece it adjoins and trace a new and accurate cut line as shown in Fig. 3. Cut on the outside of the traced line and sand for a tight fit (see Fig. 4). As you cut and fit each piece, use masking tape on both SUPPLIES Wood: walnut—one piece 3/4" x 4" x 29" (for the dark pieces): aspen—one piece 3/4" x 8" x 30" (for the white pieces); oak—one piece 3/4" x 4" x 10" (for the horn); ebony—one piece .3/4" x 1M x 1" (for the : pupil ofithe eye); cherry—one piece 3/4" x 1" x 2" ■ (for the iris); plywood—one piece 3/4" x 10" x 12" (for the backer under the head) Tools: scroll saw with No. 5 and 9 blades; band saw; drill press with sanding drums in.assorted sizes and : grits; No. 60 drill bit; flutter wheel"' with 100-grit sandpaper; finish sander s . Tracing paper Pencil Transfer paper, red and white" Stylus Sandpaper, assorted; grits (including 320 grit) Carpenter's glue 5-minute epoxy Masking tape Double-sided tape C-clamps ilili:^: wax paper Delta Matte Interior Spray Varnish4** Delta Gloss; Exterior/Interior Varnish*"* Sawtooth hanger "Available from the Sanding Catalogue; call (800) 228-0000 for a catalog. **.Available from Dick Blick Art Materials, call (800) 828-4548 for a catalog. ***Call Delta Technical Coatings at (800) 423-4135 for local dealers and color chads of their rainbow of acrylic paints. For a FtfEF Wildlife Intarsia Designs catalog, call (708) 788-6455 the front and back sides to hold the pieces together as shown in Fig. 5. Goatee detail tips After cutting and fitting all pieces of the head, position the taped assembly on the goatee and draw a pencil line as shown in Fig. 6. Draw a line on the side of the tuft in relation to its junction with the chin (see Fig. 7). Cut out the back of the tuft as shown in Fig. 8 so that it can overlap the goatee. To safely resaw the goatee with the band saw: attach it to a scrap 2x4 block with double-sided tape as shown in Fig. 9. Also see the edge view detail of goatee and tufts in Fig. 12. Back to basics Cut and fit the pieces of the neck and right tuft to the plywood backer (see Fig. 10). Cut the backer approx. 1/8" inside the traced line of the head outline and at a 15 degree angle toward the back as shown in Fig. 11. BOER GOAT Patterns Located in Full Size Pattern Section by Robed J. Hlavacek, Sr. of Wildlife Intarsia Designs No1! 28 Creative Woodworks &. Crafts |


