Creative Woodworks & crafts 2001-04, страница 27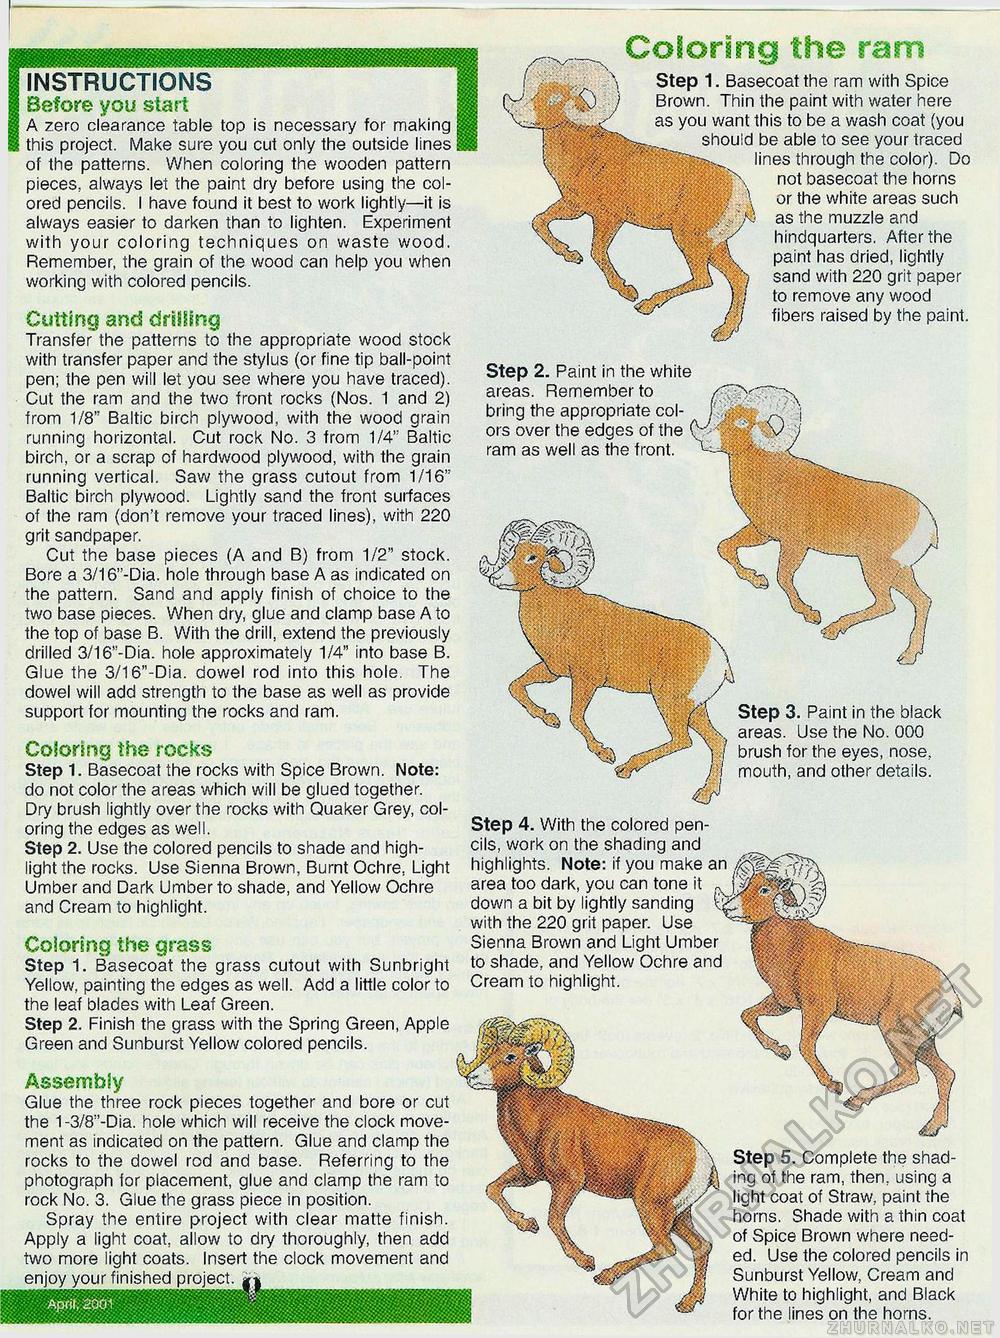
instructions Before you start A zero clearance table top is necessary for making this project. Make sure you cut only the outside lines of the patterns. When coloring the wooden pattern pieces, always let the paint dry before using the colored pencils. I have found it best to work lightly—it is always easier to darken than to lighten. Experiment with your coloring techniques on waste wood. Remember, the grain of the wood can help you when working with colored pencils. Cutting and driving Transfer the patterns to the appropriate wood stock with transfer paper and the stylus (or fine tip ball-point pen; the pen will let you see where you have traced). Cut the ram and the two front rocks (Nos. 1 and 2) from 1/8" Baltic birch plywood, with the wood grain running horizontal. Cut rock No. 3 from 1/4" Baltic birch, or a scrap of hardwood plywood, with the grain running vertical. Saw the grass cutout from 1/16" Baltic birch plywood. Lightly sand the front surfaces of the ram (don't remove your traced lines), with 220 grit sandpaper. Cut the base pieces (A and B) from 1/2" stock. Bore a 3/16"-Dia. hole through base A as indicated on the pattern. Sand and apply finish of choice to the two base pieces. When dry, glue and clamp base A to the top of base B. With the drill, extend the previously drilled 3/16"-Dia. hole approximately 1/4" into base B. Glue the 3/16"-Dia. dowel rod into this hole. The dowel will add strength to the base as well as provide support for mounting the rocks and ram. Coloring the rocks Step 1. Basecoat the rocks with Spice Brown. Note: do not color the areas which will be glued together. Dry brush lightly over the rocks with Quaker Grey, coloring the edges as well. Step 4. With the colored pen-Step 2. Use the colored pencils to shade and high- cils, work on the shading and light the rocks. Use Sienna Brown, Burnt Ochre, Light highlights. Note: if you make an f. Umber and Dark Umber to shade, and Yellow Ochre area too dark, you can tone it .J; and Cream to highlight. down a bit by lightly sanding % with the 220 grit paper. Use Coloring the grass Sienna Brown and Light Umber Step 1. Basecoat the grass cutout with Sunbright to shade, and Yellow Ochre and Yellow, painting the edges as well. Add a little color to Cream to highlight, the leaf blades with Leaf Green. Step 2. Finish the grass with the Spring Green, Apple Green and Sunburst Yellow colored pencils. .mfflmtMJv>. Assembly Glue the three rock pieces together and bore or cut the 1-3/8"-Dia. hole which will receive the clock movement as indicated on the pattern. Glue and clamp the rocks to the dowel rod and base. Referring to the photograph for placement, glue and clamp the ram to rock No. 3. Glue the grass piece in position. Spray the entire project with clear matte finish. Apply a light coat, allow to dry thoroughly, then add two more light coats. Insert the clock movement and enjoy your finished project, Step 1. Basecoat the ram with Spice Brown. Thin the paint with water here as you want this to be a wash coat (you should be able to see your traced ~ - ^ lines through the color). Do not basecoat the horns 1 or the white areas such •••; . . M as the muzzle and ^ / hindquarters. After the §1 _ paint has dried, lightly sand with 220 grit paper IH to remove any wood jm fibers raised by the paint. Step 2. Paint in the white areas. Remember to bring the appropriate colors over the edges of the ( ram as well as the front. I Step 3. Paint in the black V areas. Use the No. 000 ]brush for the eyes, nose, /;! mouth, and other details. Step 5. Complete the shading of the ram, then, using a light coat of Straw, paint the horns. Shade with a thin coat of Spice Brown where needed. Use the colored pencils in Sunburst Yellow, Cream and White to highlight, and Black for the lines on the horns. |


