Creative Woodworks & crafts 2001-04, страница 57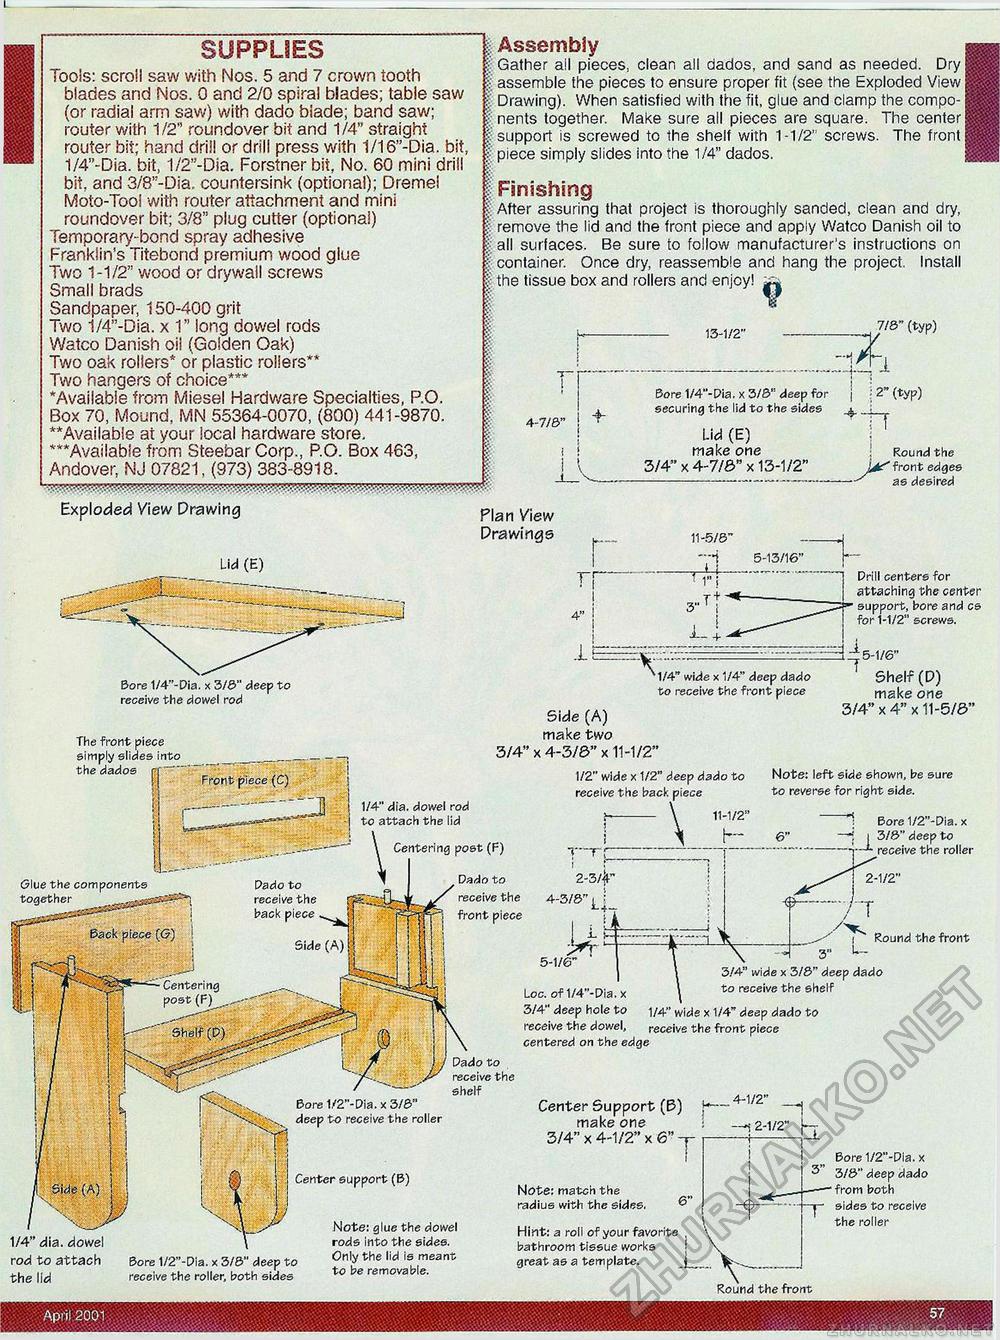
I SUPPLIES Tools: scroll saw with Nos. 5 and 7 crown tooth blades and Nos. 0 and 2/0 spiral blades; table saw (or radial arm saw) with dado biade; band saw; router with 1/2" roundover bit and 1/4" straight router bit; hand drill or drill press with 1/16"-Dia. bit, 1/4"-Dia. bit, 1/2"-Dia. Forstner bit, No. 60 mini drill bit, and 3/8"-Dia. countersink (optional); Dremel Moto-Tool with router attachment and mini roundover bit; 3/8" plug cutter (optional) Temporary-bond spray adhesive Franklin's Titebond premium wood glue Two 1-1/2" wood or drywall screws Small brads Sandpaper, 150-400 grit Two 1/4"-Dia. x 1" long dowel rods Watco Danish oil (Golden Oak) Two oak rollers* or plastic rollers** Two hangers of choice*** 'Available from Miesel Hardware Specialties, P.O. Box 70, Mound, MN 55364-0070, (800) 441-9870. **Available at your local hardware store. ***Available from Steebar Corp., P.O. Box 463, Andover, NJ 07821, (973) 383-8918. Assembly Gather ail pieces, clean all dados, and sand as needed. Dry j assemble the pieces to ensure proper fit (see the Exploded View | Drawing). When satisfied with the fit, glue and clamp the components together. Make sure all pieces are square. The center! support is screwed to the shelf with 1-1/2'! screws. The front [ piece simply slides into the 1/4" dados. Finishing After assuring that project is thoroughly sanded, clean and dry, remove the lid and the front piece and apply Watco Danish oil to all surfaces. Be sure to follow manufacturer's instructions on container. Once dry, reassemble and hang the project. Install the tissue box and rollers and enjoy! 13-1/2" 7/8" (typ) 4-7/6" 4- L Bore 1/4"-Pia. x 3/6" deep for j • 2" (typ) securing the lid to the sides _ Lid (E) make one j Round the 3/4" X 4-7/£>" X 13-1 /2" jjf front edges - . ---------------------s as desired Exploded View Drawing Plan View Drawings Lid (E) Bore 1/4"-Pia. x 3/3" deep to receive the dowel rod 1/4" wide x 1/4" deep dado to receive the front piece The front piece simply slides into the dados Side (A) make two 3/4" x 4-3/d" x 11-1/2" Prill centers for attaching the center support, bore and cs for 1-1/2" screws. 5-1/0" Shelf (D) make one 3/4" x 4" x 11-5/&" ! Glue the components together SBd Front piece (C) Pado to receive the hack piece . Side (A) 1/4" dia. dowel rod to attach the lid \ Centering post (F) * Dado to receive the front piece 1/2" wide x 1/2" deep dado to receive the back piece 11-1/2" Note: left side shown, be sure to reverse for right side. "i—rr i r 2-3/4' 4-3 !& \ 5-1/6" Li- ; Bore 1/2"-Pia. x —j j 3/8" deep to —t—re>r.e>\\ie> rn! V —..... 3/4" wide x 3/8" deep dado to receive the shelf Loc. of 1/4"-Pia. x 3/4" deep hole to 1/4" wys x 1/4" deep dado to receive the dowel, receive the front piece centered on the edge Bore 1/2"-Pia. x 3/6" „ deep to receive the roller Center support (B) 1/4" dia. dowel rod to attach the lid Bore 1/2"-Pia. x 3/6" deep to receive the roller, both sides Note: glue the dowel rods into the sides. Only the lid is meant to be removable. Center Support (f3) make one 3/4" x 4-1/2" x 6 Note: match the radius with the sides, Hint: a roll of your favorite bathroom tissue works great as a template. . 4-1/2' Bore 1/2"-Pla. x 3/8" deep dado from both sides to receive the roller Round the front |


