Creative Woodworks & crafts 2001-10, страница 20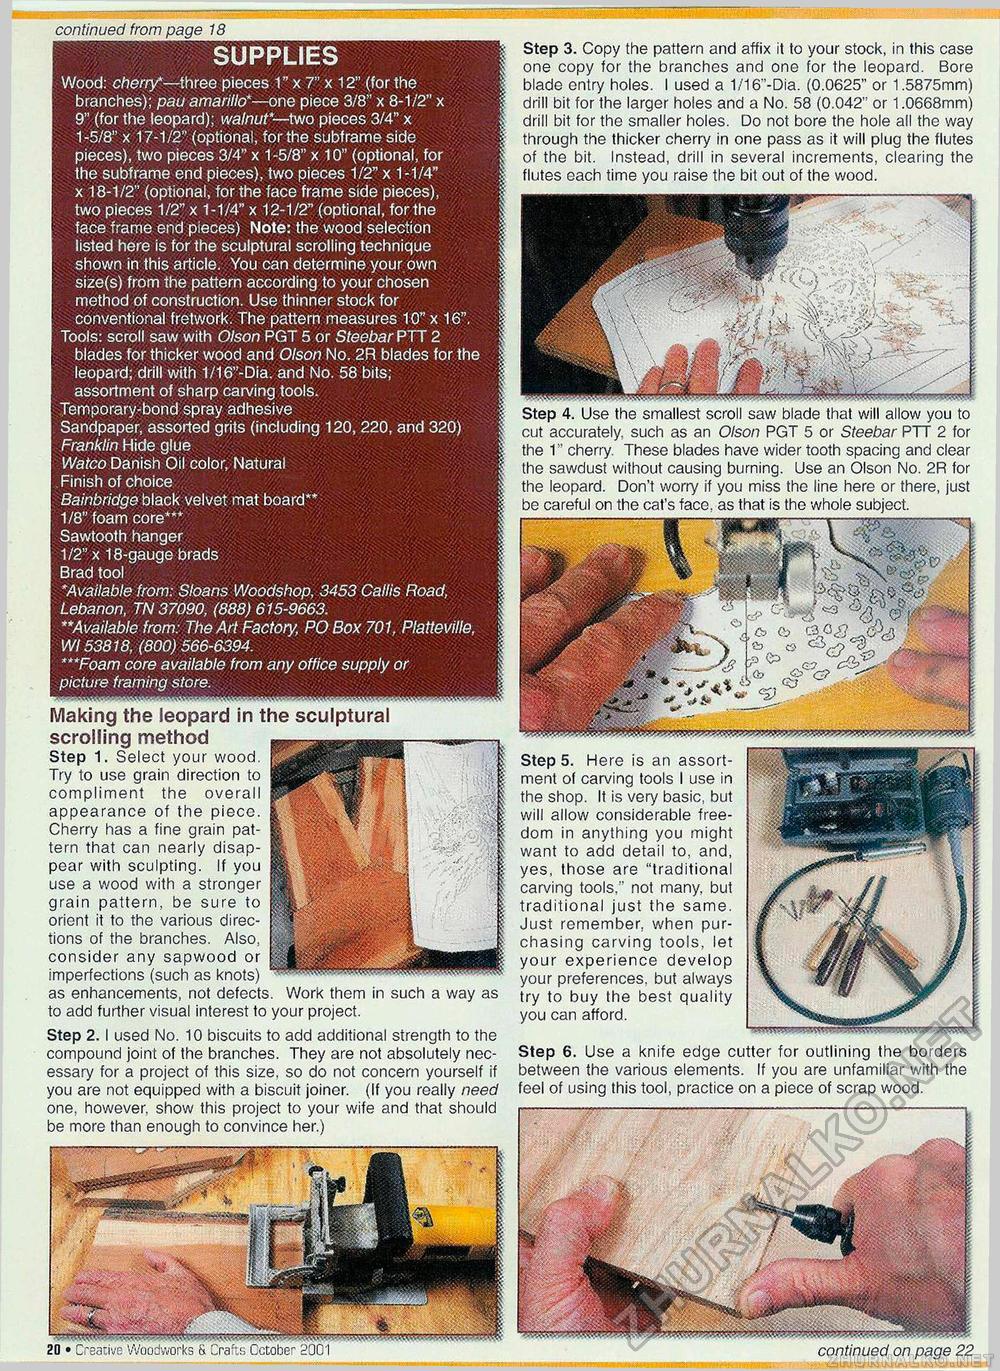
continued from page 18 SUPPLIES Wood: cherry—three pieces 1" x 7" x 12" (for the branches); pau amarillo*—one piece 3/8" x 8-1/2" x 9" (for the leopard); walnut*—two pieces 3/4" x 1-5/8" x 17-1/2" (optional, for the subframe side pieces), two pieces 3/4" x 1-5/8" x 10" (optional, for the subframe end pieces), two pieces 1/2" x 1-1/4" x 18-1/2" (optional, for the face frame side pieces), two pieces 1/2" x 1-1/4" x 12-1/2" (optional, for the face frame end pieces) Note: the wood selection listed here is for the sculptural scrolling technique shown in this article. You can determine your own size(s) from the pattern according to your chosen method of construction. Use thinner stock for conventional fretwork. The pattern measures 10" x 16". Tools: scroll saw with Olson PGT 5 or Steebar PTT 2 blades for thicker wood and Olson No. 2R blades for the leopard; drill with 1/16"-Dia. and No. 58 bits; assortment of sharp carving tools. Temporary-bond spray adhesive Sandpaper, assorted grits (including 120, 220, and 320) Franklin Hide glue Watco Danish Oil color, Natural Finish of choice Bainbridge black velvet mat board** 1/8" foam core*** Sawtooth hanger 1/2" x 18-gauge brads Brad tool *Available from: Sloans Woodshop, 3453 Callis Road, Lebanon, TN 37090, (888) 615-9663. **Available from: The Art Factory, PO Box 701, Platteville, Wl 53818, (800) 566-6394. ***Foam core available from any office supply or picture framing store. Making the leopard in the sculptural scrolling method Step 1. Select your wood. Try to use grain direction to compliment the overall appearance of the pieco. Cherry has a fine grain pattern that can nearly disappear with sculpting. If you use a wood with a stronger grain pattern, be sure to orient it to the various directions of the branches. Also, consider any sapwood or imperfections (such as knots) as enhancements, not defects. Work them in such a way to add further visual interest to your project. Step 2.1 used No. 10 biscuits to add additional strength to the compound joint of the branches. They are not absolutely necessary for a project of this size, so do not concern yourself if you are not equipped with a biscuit joiner. (If you really need one, however, show this project to your wife and that should be more than enough to convince her.) as Step 3. Copy the pattern and affix it to your stock, in this case one copy for the branches and one for the leopard. Bore blade entry holes. I used a 1/16"-Dia. (0.0625" or 1,5875mm) drill bit for the larger holes and a No. 58 (0.042" or 1.0668mm) drill bit for the smaller holes. Do not bore the hole all the way through the thicker cherry in one pass as it will plug the flutes of the bit. Instead, drill in several increments, clearing the flutes each time you raise the bit out of the wood. Step 4. Use the smallest scroll saw blade that will allow you to cut accurately, such as an Olson PGT 5 or Steebar PTT 2 for the 1" cherry. These blades have wider tooth spacing and clear the sawdust without causing burning. Use an Olson No. 2R for the leopard. Don't worry if you miss the line here or there, just be careful on the cat's facc, as that is tho whole subject. Step 5. Here is an assortment of carving tools I use in the shop. It is very basic, but will allow considerable freedom in anything you might want to add detail to, and, yes, those are "traditional carving tools." not many, but traditional just the same. Just remember, when purchasing carving tools, let your experience develop your preferences, but always try to buy the best quality you can afford. Step 6. Use a knife edge cutter for outlining the borders between the various elements. If you are unfamiliar with the feel of using this tool, practice on a piece of scrap wood. 20 • Creative Woodworks & Crafts October 2001 continued on page 22 |


