Creative Woodworks & crafts 2001-10, страница 38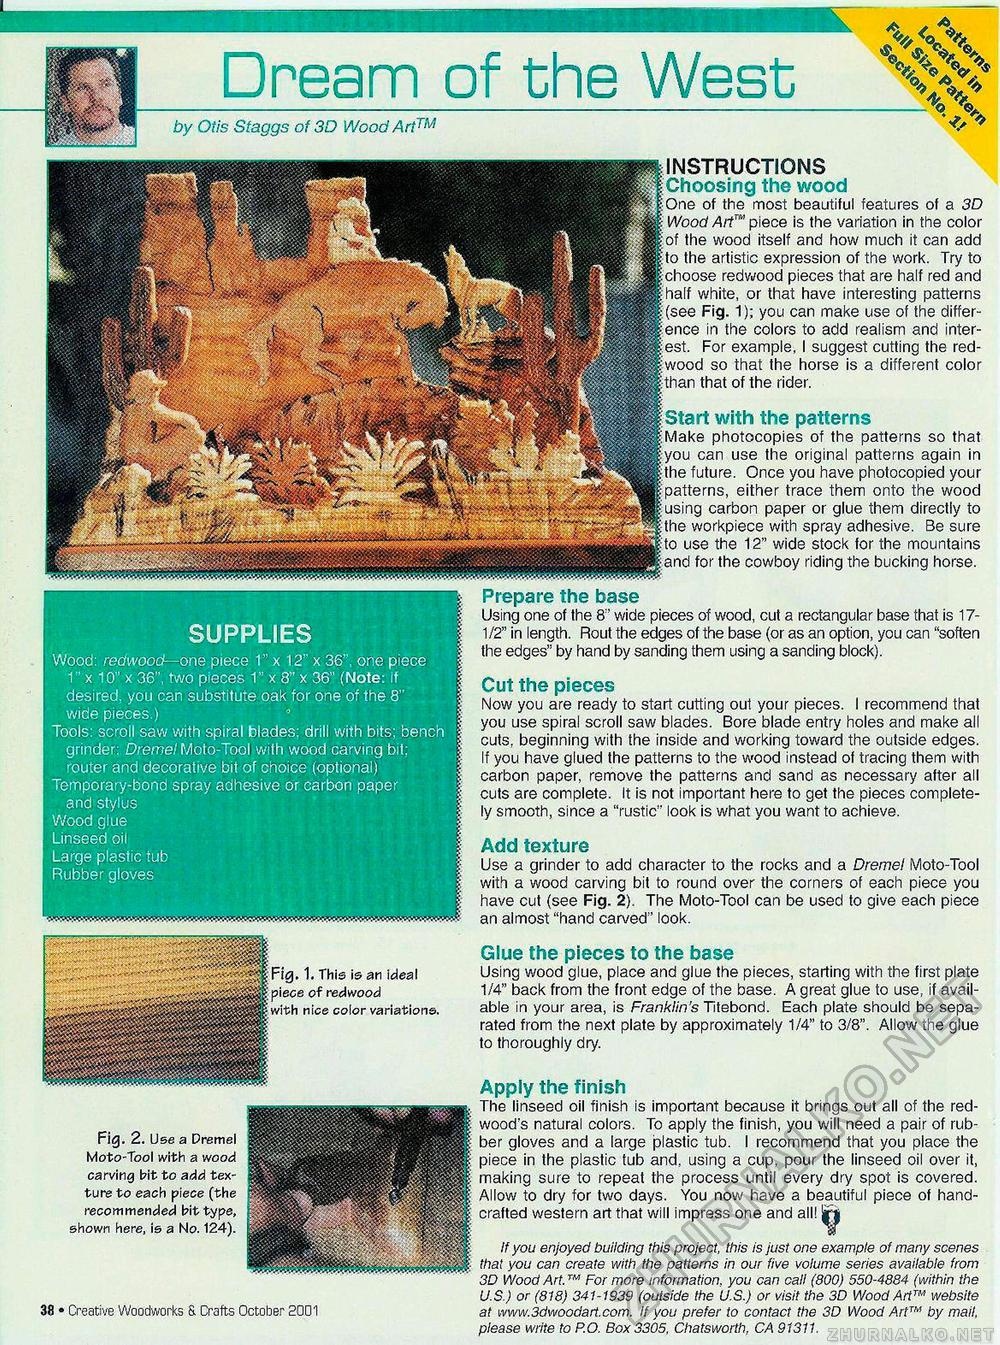
__- INSTRUCTIONS i Choosing the wood JOne of the most beautiful features of a 3D : Wood Art™ piece is the variation in the color f of the wood itself and how much it can add | to the artistic expression of the work. Try to ^choose redwood pieces that are half red and t half white, or that have interesting patterns |(see Fig. 1); you can make use of the difference in the colors to add realism and interest. For example, I suggest cutting the red-i;wood so that the horse is a different color ithan that of the rider. jStart with the patterns fMake photocopies of the patterns so that fyou can use the original patterns again in |the future. Once you have photocopied your \patterns, either trace them onto the wood fusing carbon paper or glue them directly to |the workpiece with spray adhesive. Be sure ho use the 12" wide stock for the mountains ; and for the cowboy riding the bucking horse. Dream of the West by Otis Staggs of 3D Wood Art™ Wv W — v> SUPPLIES Wood: redwood—one piece 1" x 12" x 36", one piece 1" x 10" x 36", two pieces 1" x 8" x 36" (Note: if desired, you can substitute oak for one of the 8" wide pieces.) Tools: scroll saw with spiral blades; drill with bits; bench grinder; Dremel Moto-Tool with wood carving bit; router and decorative bit of choice (optional) Temporary-bond spray adhesive or carbon paper and stylus Wood glue Linseed oil Large plastic tub Rubber gloves Prepare the base Using one of the 8" wide pieces of wood, cut a rectangular base that is 17-1/2" in length. Rout the edges of the base (or as an option, you can "soften the edges" by hand by sanding them using a sanding block). Cut the pieces Now you are ready to start cutting out your pieces. I recommend that you use spiral scroll saw blades. Bore blade entry holes and make all cuts, beginning with the inside and working toward the outside edges. If you have glued the patterns to the wood instead of tracing them with carbon paper, remove the patterns and sand as necessary after all cuts are complete. It is not important here to get the pieces completely smooth, since a "rustic" look is what you want to achieve. Add texture Use a grinder to add character to the rocks and a Dremel Moto-Tool with a wood carving bit to round over the corners of each piece you have cut (see Fig. 2). The Moto-Tool can be used to give each piece an almost "hand carved" look. Glue the pieces to the base Using wood glue, place and glue the pieces, starting with the first plate 1/4" back from the front edge of the base. A great glue to use, if available in your area, is Franklin's Titebond. Each plate should be separated from the next plate by approximately 1/4" to 3/8". Allow the glue to thoroughly dry. Apply the finish The linseed oil finish is important because it brings out all of the redwood's natural colors. To apply the finish, you will need a pair of rubber gloves and a large plastic tub. I recommend that you place the piece in the plastic tub and, using a cup, pour the linseed oil over it, making sure to repeat the process until every dry spot is covered. Allow to dry for two days. You now have a beautiful piece of handcrafted western art that will impress one and all! {jg| If you enjoyed building this project, this is just one example of many scenes that you can create with the patterns in our five volume series available from 3D Wood Art.™ For more information, you can call (800) 550-4884 (within the U.S.) or (818) 341-1939 (outside the U.S.) or visit the 3D Wood Art™ website at www.3dwoodart.com. If you prefer to contact the 3D Wood Art™ by mail, please write to P.O. Box 3305, Chatsworth, CA 91311. Fig. 2. Use a Dremel Moto-Tool with a wood carving bit to add texture to each piece (the recommended bit type, shown here, is a No. 124). 12 • Creative Woodworks & Crafts October- 2001 1. This is an ideal of redwood with nice color variations. |


