Creative Woodworks & crafts 2002-03, страница 22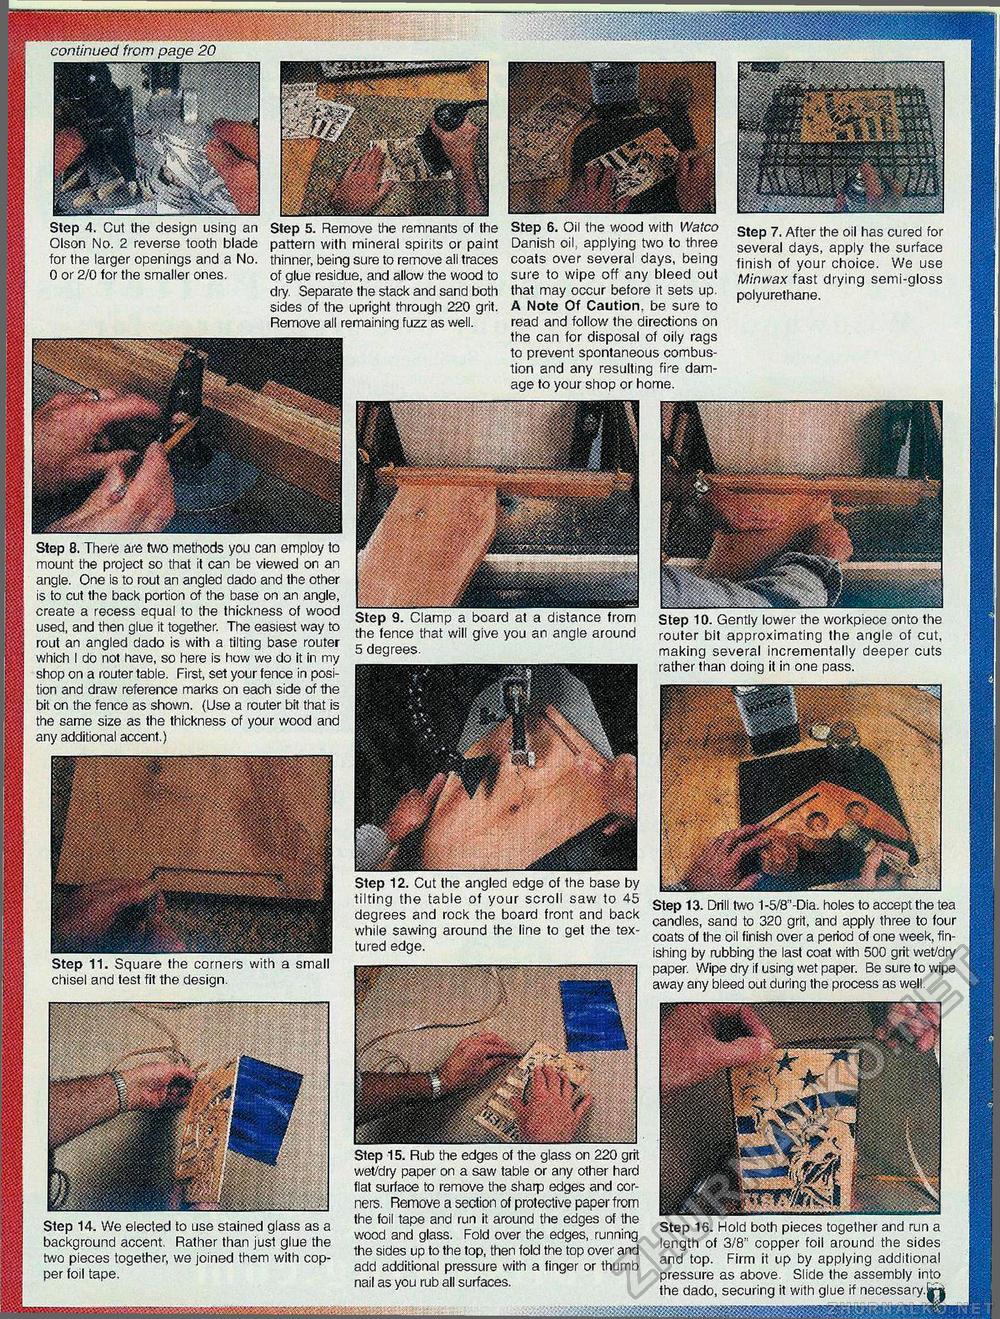
Step 9. Clamp a board at a distance from the fence that will give you an angle around 5 degrees. Step 12. Cut the angled edge of the base by tilting the table ot your scroll saw to 45 degrees and rock the board front and back while sawing around the line to get the textured edge. Step 13. Drill two 1-5/8"-Dia. holes to accept the tea candles, sand to 320 grit, and apply three to four coats of the oil finish over a period of one week, finishing by rubbing the last coat with 500 grit wet/dry paper. Wipe dry if using wet paper. Be sure to wipe away any bleed out during the process as well. Step 15. Rub the edges of the glass on 220 grit wet/dry paper on a saw table or any other hard flat surface to remove the sharp edges and corners. Remove a section of protective paper from the foil tape and run it around the edges of the wood and glass. Fold over the edges, running the sides up to the top, then fold the top over and add additional pressure with a finger or thumb nail as you rub all surfaces. Step 16. Hold both pieces together and run a length of 3/8" copper foil around the sides and top. Firm it up by applying additional pressure as above. Slide the assembly into the dado, securing it with glue if necessary.j Step 5. Remove the remnants of the pattern with mineral spirits or paint thinner, being sure to remove all traces of glue residue, and allow the wood to dry. Separate the stack and sand both sides of the upright through 220 grit. Remove all remaining fuzz as well. Step 6. Oil the wood with Watco Danish oil, applying two to three coats over several days, being sure to wipe off any bleed out that may occur before it sets up. A Note Of Caution, be sure to read and follow the directions on the can for disposal of oily rags to prevent spontaneous combustion and any resulting fire damage to your shop or home. Step 7. After the oil has cured for several days, apply the surface finish of your choice. We use Minwax fast drying semi-gloss polyurethane. Step 8. There are two methods you can employ to mount the project so that it can be viewed on an angle. One is to rout an angled dado and the other is to cut the back portion of the base on an angle, create a recess equal to the thickness of wood used, and then glue it together. The easiest way to rout an angled dado is with a tilting base router which I do not have, so here is how we do it in my shop on a router table. First, set your fence in position and draw reference marks on each side of the bit on the fence as shown. (Use a router bit that is the same size as the thickness of your wood and any additional accent.) Step 10. Gently lower the workpiece onto the router bit approximating the angle of cut, making several incrementally deeper cuts rather than doing it in one pass. Step 4. Cut the design using an Olson No. 2 reverse tooth blade for the larger openings and a No. 0 or 2/0 for the smaller ones. Step 11. Square the corners with a small chisel and test fit the design. Step 14. We elected to use stained glass as a background accent. Rather than just glue the two pieces together, we joined them with copper foil tape. |


