Creative Woodworks & crafts 2002-03, страница 24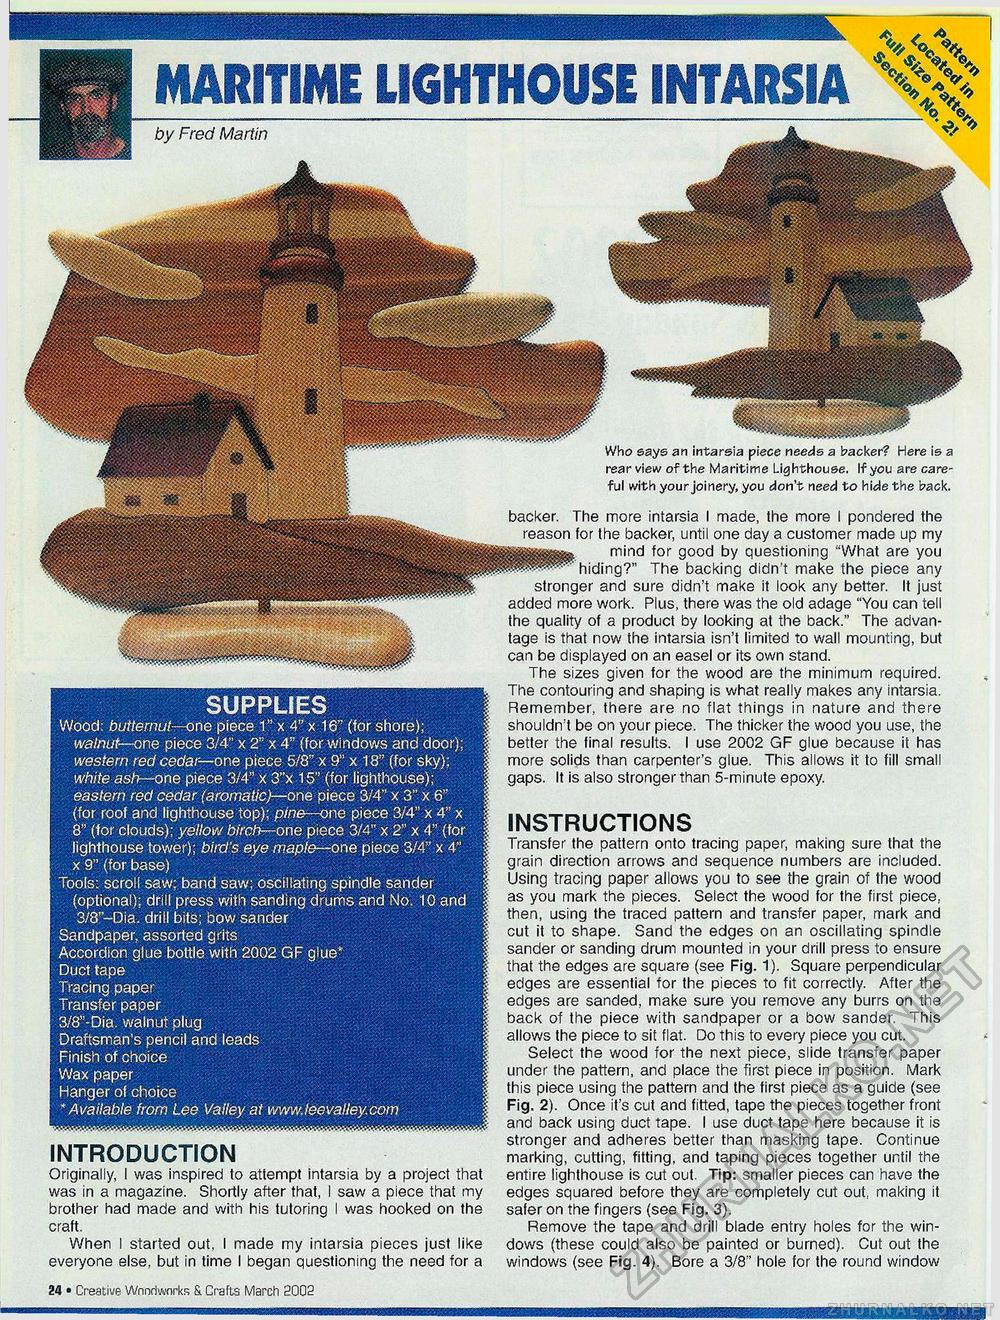
SUPPLIES Wood: butternut—one piece 1" x 4" x 16" (for shore); walnut—one piece 3/4" x 2" x 4" (for windows and door); western red cedar— one piece 5/8" x 9" x 18" (for sky); white ash—one piece 3/4" x 3"x 15" (for lighthouse); eastern red cedar (aromatic)—one piece 3/4" x 3" x 6" (for roof and lighthouse top); pine—one piece 3/4" x 4" x 8" (for clouds); yellow birch—one piece 3/4" x 2" x 4" (for lighthouse tower); bird's eye maple—one piece 3/4" x 4" x 9" (for base) Tools: scroll saw; band saw; oscillating spindle sander (optional): drill press with sanding drums and No. 10 and 3/8"-Dia. drill bits; bow sander Sandpaper, assorted grits Accordion glue bottle with 2002 GF glue* Duct tape Tracing paper Transfer paper 3/8"-Dia. walnut plug Draftsman's pencil and leads Finish of choice Wax paper Hanger of choice * Available from Lee Valley at www.leevalley.com INTRODUCTION Originally, I was inspired to attempt intarsia by a project that was in a magazine. Shortly after that, I saw a piece that my brother had made and with his tutoring I was hooked on the craft. When I started out, I made my intarsia pieces just like everyone else, but in time I began questioning the need for a backer. The more intarsia I made, the more I pondered the reason for the backer, until one day a customer made up my mind for good by questioning "What are you hiding?" The backing didn't make the piece any stronger and sure didn't make it look any better. It just added more work. Plus, there was the old adage "You can tell the quality of a product by looking at the back." The advantage is that now the intarsia isn't limited to wall mounting, but can be displayed on an easel or its own stand. The sizes given for the wood are the minimum required. The contouring and shaping is what really makes any intarsia. Remember, there are no flat things in nature and there shouldn't be on your piece. The thicker the wood you use, the better the final results. I use 2002 GF glue because it has more solids than carpenter's glue. This allows it to fill small gaps. It is also stronger than 5-minute epoxy. INSTRUCTIONS Transfer the pattern onto tracing paper, making sure that the grain direction arrows and sequence numbers are included. Using tracing paper allows you to see the grain of the wood as you mark the pieces. Select the wood for the first piece, then, using the traced pattern and transfer paper, mark and cut it to shape. Sand the edges on an oscillating spindle sander or sanding drum mounted in your drill press to ensure that the edges are square (see Fig. 1). Square perpendicular edges are essential for the pieces to fit correctly. After the edges are sanded, make sure you remove any burrs on the back of the piece with sandpaper or a bow sander. This allows the piece to sit flat. Do this to every piece you cut. Select the wood for the next piece, slide transfer paper under the pattern, and place the first piece in position. Mark this piece using the pattern and the first piece as a guide (see Fig. 2). Once it's cut and fitted, tape the pieces together front and back using duct tape. I use duct tape here because it is stronger and adheres better than masking tape. Continue marking, cutting, fitting, and taping pieces together until the entire lighthouse is cut out. Tip: smaller pieces can have the edges squared before they are completely cut out, making it safer on the fingers (see Fig. 3). Remove the tape and drill blade entry holes for the windows (these could also be painted or burned). Cut out the windows (see Fig. 4). Bore a 3/8" hole for the round window by Fred Martin Who says an intarsia piece needs a backer? Here is a rear view of the Maritime Lighthouse. If you are careful with your joinery, you don't need to hide the back. 24 • Creative Wnnriwnrks & Crafts March 2002 |


