Creative Woodworks & crafts 2002-04, страница 53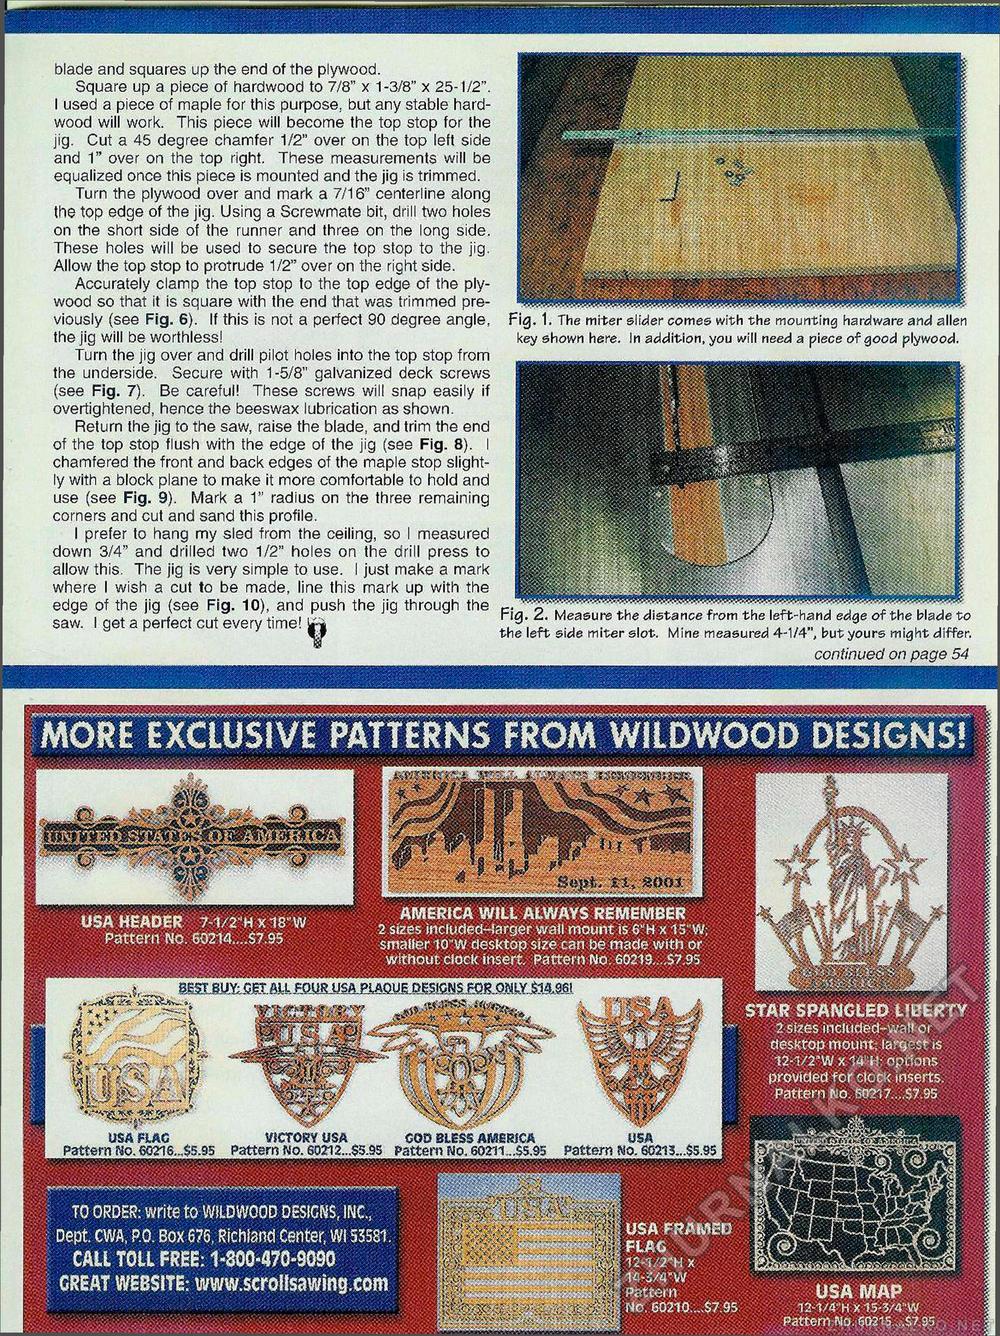
mm teg; wmmmm Fig. 2. Measure the distance from the left-hand edge of the blade to the left side miter slot. Mine measured 4-1/4", but yours might differ. continued on page 54 blade and squares up the end of the plywood. Square up a piece of hardwood to 7/8" x 1-3/8" x 25-1/2". I used a piece of maple for this purpose, but any stable hardwood will work. This piece will become the top stop for the jig. Cut a 45 degree chamfer 1/2" over on the top left side and 1" over on the top right. These measurements will be equalized once this piece is mounted and the jig is trimmed. Turn the plywood over and mark a 7/16" centerline along the top edge of the jig. Using a Screwmate bit, drill two holes on the short side of the runner and three on the long side. These holes will be used to secure the top stop to the jig. Allow the top stop to protrude 1/2" over on the right side. Accurately clamp the top stop to the top edge of the plywood so that it is square with the end that was trimmed previously (see Fig. 6). If this is not a perfect 90 degree angle, the jig will be worthless! Turn the jig over and drill pilot holes into the top stop from the underside. Secure with 1-5/8" galvanized deck screws (see Fig. 7). Be careful! These screws will snap easily if overtightened, hence the beeswax lubrication as shown. Return the jig to the saw, raise the blade, and trim the end of the top stop flush with the edge of the jig (see Fig. 8). I chamfered the front and back edges of the maple stop slightly with a block plane to make it more comfortable to hold and use (see Fig. 9). Mark a 1" radius on the three remaining corners and cut and sand this profile. I prefer to hang my sled from the ceiling, so I measured down 3/4" and drilled two 1/2" holes on the drill press to allow this. The jig is very simple to use. I just make a mark where I wish a cut to be made, line this mark up with the edge of the jig (see Fig. 10), and push the jig through the saw. I get a perfect cut every time! F _ key shown here. In addition, you will need a piece of good plywood. MORE EXCLUSIVE PATTERNS FROM WILDWOOD DESIGNS! AMERICA WILL ALWAYS REMEMBER 2 sizes includeci-farger wall mount is 6"H x 15'"W; smaller 10'W desktop size can be made with or without clock insert. Pattern No. 60219....S7.95 USA HEADER 7-1/2"HX18',W Pattern No. 60214....$7.9S STAR SPANGLED LIBERTY 2 Sizes inciucJed-walt or desktop mount; largest is 12-1/2"W X 14"H; options provided for clock inserts. Pattern No. 6Q217....S7.95 TO ORDER: write to WILDWOOD DESIGNS, INC., Dept. CWA, P.O. Box 676, Richland Center, w 53581. CALL TOIL FREE: 1-800-470-9090 GREAT WEBSITE: www.scroIIsawjng.com USA FRAMED FLAG 12-1/2"H X 14-3/4'W Pattern NO. 60210....$7.95 USA MAP 12-1/4"H X 15-3/4"W Pattern No. 60215....$7.95 mmm f©j»t. ti, mot .....5,. BEST BUY: CET ALL TOUR USA PLAQUE DESIGNS FOR ONLY S1&961 P^m mmzm jdsaaamk yiPM i -vWr If SP8W WIS w §« a J Opt/ 11 ; LI 1 / / USA FLAG VICTORY USA COD BLES5 AMERICA USA Pattern Pfo. 6Q216...$5.95 Pattern No. 60212...$S.95 Pattern No. 60211 ...S5.95 Pattern wo. 60213...$5.95 |


