Creative Woodworks & crafts 2002-06, страница 46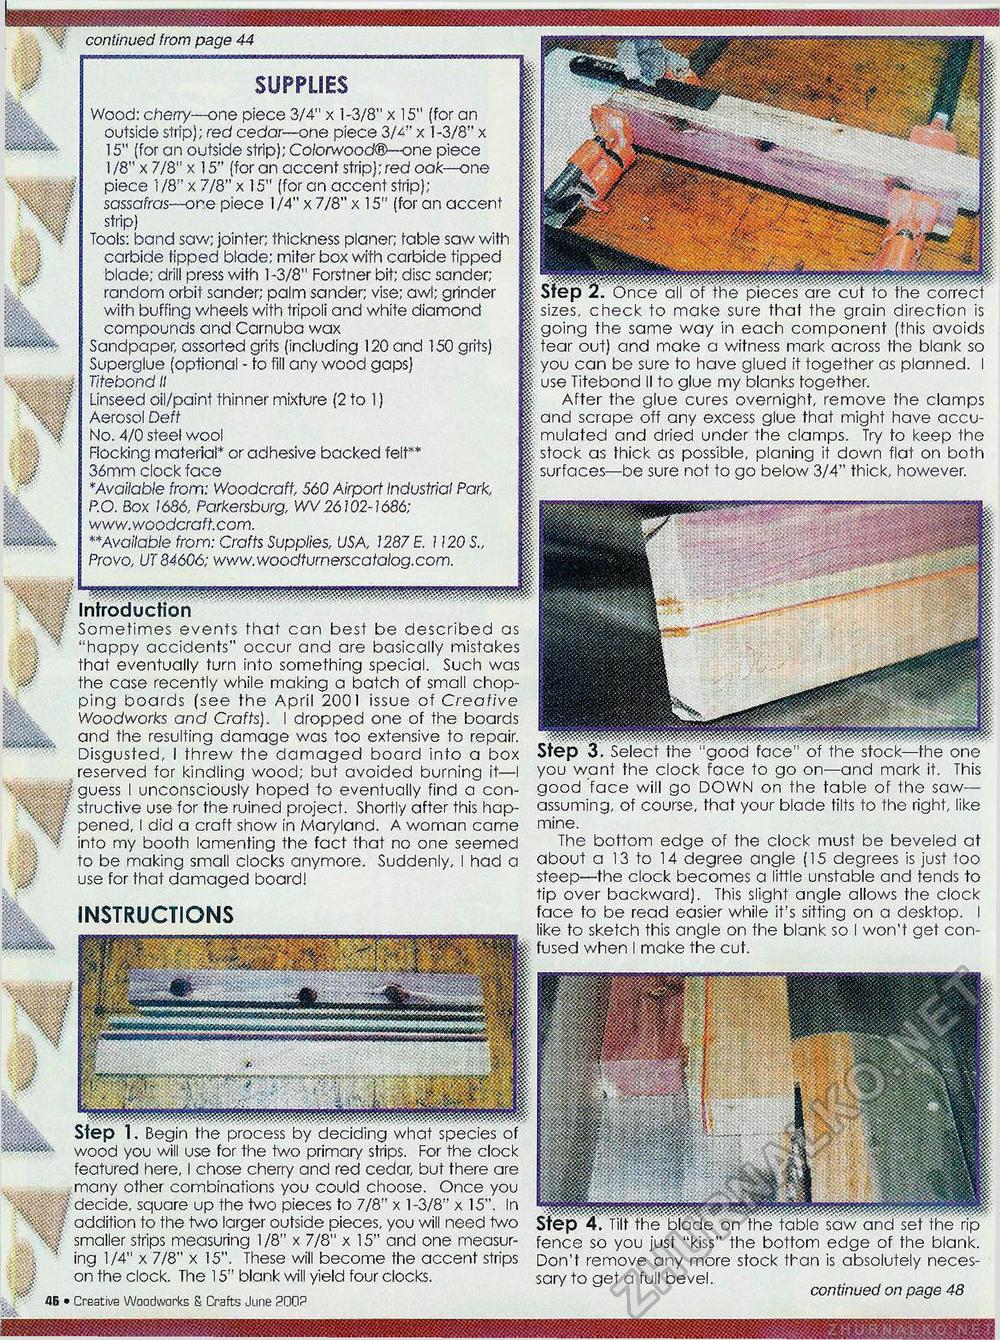
| ......wAffl/'jyjj) n SSSfW wijvjwiim continued from page 44 SUPPLIES Wood: cherry—one piece 3/4" x 1-3/8" x 15" (for an outside strip); red cedar— one piece 3/4" x 1-3/8" x 15" (for an outside strip); Co/orwood®—one piece l/8"x7/8"x 15" (for an accent strip);red oak—one piece 1/8" x 7/8" x 15" (for an accent strip); sassafras—ore piece 1/4" x 7/8" x 15" (for an accent strip) Tools: band saw; jointer; thickness planer; fable saw with carbide tipped blade; miter box with carbide tipped blade; drill press with 1-3/8" Forstner bit; disc sander; random orbit sander; palm sander; vise; awl; grinder with buffing wheels with tripoli and white diamond compounds and Carnuba wax Sandpaper, assorted grits (including 120 and 150 grits) Superglue (optional - to fill any wood gaps) Titebond II Linseed oil/paint thinner mixture (2 to 1) Aerosol Deft No. 4/0 steel wool Hocking material* or adhesive backed felt*'* 36mm clock face *Available from: Woodcraff, 560 Airport Industrial Park, P.O. Box 1686, Parkersburg, WV26102-1686; www.woodcraft.com. **Available from: Crafts Supplies, USA, 1287 E. 1120 S„ Provo, UT 84606; www.woodfurnerscafalog.com. Introduction Sometimes events that can best be described as "happy accidents" occur and are basically mistakes that eventually turn into something special. Such was the case recently while making a batch of small chopping boards (see the April 2001 issue of Creative Woodworks and Crafts). I dropped one of the boards and the resulting damage was too extensive to repair. Disgusted, I threw the damaged board into a box reserved for kindling wood; but avoided burning it—I guess I unconsciously hoped to eventually find a constructive use for the ruined project. Shortly after this happened, I did a craft show in Maryland. A woman came into my booth lamenting the fact that no one seemed to be making small clocks anymore. Suddenly, I had a use for that damaged boardl INSTRUCTIONS J: Step 2. Once ali of fne'pieces are cut to the correct |§ sizes, check to make sure that the grain direction is f£ going the same way in each component (fhis avoids p. tear out) and make a witness mark across the blank so H you can be sure to have glued it together as planned. I " use Titebond II to glue my blanks together. After the glue cures overnight, remove the clamps and scrape off any excess glue that might have accu-j! mulated and dried under the clamps. Try to keep the ||i stock as thick as possible, planing it down flat on both j§? surfaces—be sure not to go below 3/4" thick, however. Step 3. Select the "good face" of the stock—the one you want the clock face to go on—and mark it. This good face will go DOWN on the table of the saw— assuming, of course, that your blade tilts to the right, like mine. The bottom edge of the clock must be beveled at about a 13 to 14 degree angle (15 degrees is just too steep—the clock becomes a little unstable and tends to tip over backward). This slight angle allows the clock face to be read easier while it's sitting on a desktop. I like to sketch this angle on the blank so I won't get con fused when I make the cut. w & 1 Step 1. Begin fhe process by deciding what species of wood you will use for the two primary strips. For the clock featured here, I chose cherry and red cedar, but there are many other combinations you could choose. Once you decide, square up the two pieces to 7/8" x 1-3/8" x 15". In addition to the two larger outside pieces, you will need two smaller strips measuring 1/8" x 7/8" x 15" and one measuring 1/4" x 7/8" x 15". These will become the accent strips on the clock. The 15" blank will yield four clocks. 46 • Creative Woodworks S. Crafts June 2002 theme of Pete's. fence so you just "kiss" the bottom edge of the blank. Don't remove any more stock than is absolutely necessary to get a full bevel. continued on page 48 |


