Creative Woodworks & crafts 2002-11, страница 38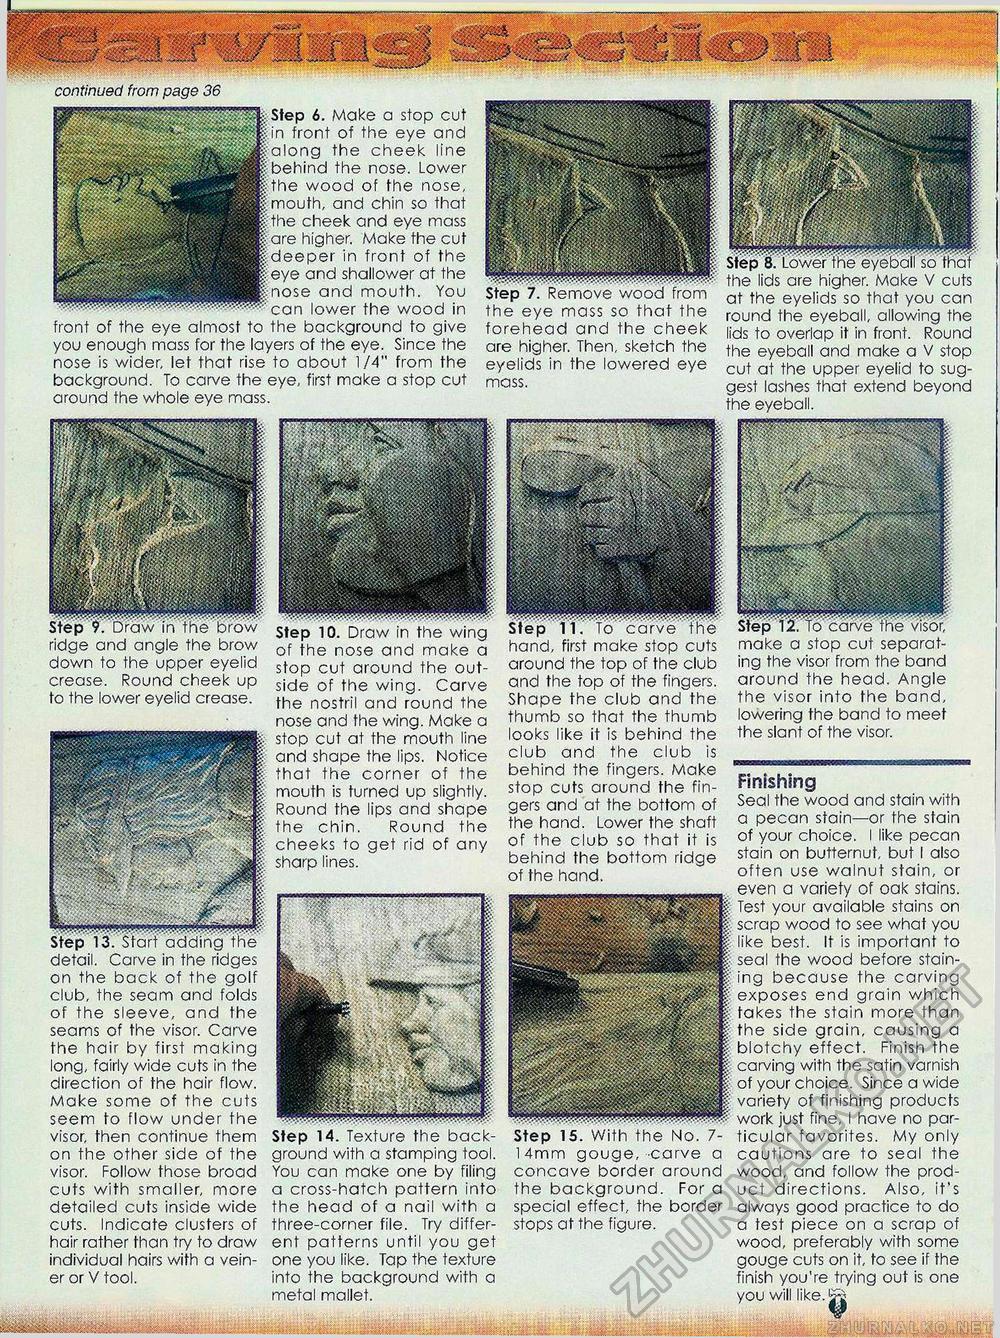
make a stop cut separating the visor from the band around the head. Angle the visor into the band, lowering the band to meet the slant of the visor. Finishing Seal the wood and stain with a pecan stain—or the stain of your choice. I like pecan stain on butternut, but I also often use walnut stain, or even a variety of oak stains. Test your available stains on scrap wood to see what you like best. It is important to seal the wood before staining because the carving exposes end grain which takes the stain more than the side grain, causing a blotchy effect. Finish the carving with the satin varnish of your choice. Since a wide variety of finishing products work just fine, I have no particular favorites. My only cautions are to seal the wood, and follow the product directions. Also, it's always good practice to do a test piece on a scrap of wood, preferably with some gouge cuts on it, to see if the finish you're trying out is one you will like. ridge and angle the brow down to the upper eyelid crease. Round cheek up to the lower eyelid crease. of the nose and make a stop cut around the outside of the wing. Carve the nostril and round the nose and the wing. Make a stop cut at the mouth line and shape the lips. Notice that the corner of the mouth is turned up slightly. Round the lips and shape the chin. Round the cheeks to get rid of any sharp lines. hand, first make stop cuts around the top of the club and the top of the fingers. Shape the club and the thumb so that the thumb looks like it is behind the club and the club is behind the fingers. Make stop cuts around the fingers and at the bottom of the hand. Lower the shaft of the club so that it is behind the bottom ridge of the hand. on the back of the golf club, the seam and folds of the sleeve, and the seams of the visor. Carve the hair by first making long, fairly wide cuts in the direction of the hair flow. Make some of the cuts seem to flow under the visor, then continue them on the other side of the visor. Follow those broad cuts with smaller, more detailed cuts inside wide cuts. Indicate clusters of hair rather than try to draw individual hairs with a veiner or V tool. Step 14. Texture the background with a stamping tool. You can make one by filing a cross-hatch pattern into the head of a nail with a three-corner file. Try different patterns until you get one you like. Tap the texture into the background with a metal mallet. Step 15. With the No. 7-14mm gouge, carve a concave border around the background. For a special effect, the border stops at the figure. continued from page 36 6. Make a stop cut n front of the eye and long the cheek line the nose. Lower wood of the nose, and chin so that cheek and eye mass higher. Make the cut er in front of the and shallower at the and mouth. You can lower the wood in front of the eye almost to the background to give you enough mass for the layers of the eye. Since the nose is wider, let that rise to about 1/4" from the background. To carve the eye, first make a stop cut around the whole eye mass. the eye mass so that the forehead and the cheek are higher. Then, sketch the eyelids in the lowered eye mass. the lids are higher. Make V cuts at the eyelids so that you can round the eyeball, allowing the lids to overlap it in front. Round the eyeball and make a V stop cut at the upper eyelid to suggest lashes that extend beyond the eyeball. |


