Creative Woodworks & crafts 2002-11, страница 41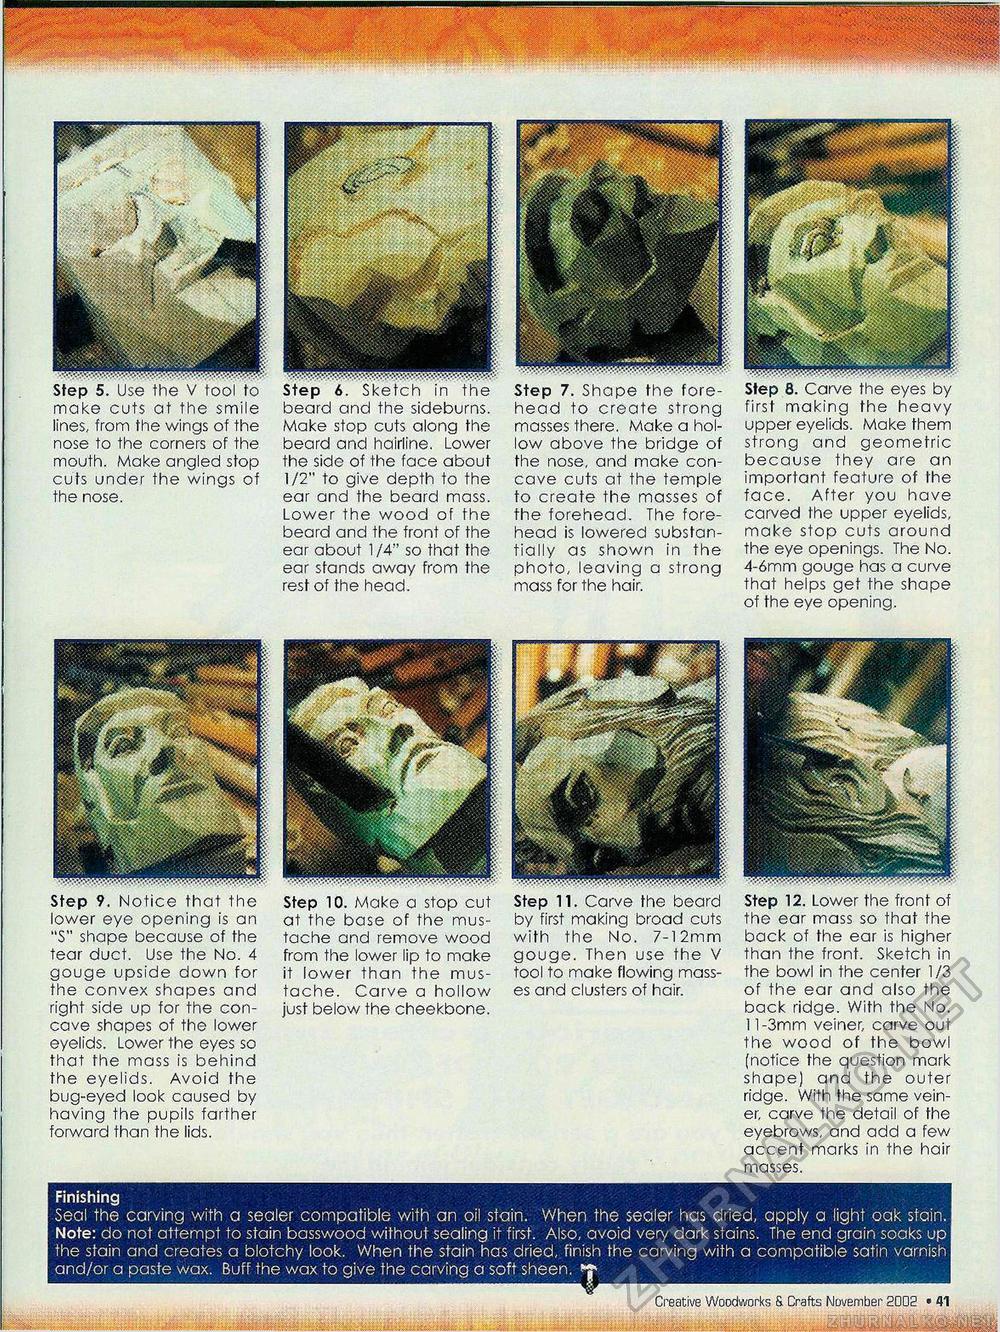
make cuts at the smile lines, from the wings of the nose to the corners of the mouth. Make angled stop cuts under the wings of the nose. Step 7. Shape the forehead to create strong masses there. Make a hollow above the bridge of the nose, and make concave cuts at the temple to create the masses of the forehead. The forehead is lowered substantially as shown in the photo, leaving a strong mass for the hair. Step 8. Carve the eyes by first making the heavy upper eyelids. Make them strong and geometric because they are an important feature of the face. After you have carved the upper eyelids, make stop cuts around the eye openings. The No. 4-6mm gouge has a curve that helps get the shape of the eye opening. Step 9. Notice that the lower eye opening is an "S" shape because of the tear duct. Use the No. 4 gouge upside down for the convex shapes and right side up for the concave shapes of the lower eyelids. Lower the eyes so that the mass is behind the eyelids. Avoid the bug-eyed look caused by having the pupils farther forward than the lids. Step 10. Make a stop cut at the base of the mustache and remove wood from the lower lip to make it lower than the mustache. Carve a hollow just below the cheekbone. Step 11. Carve the beard by first making broad cuts with the No. 7-12mm gouge. Then use the V tool to make flowing masses and clusters of hair. Step 12. Lower the front of the ear mass so that the back of the ear is higher than the front. Sketch in the bowl in the center 1/3 of the ear and also the back ridge. With the No. 1 l-3mm veiner, carve out the wood of the bowl (notice the question mark shape) and the outer ridge. With the same veiner, carve the detail of the eyebrows, and add a few accent marks in the hair masses. Finishing Seal the carving with a sealer compatible with an oil stain. When the sealer has dried, apply a light oak stain. Note: do not attempt to stain basswood without sealing it first. Also, avoid very dark stains. The end grain soaks up the stain and creates a blotchy look. When the stain has dried, finish the carving with a compatible satin varnish and/or a paste wax. Buff the wax to give the carving a soft sheen. Creative Woodworks S. Crafts November 2002 • 29 ___r 6. Sketch in the beard and the sideburns. Make stop cuts along the beard and hairline. Lower the side of the face about 1/2" to give depth to the ear and the beard mass. Lower the wood of the beard and the front of the ear about 1/4" so that the ear stands away from the rest of the head. |


