Creative Woodworks & crafts 2003-03, страница 38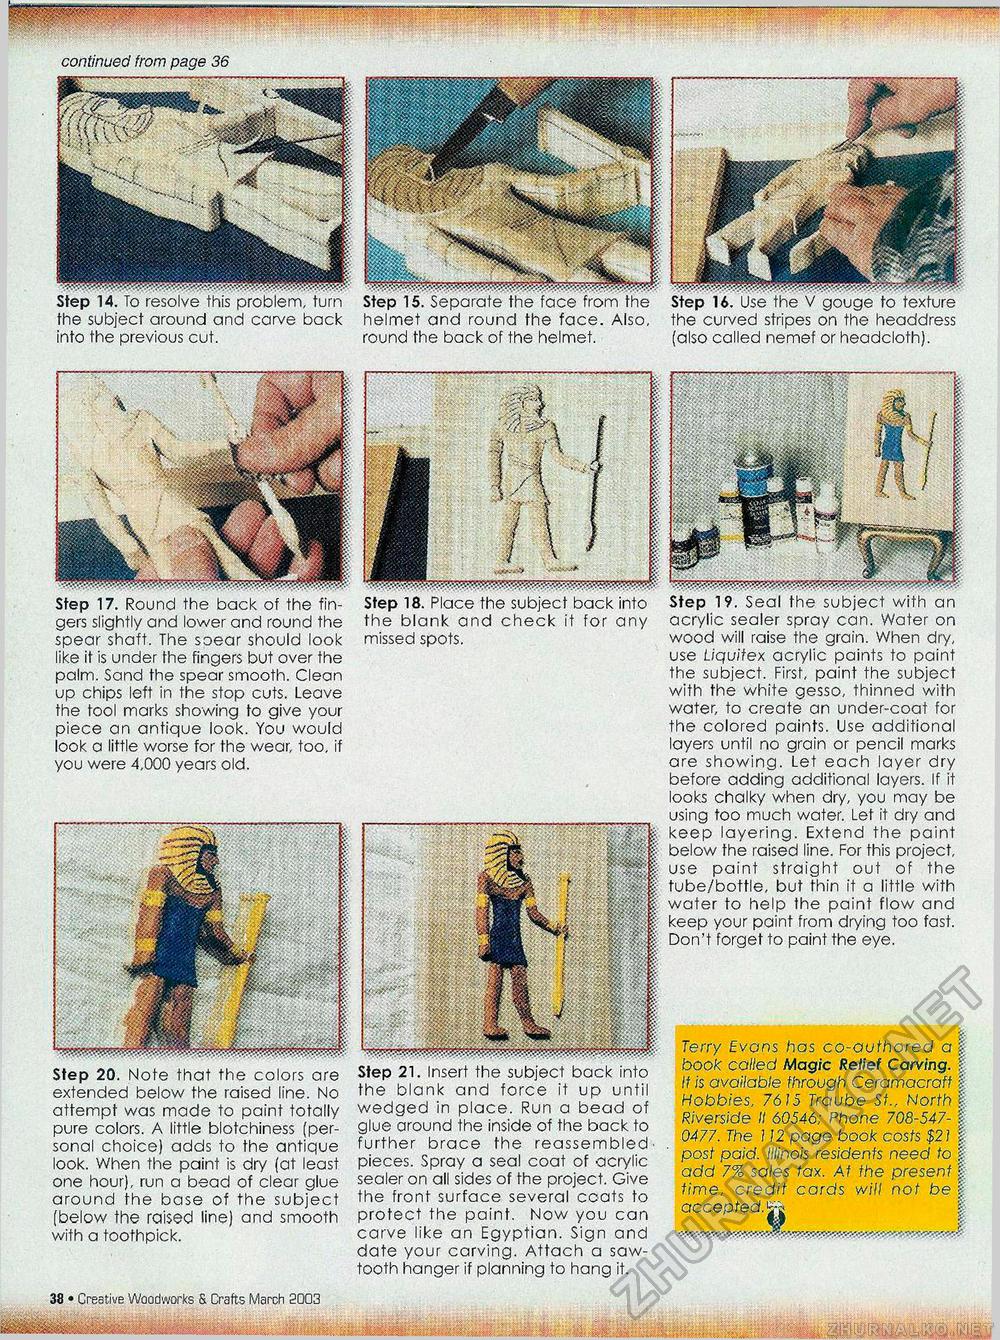
the subject around and carve into the previous cut. continued from page 38 helmet and round the face. Also, round the back of the helmet. Step 17. Round the back of the fingers slightly and lower and round the spear shaft. The soear should look like it is under fhe fingers but over the palm. Sand the spear smooth. Clean up chips left in the stop cuts. Leave the tool marks showing to give your piece an antique look. You would look a little worse for the wear, too, if you were 4,000 years old. Step 18. Place the subject back into the blank and check it for any missed spots. Step 19. Seal the subject with an acrylic sealer spray can. Water on wood will raise the grain. When dry, use Liquitex acrylic paints to paint the subject. First, paint the subject with the white gesso, thinned with water, to create an under-coat for the colored paints. Use additional layers until no grain or pencil marks are showing. Let each layer dry before adding additional layers. If it looks chalky when dry, you may be using too much water. Let it dry and keep layering. Extend the paint below the raised line. For this project, use paint straight out of the tube/bottle, but thin it a little with water to help the paint flow and keep your paint from drying too fast. Don't forget to paint the eye. «8 • Creative Woodworks & Crafts March 2003 ■'SjS the curved stripes on the headdress (also called nemef or headcloth). Step 20. Note that the colors are extended below the raised line. No attempt was made to paint totally pure colors. A little blotchiness (personal choice) adds to the antique look. When the paint is dry (at least one hour), run a bead of clear glue around the base of the subject (below the raised line) and smooth with a toothpick. Step 21. Insert the subject back into the blank and force it up until wedged in place. Run a bead of glue around the inside of the back to further brace the reassembled-pieces. Spray a seal coat of acrylic sealer on all sides of the project. Give the front surface several ccats to protect the paint. Now you can carve like an Egyptian. Sign and date your carving. Attach a sawtooth hanger if planning to hang it. % .. % Terry Evans has co-authored a % book called Magic Relief Carving, £ If is available through Ceramacraft % Hobbies, 76 J5 Traube St., North % Riverside II 60546; Phone 708-547-1 0477. The 112 page book costs $21 \ post paid. Illinois residents need to | add 7% sales tax. At the present | time, credit cards will not be f accepted^ s; V I |


