Creative Woodworks & crafts 2003-03, страница 52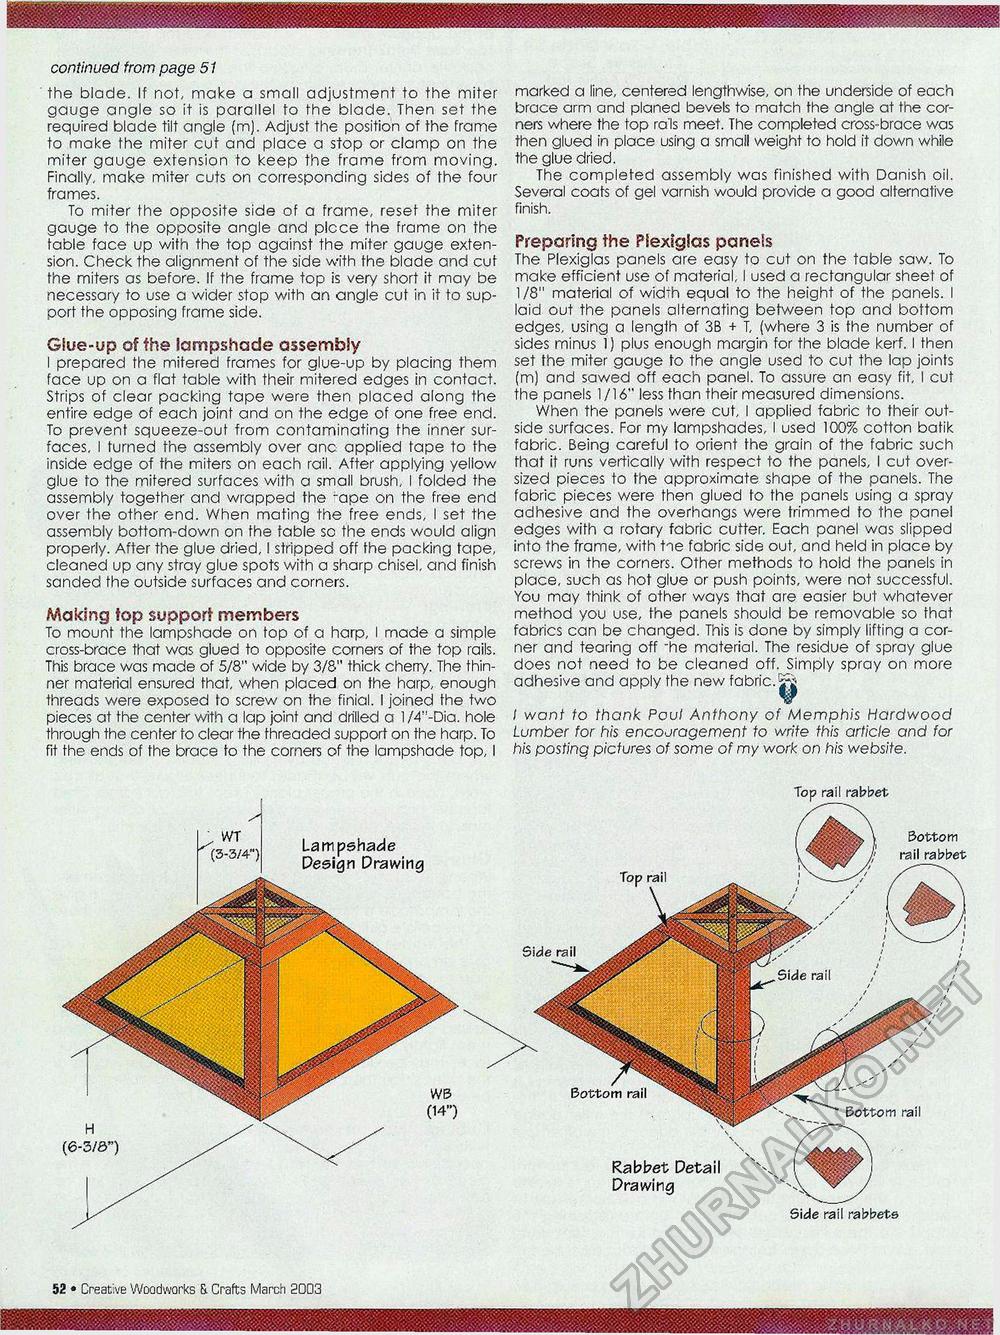
continued from page 51 the blade. If not, make a small adjustment to the miter gauge angle so it is parallel to the blade. Then set the required blade tilt angle (m). Adjust the position of the frame to make the miter cut and place a stop or clamp on the miter gauge extension to keep the frame from moving. Finally, make miter cuts on corresponding sides of the four frames. To miter the opposite side of a frame, reset the miter gauge to the opposite angle and plcce the frame on the table face up with the top against the miter gauge extension. Check the alignment of the side with the blade and cut the miters as before. If the frame top is very short it may be necessary to use a wider stop with an angle cut in it to support the opposing frame side. Glue-up of the lampshade assembly I prepared the mitered frames for glue-up by placing them face up on a flat table with their mitered edges in contact. Strips of clear packing tape were then placed along the entire edge of each joint and on the edge of one free end. To prevent squeeze-out from contaminating the inner surfaces, I turned the assembly over anc applied tape to the inside edge of the miters on each rail. After applying yellow glue to the mitered surfaces with a small brush, I folded the assembly together and wrapped the "ape on the free end over the other end. When mating the free ends, I set the assembly bottom-down on the table sc the ends would align properly. After the glue dried, I stripped off the packing tape, cleaned up any stray glue spots with a sharp chisel, and finish sanded the outside surfaces and corners. Making top support members To mount the lampshade on top of a harp, I made a simple cross-brace that was glued to opposite corners of the top rails. This brace was made of 5/8" wide by 3/S" thick cherry. The thinner material ensured that, when placed on the harp, enough threads were exposed to screw on the finial. I joined the two pieces at the center with a lap joint and drilled a l/4'!-Dia. hole through the center to clear the threaded support on the harp. To fit the ends of the brace to the corners of the lampshade top, I marked a line, centered lengthwise, on the underside of each brace arm and planed bevels to match the angle at the corners where the top ra'ls meet. The completed cross-brace was then glued in place using a small weight to hold it down while the glue dried. The completed assembly was finished with Danish oil. Several coats of gel varnish would provide a good alternative finish. Preparing the Plexiglas panels The Plexiglas panels are easy to cut on the table saw. To make efficient use of material, I used a rectangular sheet of 1/8" material of width equal to the height of the panels. I laid out the panels alternating between top and bottom edges, using a length of 3B + T, (where 3 is the number of sides minus 1) plus enough margin for the blade kerf. I then set the miter gauge to the angle used to cut the lap joints (m) and sawed off each panel. To assure an easy fit, I cut the panels 1/16" less than their measured dimensions. When the panels were cut, I applied fabric to their outside surfaces. For my lampshades, I used 100% cotton batik fabric. Being careful to orient the grain of the fabric such that it runs vertically with respect to the panels, I cut oversized pieces to fhe approximate shape of the panels. The fabric pieces were then glued to fhe panels using a spray adhesive and the overhangs were trimmed to the panel edges with a rotary fabric cutter. Each panel was slipped into the frame, with tie fabric side out, and held in place by screws in the corners. Other methods to hold the panels in place, such as hot glue or push points, were not successful. You may think of other ways that are easier but whatever method you use, fhe panels should be removable so that fabrics can be changed. This is done by simply lifting a corner and tearing off 'he material. The residue of spray glue does not need to be cleaned off. Simply spray on more adhesive and apply the new fabric. ¥ I want to thank Poul Anthony of Memphis Hardwood Lumber for his encouragement to write this article and for his posting pictures of some of my work on his website. ^ WT (3-3/4") Lampshade Design Drawing H (6-3/3") Bottom rail Rabbet Detail Drawing Bottom rail Side rail rabbets Top rail Side rail Top rail rabbet Bottom rail rabbet Side rail «8 • Creative Woodworks & Crafts March 2003 ■'SjS |


