Creative Woodworks & crafts 2003-04, страница 37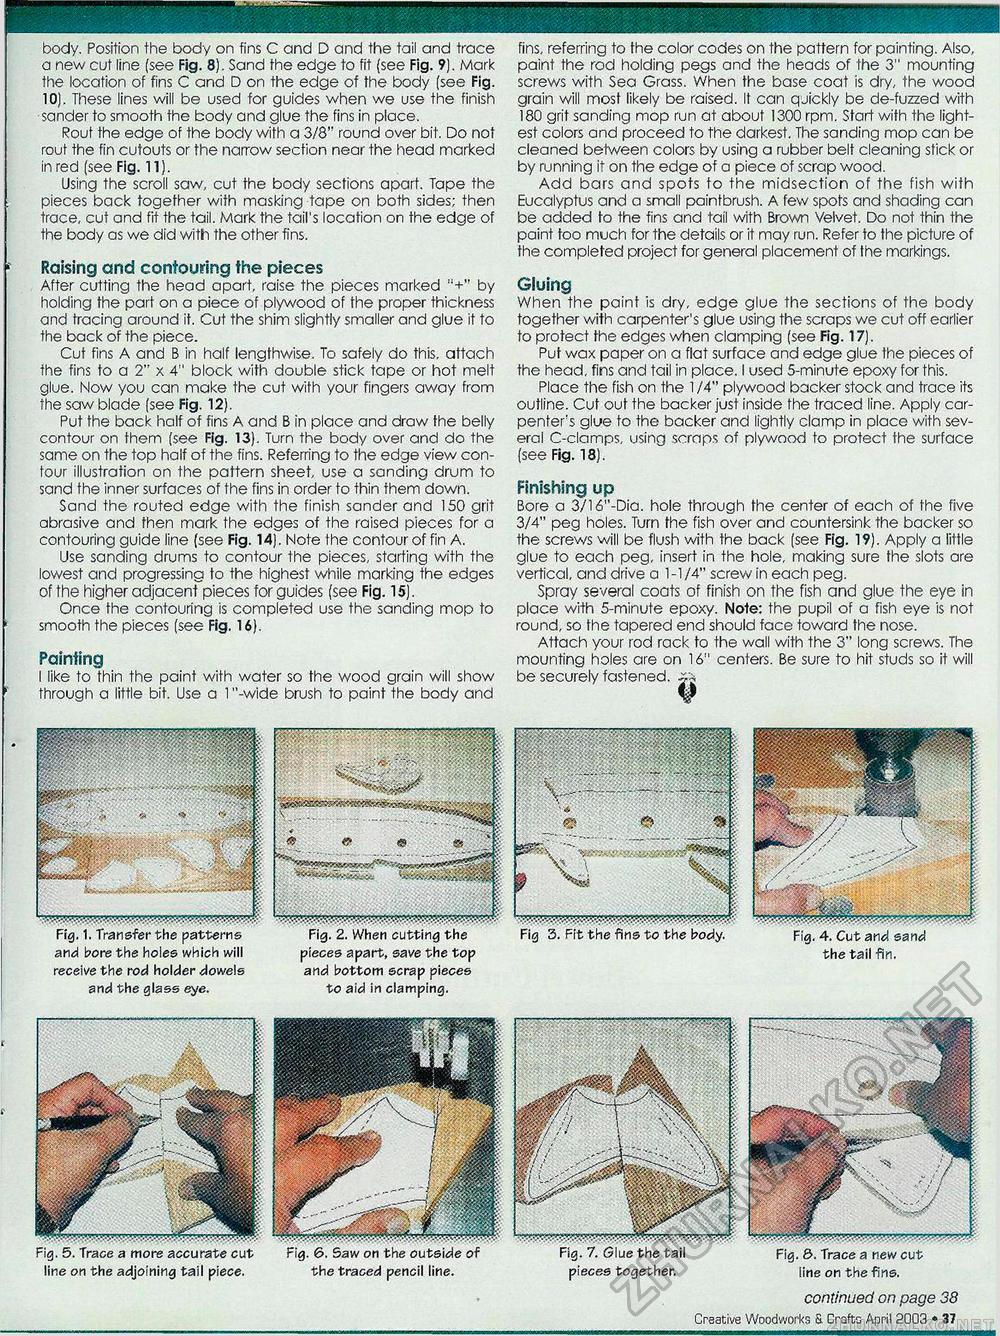
body. Position the body on fins C and D and the tail and trace a new cut line (see Fig. 8). Sand the edge to fit (see Fig. 9). Mark the location of fins C and D on the edge of the body (see Fig. 10). These lines will be used for guides when we use the finish sander to smooth the body and glue the fins in place. Rout the edge of the body with a 3/8" round over bit. Do not rout the fin cutouts or the narrow section near the head marked in red (see Fig. 11). Using the scroll saw, cut the body sections apart. Tape the pieces back together with masking tape on both sides; then trace, cut and fit the tail. Mark the tail's location on the edge of the body as we did with the other fins. Raising and contouring the pieces After cutting the head apart, raise the pieces marked "+" by holding the part on a piece of plywood of the proper thickness and tracing around it. Cut the shim slightly smaller and glue it to the back of the piece. Cut fins A and B in half lengthwise. To safely do this, attach the fins to a 2" x 4" block with double stick tape or hot melt glue. Now you can make the cut with your fingers away from the saw blade (see Fig. 12). Put the back half of fins A and B in place and draw the belly contour on them (see Fig. 13). Turn the body over and do the same on the top half of the fins. Referring to the edge view contour illustration on the pattern sheet, use a sanding drum to sand the inner surfaces of the fins in order to thin them down. Sand the routed edge with the finish sander and 150 grit abrasive and fhen mark the edges of the raised pieces for a contouring guide line (see Fig. 14). Note the contour of fin A. Use sanding drums to contour the pieces, starting with the lowest and progressing to the highest while marking the edges of the higher adjacent pieces for guides (see Fig. 15). Once the contouring is completed use the sanding mop to smooth the pieces (see Fig. 16). Painting I like to thin the paint with water so the wood grain will show through a little bit. Use a 1 "-wide brush to paint the body and fins, referring to the color codes on the pattern for painting. Also, paint the rod holding pegs and the heads of the 3" mounting screws with Sea Grass. When the base coat is dry, the wood grain will most likely be raised. It can quickly be de-fuzzed with 180 grit sanding mop run at about 1300 rpm. Start with the lightest colors and proceed to the darkest. The sanding mop can be cleaned belween colors by using a rubber belt cleaning stick or by running it on the edge of a piece of scrap wood. Add bars and spots to the midsection of the fish with Eucalyptus and a small paintbrush. A few spots and shading can be added to the fins and tail with Brown Velvet. Do not thin the paint too much for the details or it may run. Refer to the picture of the completed project for general placement of the markings. Gluing When the paint is dry, edge glue the sections of the body together with carpenter's glue using the scraps we cut off earlier to protect the edges when clamping (see Fig. 17). Put wax paper on a flat surface and edge glue the pieces of the head, fins and tail in place. I used 5-minute epoxy for this. Place the fish on the 1 /4" plywood backer stock and trace its outline. Cut out the backer just inside the traced line. Apply carpenter's glue to the backer and lightly clamp in place with several C-clamps, using scraps of plywood to protect the surface (see Fig. 18). Finishing up Bore a 3/16"-Dia. hole through the center of each of the five 3/4" peg holes. Turn the fish over and countersink the backer so the screws will be flush with the back (see Fig. 19). Apply a little glue to each peg, insert in the hole, making sure the slots are vertical, and drive a 1-1/4" screw in each peg. Spray several coats of finish on the fish and glue the eye in place with 5-minute epoxy. Note: the pupil of a fish eye is not round, so the tapered end should face toward the nose. Attach your rod rack to the wall with the 3" long screws. The mounting holes are on 16" centers. Be sure to hit studs so it will be securely fastened. Fig. 1. Transfer the patterns and bore the holes which will receive the rod holder dowels and the glass eye. pieces apart, save the top and bottom scrap pieces to aid in clamping. pieces together. continued on page 38 Creative Woodworks & Crofto April 2003 • 37 Trace a more accurate cut line on the adjoining tail piece. the traced pencil line. |


