Creative Woodworks & crafts 2003-04, страница 46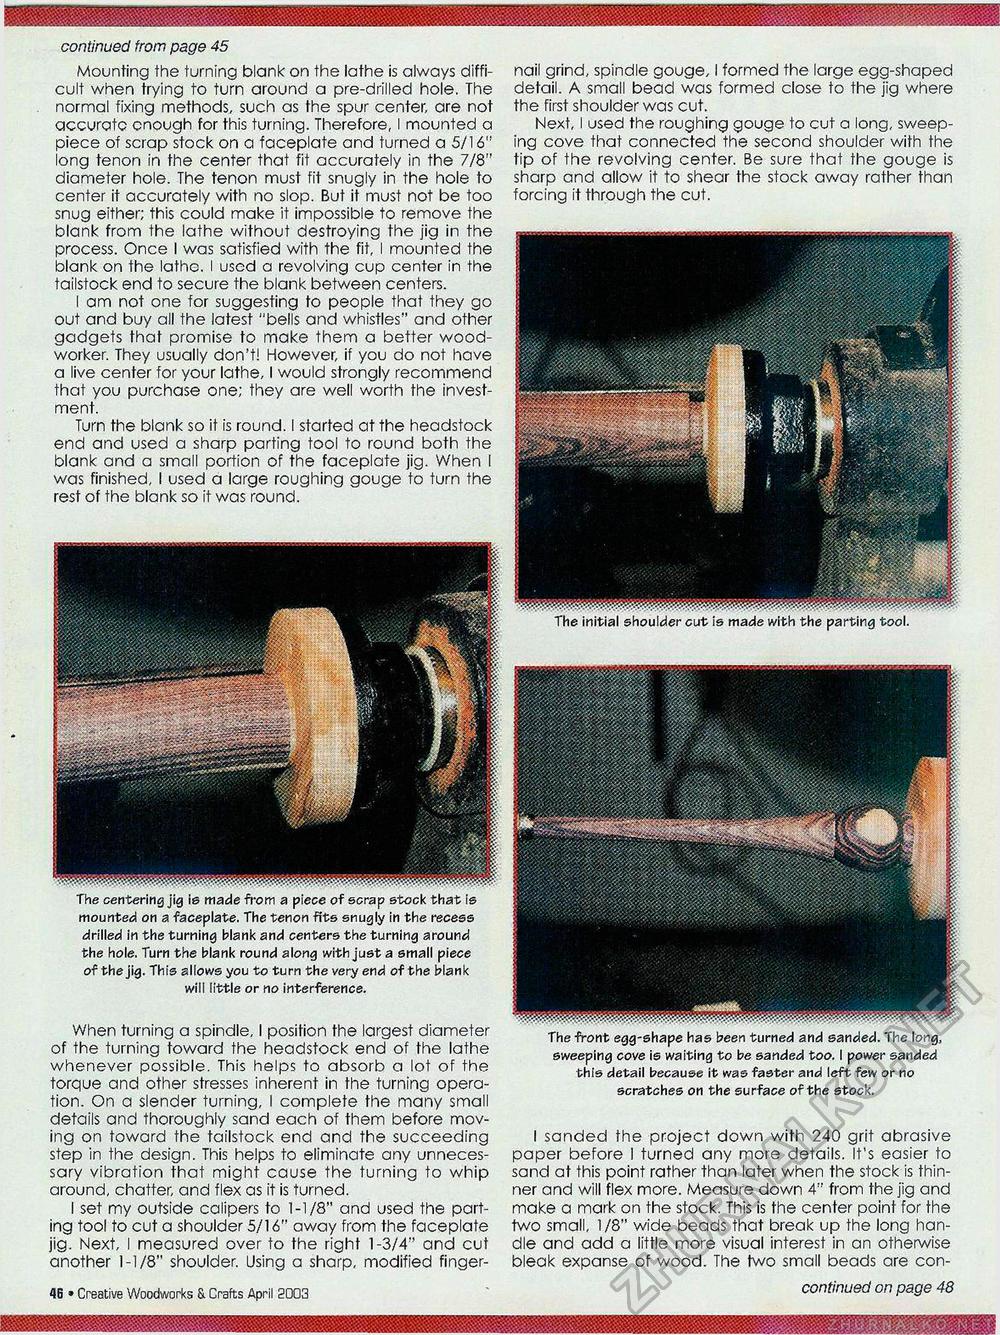
continued from page 45 Mounting the turning blank on the lathe is always difficult when trying to turn around a pre-drilled hole. The normal fixing methods, such as the spur center, are not accurato enough for this turning. Therefore, I mounted a piece of scrap stock on a faceplate and turned a 5/16" long tenon in the center that fit accurately in the 7/8" diameter hole. The tenon must fit snugly in the hole to center it accurately with no slop. But it must not be too snug either; this could make it impossible to remove the blank from the lathe without aestroying the jig in the process. Once I was satisfied with the fit, I mounted the blank on the lathe. I used a revolving cup center in the tailstock end to secure the blank between centers. I am not one for suggesting to people that they go out and buy all the latest "bells and whistles" and other gadgets that promise to make them a better woodworker. They usually don't! However, if you do not have a live center for your lathe, I would strongly recommend that you purchase one; they are well worth the investment. Turn the blank so it is round. I started at the headstock end and used a sharp parting tool to round both the blank and a small portion of the faceplate jig. When I was finished, I used a large roughing gouge to turn the rest of the blank so it was round. The centering jig is made from a piece of scrap stock that is mounted on a faceplate. The tenon fits snugly in the recess drilled in the turning blank and centers the turning around the hole. Turn the blank round along with just a small piece of the jig. This allows you to turn the very end of the blank will little or no interference. When turning a spindle. I position the largest diameter of the turning toward the headstock ena of the lathe whenever possible. This helps to absorb a lot of the torque and other stresses inherent in the turning operation. On a slender turning, I complete the many small details and thoroughly sand each of them before moving on towara the tailstock end and the succeeding step in the design. This helps to eliminate any unnecessary vibration that might cause the turning to whip arounp, chatter, and flex as it is turned. I set my outside calipers to 1-1/8" ana used the parting tool to cut a shoulder 5/16" away from the faceplate jig. Next, I measured over to the right 1-3/4" and cut another 1-1/8" shoulder. Using a sharp, modified finger- 46 » Creative Woodworks & Crafts April 2003 nail grind, spindle gouge, I formed the large egg-shaped detail. A small bead was formed close to the jig where the first shoulder was cut. Next, I used the roughing gouge to cut a long, sweeping cove that connected the second shoulder with the tip of the revolving center. Be sure that the gouge is sharp and allow it to shear the stock away rather than forcing it through the cut. The initial shoulder cut is made with the parting tool. The front egg-shape has been turned and sanded. The long, sweeping cove is waiting to be sanded too. I power sanded this detail because it was faster and left few or no scratches on the surface of the stock. I sanded the project down with 240 grit abrasive paper before I turned any more details. It's easier to sand at this point rather than later when the stock is thinner and will flex more. Measure down 4" from the jig and make a mark on the stock. This is the center point for the two small, 1/8" wide beads that break up the long handle and add a little more visual interest in an otherwise bleak expanse of wood. The two small beads are con- continued on page 48 |


