Creative Woodworks & crafts 2003-11, страница 44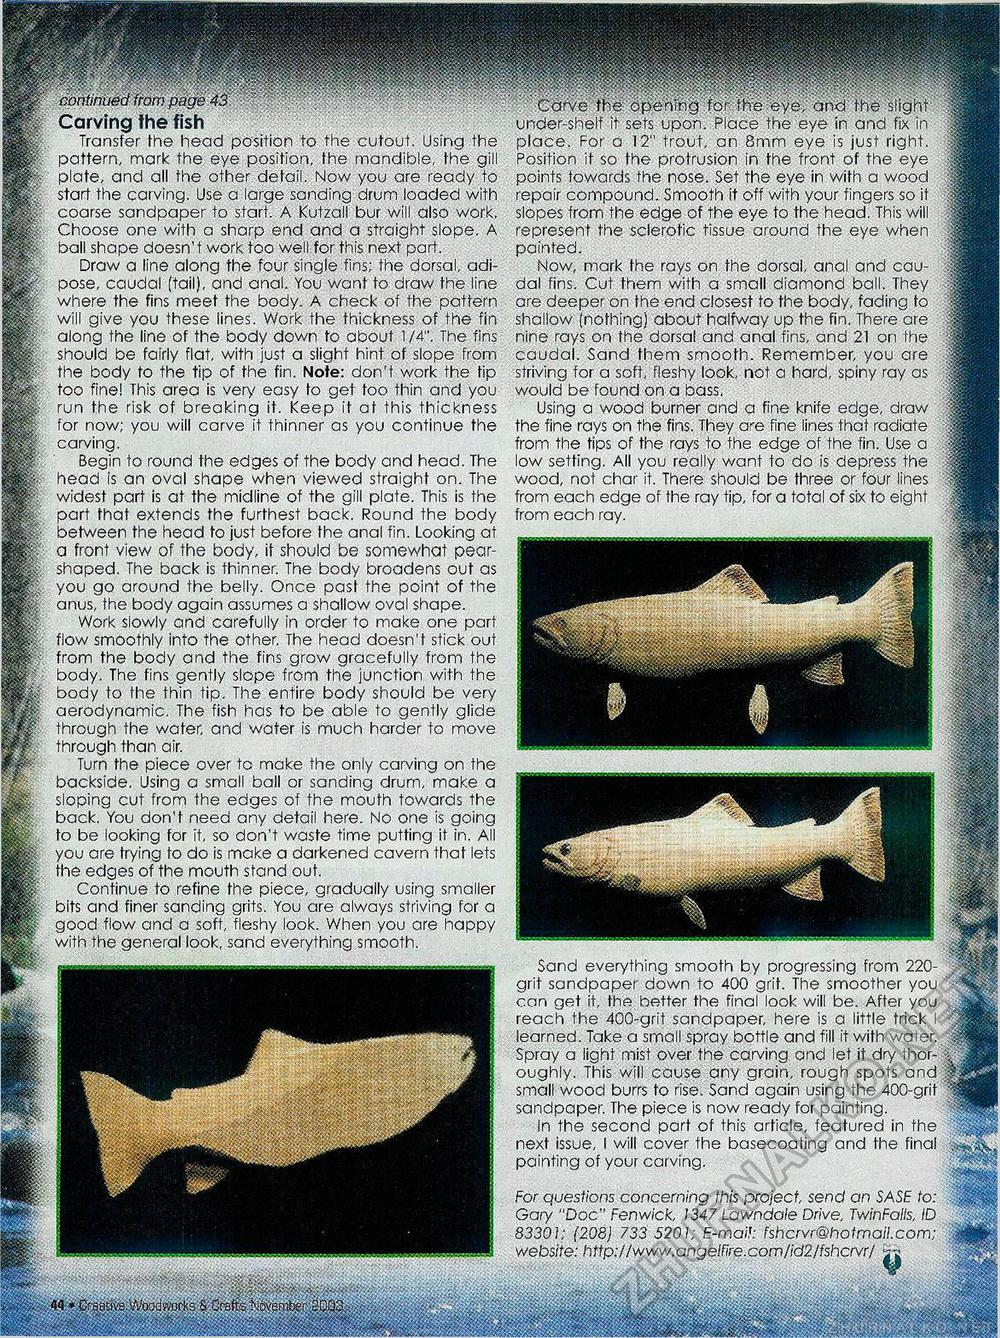
Ill | m continued from page 43 Carving the fish Transfer the head position to the cutout. Using the pattern, mark the eye position, the mandible, the gill plate, and all the other detail. Now you are ready to start the carving. Use a large sanding drum loaded with coarse sandpaper to start. A Kutzall bur will also work. Choose one with a sharp end and a straight slope. A ball shape doesn't work too well for this next part. Draw a line along the four single fins; the dorsal, adipose, caudal (tail), and anal. You want to draw the line where the fins meet the body. A check of the pattern will give you these lines. Work the thickness of the fin along the line of the body down to about 1/4". The fins should be fairly flat, with just a slight hint of slope from the body to the tip of the fin. Note: don't work the tip too fine! This area is very easy to get too thin and you run the risk of breaking it. Keep it at this thickness for now; you will carve it thinner as you continue the carving. Begin to round the edges of the body and head. The head is an oval shape when viewed straight on. The widest part is at the midline of the gill plate. This is the part that extends the furthest back. Round the body between the head to just before the anal fin. Looking at a front view of the body, it should be somewhat pear-shaped. The back is thinner. The body broadens out as you go around the belly. Once past the point of the anus, the body again assumes a shallow oval shape. Work slowly and carefully in order to make one part flow smoothly into the other. The head doesn't stick out from the body and the fins grow gracefully from the body. The fins gently slope from the junction with the body to the thin tip. The entire body should be very aerodynamic. The fish has to be able to gently glide through the water, and water is much harder to move through than air. Turn the piece over to make the only can/ing on the backside. Using a small ball or sanding drum, make a sloping cut from the edges of the mouth towards the back. You don't need any detail here. No one is going to be looking for it, so don't waste time putting it in. All you are trying to do is make a darkened cavern that lets the edges of the mouth stand out. Continue to refine the piece, gradually using smaller bits and finer sanding grits. You are always striving for a good flow and a soft, fleshy look. When you are happy with the general look, sand everything smooth. Carve the cpen'ng fo; the eye. and the slight under-shelf it sets upon. Place the eye in and fix in place. For a 12" trout, an Smm eye is just right. Position it so the protrusion in the front of the eye points towards the nose. Set the eye in with a wood repair compound. Smooth it off with your fingers so it slopes from the edge of the eye to the head. This will represent the sclerotic tissue around the eye when painted. Now, mark the rays on the dorsal, anal and caudal fins. Cut them with a small diamond ball. They are deeper on the end closest to the body, fading to shallow (nothing) about halfway up the fin. There are nine rays on the dorsal and anal fins, and 21 on the caudal. Sand them smooth. Remember, you are striving for a soft, fleshy look, not a hard, spiny ray as would be found on a bass. Using a wood burner and a fine knife edge, draw the fine rays on the fins. They are fine lines that radiate from the tips of the rays to the edge of the fin. Use a low setting. All you really want to do is depress the wood, not char it. There should be three or four lines from each edge of the ray tip, for a total of six to eight from each ray. Sand everything smooth by progressing from 220-grit sandpaper down to 400 grit. The smoother you can get it, the better the final look will be. After you reach the 400-grit sandpaper, here is a little trick I learned. Take a small spray bottle and fill it with water. Spray a light mist over the carving and let it dry thoroughly. This will cause any grain, rough spots and small wood burrs to rise. Sand again using the 400-grit sandpaper. The piece is now ready for painting. In the second part of this article, featured in the next issue, I will cover the basecoating and the final painting of your carving. For questions concerning this project send an SASE to: Gary "Doc" Fenwick, 134/ Lawndaie Drive, TwinFaiis, ID 83301; (208) 733 5201; E-mai!: fshcrvr@hotmail.com; website: http://www.angeifire.com/id2/fshcrvr/ jn: 44 * 0rs8»v8 Woodworks & Graft? ^lovambef 20} |


