Creative Woodworks & crafts 2003-11, страница 47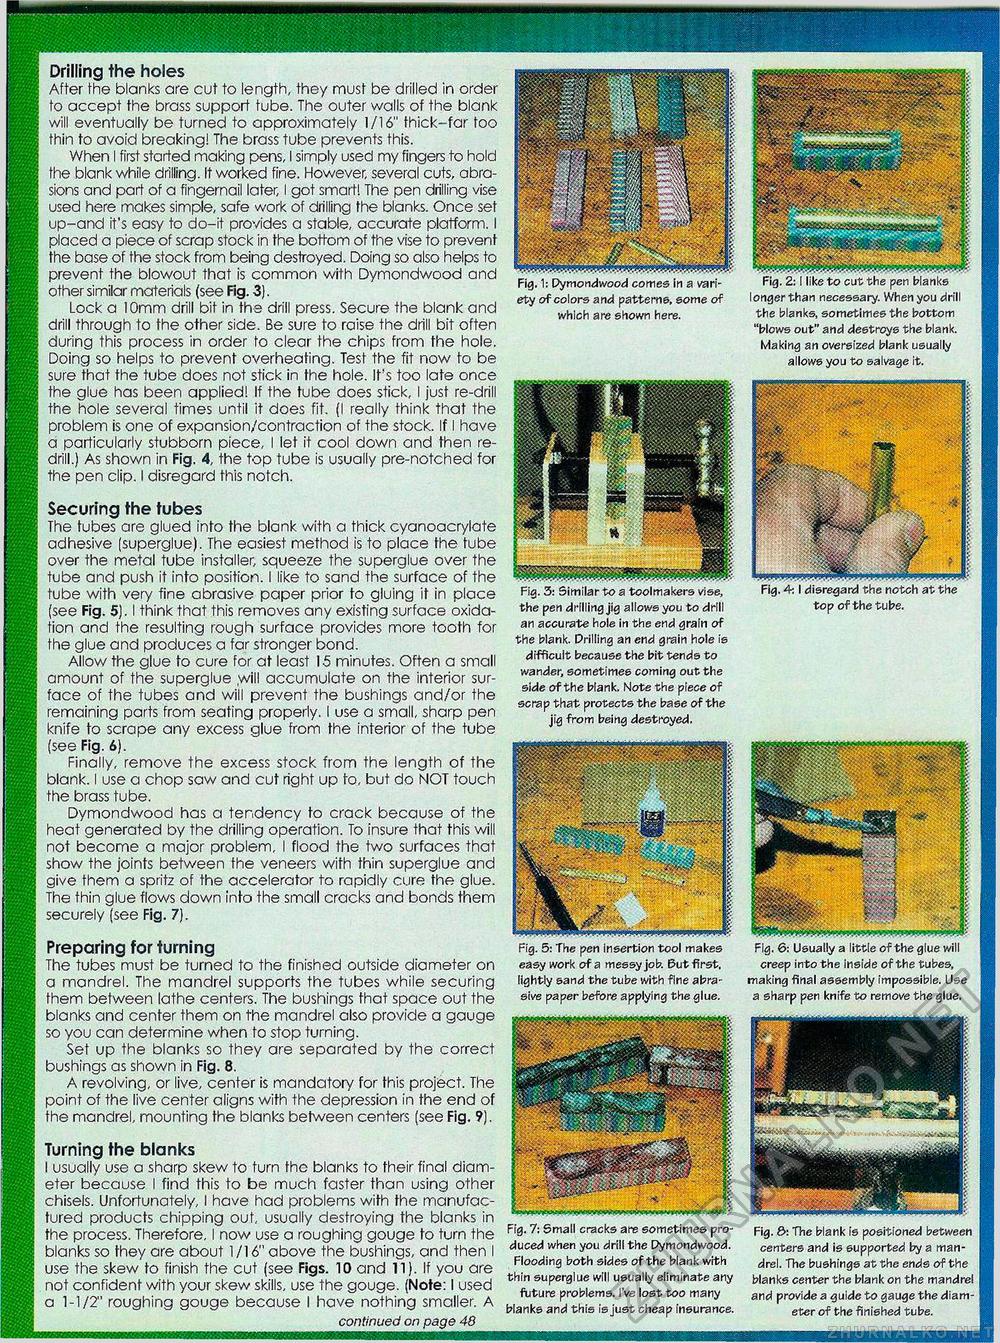
Drilling the holes After the blanks are cut to length, they must be drilled in order to accept the brass support tube. The outer walls of the blank will eventually be turned to approximately 1/16" thick-far too thin to avoid breaking! The brass tube prevents this. When I first started making pens, I simply used my fingers to hold the blank while drilling. It worked fine. However, several cuts, abrasions and part of a fingernail later, I got smart! The pen drilling vise used here makes simple, safe work of drilling the blanks. Once set up-and it's easy to do-it provides a stable, accurate platform. I placed a piece of scrap stock in the bottom of the vise to prevent the base of the stock from being destroyed. Doing so also helps to prevent the blowout that is common with Dymondwood and other similar materials (see Fig. 3). Lock a 10mm drill bit in the drill press. Secure the blank and drill through to the other side. Be sure to raise the drill bit often during this process in order to clear the chips from the hole. Doing so helps to prevent overheating. Test the fit now to be sure that the tube does not stick in the hole. It's too late once the glue has been applied! If the tube does stick, I just re-drill the hole several times until it does fit. (I really think that the problem is one of expansion/contraction of the stock. If I have a particularly stubborn piece, I let it cool down and then re-drill.) As shown in Fig. 4, the top tube is usually pre-notched for the pen clip. I disregard this notch. Securing the tubes The tubes are glued info the blank with a thick cyanoacrylate adhesive (superglue). The easiest method is to place the tube over the metal tube installer, squeeze the superglue over the tube and push it into position. I like to sand the surface of the tube with very fine abrasive paper prior to gluing it in place (see Fig. 5). I think that this removes any existing surface oxidation and the resulting rough surface provides more tooth for the glue and produces a far stronger bond. Allow the glue to cure for at least 15 minutes. Often a small amount of the superglue .will accumulate on the interior surface of the tubes and will prevent the bushings and/or the remaining parts from seating properly. I use a small, sharp pen knife to scrape any excess glue from the interior of the tube (see Fig. 6). Finally, remove the excess stock from the length of the blank. I use a chop saw and cut right up to, but do NOT touch the brass tube. Dymondwood has a tendency to crack because of the heat generated by the drilling operation. To insure that this will not become a major problem, I flood the two surfaces that show the joints between the veneers with thin superglue and give them a spritz of the accelerator to rapidly cure the glue. The thin glue flows down into the small cracks and bonds them securely (see Fig. 7). Preparing for turning The tubes must be turned to the finished outside diameter on a mandrel. The mandrel supports the tubes while securing them between lathe centers. The bushings that space out the blanks and center them on the mandrel also provide a gauge so you can determine when to stop turning. Set up the blanks so they are separated by the correct bushings as shown in Fig. 8. A revolving, or live, center is mandatory for this project. The point of the live center aligns with the depression in the end of the mandrel, mounting the blanks between centers (see Fig. ?). Turning the blanks I usually use a sharp skew to turn the blanks to their final diameter because I find this to be much faster than using other chisels. Unfortunately, I have had problems with the manufactured products chipping out, usually destroying the blanks in the process. Therefore, I now use a roughing gouge to turn the blanks so they are about 1/16" above the bushings, and then I use the skew to finish the cut (see Figs. 10 and 11). If you are not confident with your skew skills, use the gouge. (Note: I used a 1-1/2" roughing gouge because I have nothing smaller. A continued on page 48 ety of colors and patterns, some of which are shown here. Fig. 3: Similar to a tool makers vise, the pen drilling jig allows you to drill an accurate hoie in the end grain of the blank. Drilling an end grain hole is difficult because the bit tends to wander, sometimes coming out the side of the blank. Note the piece of scrap that protects the base of the jig from being destroyed. Fig. 5: The pen Insertion tool makes easy work of a messy job. But first, lightly sand the tube with fine abrasive paper before applying the glue. Fig. 7: Small cracks are sometimes produced when you drill the Pymondwood. Flooding both sides of the blank with thin superglue will usually eliminate any future problems. I've lost too many blanks and this is just cheap insurance. top of the tube. Fig. 6: Usually a little of the glue will creep into the inside of the tubes, making final assembly impossible. Use a sharp pen knife to remove the glue. Fig. 8: The blank is positioned between centers and is supported by a mandrel. The bushings at the ends of the blanks center the blank on the mandrel and provide a guide to gauge the diameter of the finished tube. longer than necessary. When you drill the blanks, sometimes the bottom "blows out" and destroys the blank. Making an oversized blank usually allows you to salvage it. |


