Creative Woodworks & crafts 2003-11, страница 48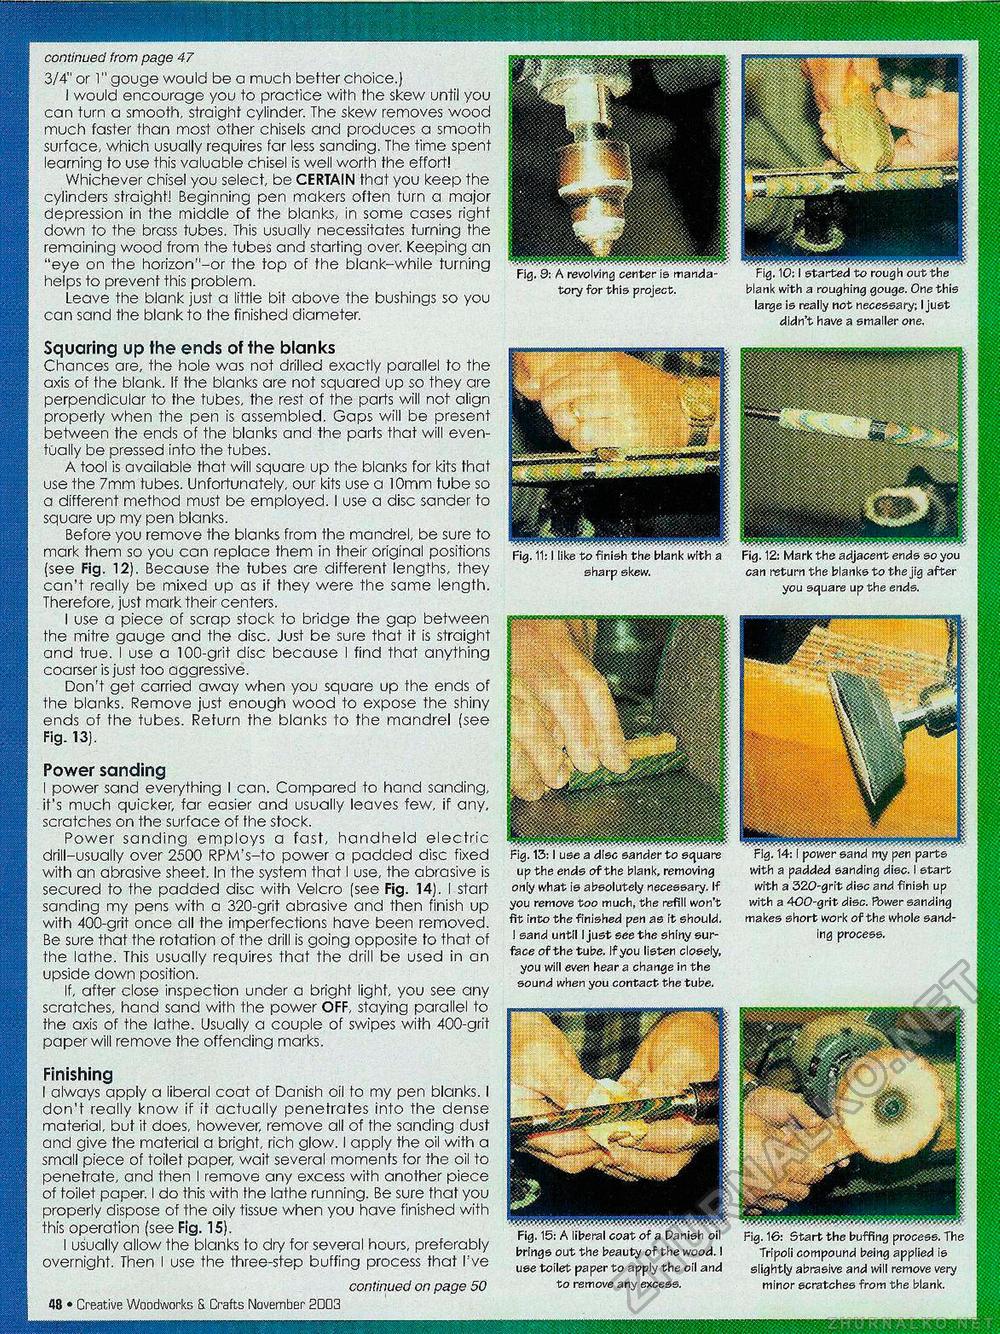
continued from page 47 3/4" or 1" gouge would be a much better choice.) I would encourage you to practice with the skew until you can turn a smooth, straight cylinder. The skew removes wood much faster than most other chisels and produces a smooth surface, which usually requires far less sanding. The time spent learning to use this valuable chisel is well worth the effort! Whichever chisel you select, be CERTAIN that you keep the cylinders straight! Beginning pen makers often turn a major depression in the middle of the blanks, in some cases right down to the brass tubes. This usually necessitates turning the remaining wood from the tubes and starting over. Keeping an "eye on the horizon"-or the top of the blank-while turning helps to prevent this problem. Leave the blank just a little bit above the bushings so you can sand the blank to the finished diameter. Squaring up the ends of fhe blanks Chances are, the hole was not drilled exactly parallel to the axis of the blank. If the blanks are not squared up so they are perpendicular to the tubes, the rest of the parts will not align properly when the pen is assembled. Gaps will be present between the ends of the blanks and the parts that will eventually be pressed info the tubes. A tool is available that will square up the blanks for kits that use the 7mm tubes. Unfortunately, our kits use a 10mm tube so a different method must be employed. I use a disc sander to square up my pen blanks. Before you remove the blanks from the mandrel, be sure to mark them so you can replace them in their original positions (see Fig. 12). Because the tubes are different lengths, they can't really be mixed up as if they were the same length. Therefore, just mark their centers. I use a piece of scrap stock to bridge the gap between the mitre gauge and the disc. Just be sure that it is straight and true. I use a 100-grit disc because I find that anything coarser is just too aggressive. Don't get carried away when you square up the ends of the blanks. Remove just enough wood to expose the shiny ends of the tubes. Return the blanks to the mandrel (see Fig. 13). Power sanding I power sand everything I can. Compared to hand sanding, it's much quicker, far easier and usually leaves few, if any, scratches on the surface of fhe stock. Power sanding employs a fast, handheld electric drill-usually over 2500 RPM's-to power a padded disc fixed with an abrasive sheet. In the system that I use, the abrasive is secured to the padded disc with Velcro (see Fig. 14). I start sanding my pens with a 320-grit abrasive and then finish up with 400-grit once all the imperfections have been removed. Be sure that the rotation of the drill is going opposite to that of the lathe. This usually requires that the drill be used in an upside down position. If, after close inspection under a bright light, you see any scratches, hand sand with the power OFF, staying parallel to the axis of the lathe. Usually a couple of swipes with 400-grit paper will remove the offending marks. Finishing I always apply a liberal coat of Danish oil to my pen blanks. I don't really know if it actually penetrates into the dense material, but it does, however, remove all of the sanding dust and give the material a bright, rich glow. I apply the oil with a small piece of toilet paper, wait several moments for the oil to penetrate, and then I remove any excess with another piece of toilet paper. I do this with the lathe running. Be sure that you properly dispose of the oily tissue when you have finished with this operation (see Fig. 15). I usually allow the blanks to dry for several hours, preferably overnight. Then I use the three-step buffing process that I've continued on page 50 56 • Creative Woodworks 8. Crafts November 2003 tory for this project. sharp skew. up the ends of the blank, removing only what is absolutely necessary. If you remove too much, the refill won't fit into the finished pen as it should. I sand until I just see the shiny surface of the tube. If you listen closely, you will even hear a change in the sound when you contact the tube. Fig. 15: A liberal coat of a Panish oil brings out the beauty of the wood. I use toilet paper to apply the oil and to remove any excess. blank with a roughing gouge. One this large is really not necessary; I just didn't have a smaller one. can return the blanks to the jig after you square up the ends. Fig. 16: Start the buffing process. The Tripoli compound being applied is slightly abrasive and will remove very minor scratches from the blank. Fig. 14:1 power sand my pen parts with a padded sanding disc. I start with a 320-grit disc and finish up with a 400-grit disc. Power sanding makes short work of the whole sand ing process. |


