Creative Woodworks & crafts 2004-01, страница 24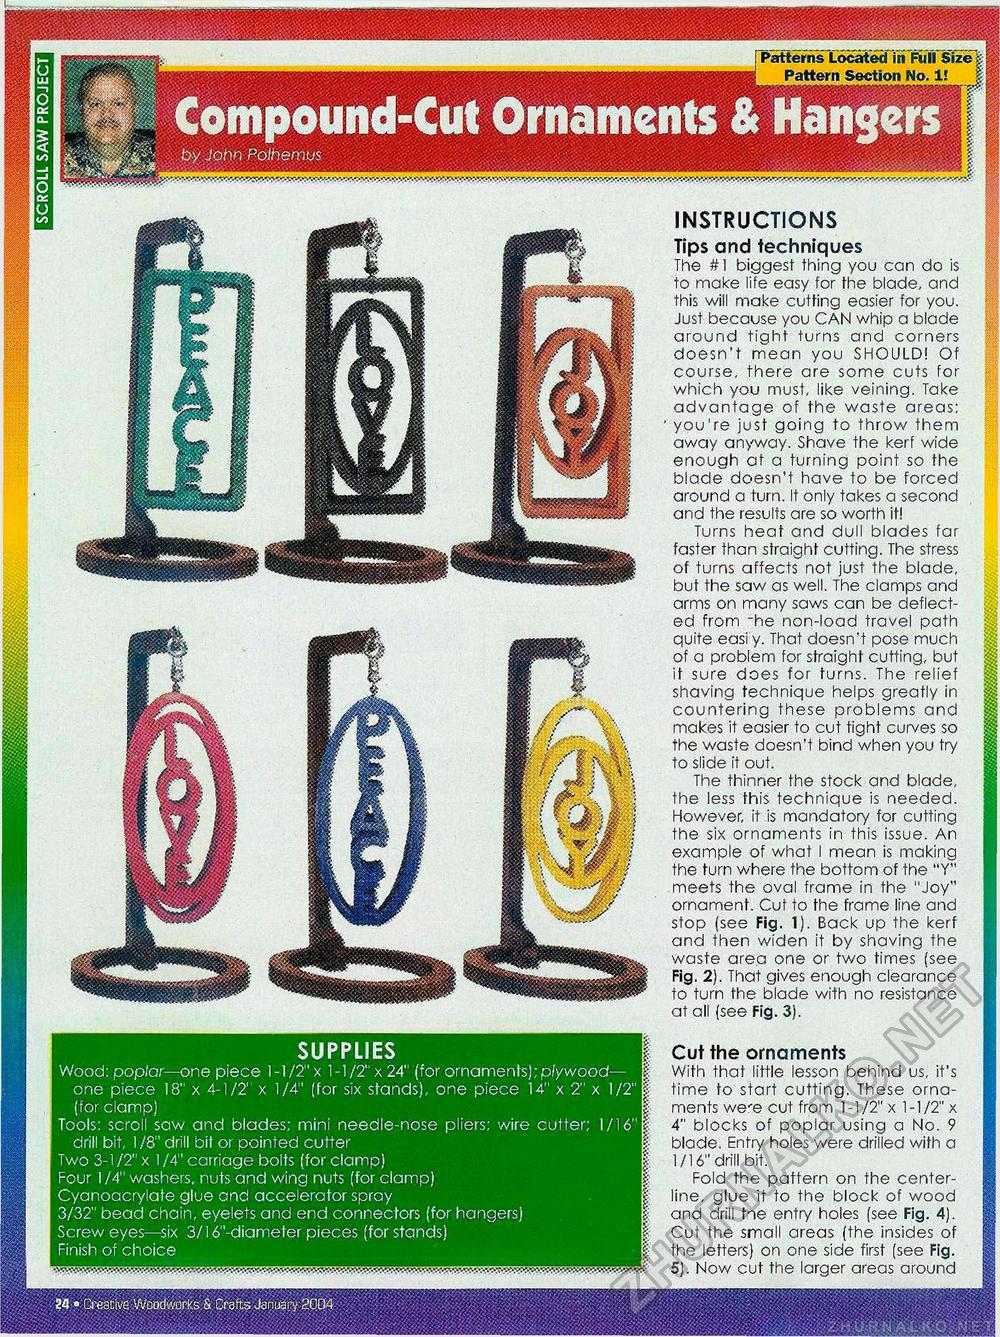
Compound-Cut Ornaments & Hangers by John Polhemus 24 • -Creative Woodworks & Crafts January 2004 rrttems Located! nFull Size Pattern Section No. 1! INSTRUCTIONS Tips and techniques The #1 biggest thing you can do is to make life easy for the blade, and this will make cutting easier for you. Just because you CAN whip a blade around tight turns and corners doesn't mean you SHOULD! Of course, there are some cuts for which you must, like veining. Take advantage of the waste areas; ' you're just going to throw them away anyway. Shave the kerf wide enough at a turning point so the blade doesn't have to be forced around a turn. It only takes a second and the results are so worth it! Turns heat and dull blades far faster than straight cutting. The stress of turns affects not just the blade, but the saw as well. The clamps and arms on many saws can be deflected from "he non-load travel path guite easi y. That doesn't pose much of a problem for straight cutting, but it sure does for turns. The relief shaving technigue helps greatly in countering these problems and makes it easier to cut tight curves so the waste doesn't bind when you try to slide it out. The thinner the stock and blade, the less this technigue is needed. However, it is mandatory for cutting the six ornaments in this issue. An example of what I mean is making the turn where the bottom of the "Y" meets the oval frame in the "Joy" ornament. Cut to the frame line and stop (see Fig. 1). Back up the kerf and then widen it by shaving the waste area one or two times (see Fig. 2). That gives enough clearance to turn the blade with no resistance at all (see Fig. 3). SUPPLIES Wood: poplar—one piece l-l/2"x l-l/2"x24" (for ornaments);plywood— one piece 18" x 4-1/2' x 1/4" (for six stands), one piece 14" x 2" x 1/2" (for clamp) Tools: scroll saw and blades; mini needle-nose pliers; wire cutter; 1/16" drill bit, 1/8" drill bit or pointed cutter Two 3-1 /2" x 1 /4" carriage bolts (for clamp) Four 1 /4" washers, nuts and wing nuts (for clamp) Cyanoacrylate glue and accelerator spray 3/32" bead chain, eyelets and end connectors (for hangers) Screw eyes—six 3/16"-diameter pieces (for stands) Finish of choice Cut the ornaments With that little lesson behind us, it's time to start cutting. These ornaments we'e cut from 1-1/2" x 1-1/2" x 4" blocks of poplar using a No. 9 blade. Entry holes were drilled with a 1/16" drill bit. Fold the pattern on the center-line, glue it to the block of wood and drill tie entry holes (see Fig. 4). Cut the small areas (the insides of the letters) on one side first (see Fig. 5). Now cut the larger areas around |


