Creative Woodworks & crafts 2004-01, страница 56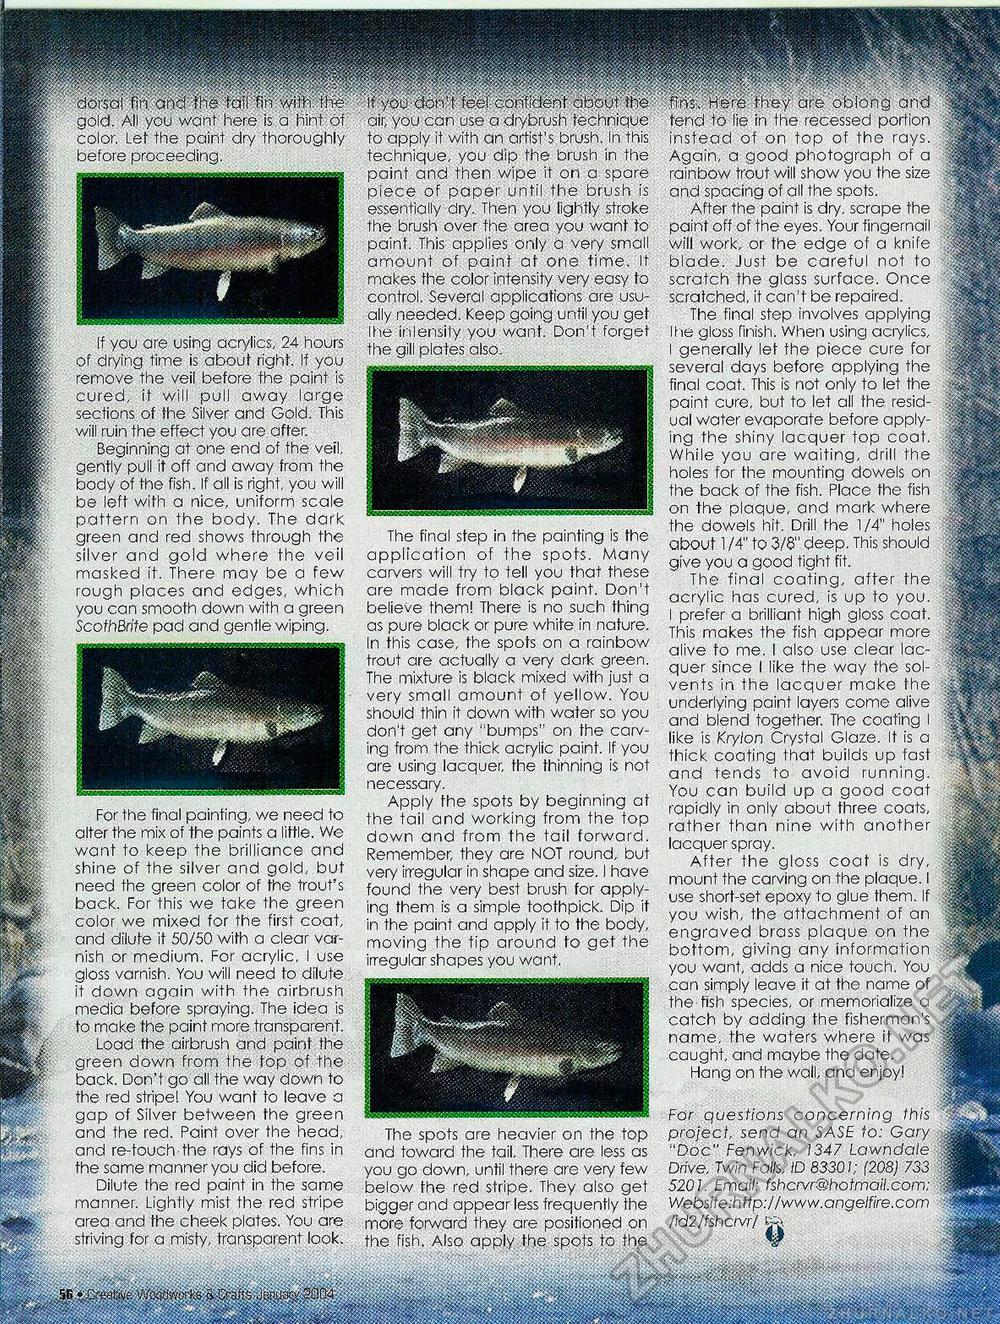
•ybrsbrfin^ gold. All you wont here is a hint of color. Let the paint dry thoroughly before proceeding. If you don't feel confident about the air, you can use a drybrush technique to apply it with an artist's brush. In this technique, you dip the brush in the paint and then wipe it on a spare piece of paper until the brush is essentially dry. Then you lightly stroke the brush over the area you want to paint. This applies only a very small amount of paint at one time, it makes the color intensity very easy to control. Several applications are usually needed. Keep going until you get I he inlensity you want. Don't forget the gili plates also. fins. Here they are'oblong an'd fend to lie in the recessed portion instead of on top of the rays. Again, a good photograph of a rainbow trout will show you the size and spacing of all the spots. After the paint is dry, scrape the paint off of the eyes. Your fingernail will work, or the edge of a knife blade. Just be careful not to scratch the glass surface. Once scratched, it can't be repaired. The final step involves applying I he gloss finish. When using acrylics, I generally let the piece cure for several days before applying the final coat. This is not only to let the paint cure, but to let all the residual water evaporate before applying the shiny lacquer top coat. While you are waiting, drill the holes for the mounting dowels on the back of the fish. Place the fish on the plaque, and mark where the dowels hit. Drill the 1/4" holes about 1 /4" to 3/8" deep. This should give you a good tight fit. The final coating, after the acrylic has cured, is up to you. I prefer a brilliant high gloss coat. This makes the fish appear more alive fo me. I also use clear lacquer since I like the way the solvents in the lacquer make the underlying paint layers come alive and blend together. The coating I like is Krylon Crystal Glaze. It is a thick coating that builds up fast and tends to avoid running. You can build up a good coat rapidly in only about three coats, rather than nine with another lacquer spray. After the gloss coat is dry, mount the carving on the plaque. I use short-set epoxy to glue them. If you wish, the attachment of an engraved brass plaque on the bottom, giving any information you want, adds a nice touch. You can simply leave it at the name of the fish species, or memorialize a catch by adding the fisherman's name, the waters where if was caught, and maybe the date. Hang on the wall, and enjoy! If you are using acrylics, 24 hours of drying time is about right. If you remove the veil before the paint is cured, it will pull away large sections of the Silver and Gold. This will ruin the effect you are after. Beginning at one end of the veil, gently pull it off and away from the body of the fish. If all is right, you will be left with a nice, uniform scale pattern on the body. The dark green and red shows through the silver and gold where the veil masked it. There may be a few rough places and edges, which you can smooth down with a green ScofhBrite pad and gentle wiping. The final step in the painting is the application of the spots. Many carvers will try to tell you that these are made from black paint. Don't believe them! There is no such thing as pure black or pure white in nature. In this case, the spots on a rainbow trout are actually a very dark green. The mixture is black mixed with just a very small amount of yellow. You should thin it down with water so you don't get any "bumps" on the carving from the thick acrylic paint. If you are using lacquer, the thinning is not necessary. Apply the spots by beginning at the tail and working from the top down and from the tail forward. Remember, they are NOT round, but very irregular in shape and size. I have found the very best brush for applying them is a simple toothpick. Dip it in the paint and apply it to the body, moving the tip around to get the irregular shapes you want, For the final painting, we need to alter the mix of the paints a little. We want to keep the brilliance and shine of the silver and gold, but need the green color of the trout's back. For this we take the green color we mixed for the first coat, and dilute it 50/50 with a clear varnish or medium. For acrylic, I use gloss varnish. You will need to dilute it down again with the airbrush media before spraying. The idea is to make the paint more transparent. Load the airbrush and paint the green down from the top of the back. Don't go all the way down to the red stripe! You want to leave a gap of Silver between the green and the red. Paint over the head, and re-touch the rays of the fins in the same manner you did before. Dilute the red paint in the same manner. Lightly mist the red stripe area and the cheek plates. You are striving for a misty, transparent look. For questions concerning this project send an SASE to: Gary "Doc" Fenwick, 1347 Lawndale Drive, Twin Falls, ID 83301; (208) 733 5201. Email: fshcrvr@hotmail.com; Website:h ftp://www. angelfire. com /id2/fshcrvr/ The spots are heavier on the top and toward the tail. There are less as you go down, until there are very few below the red stripe. They also get bigger and appear less frequently the more forward they are positioned on the fish. Also apply the spots to the 111111S mmSSmmi! |


