Creative Woodworks & crafts 2004-06, страница 59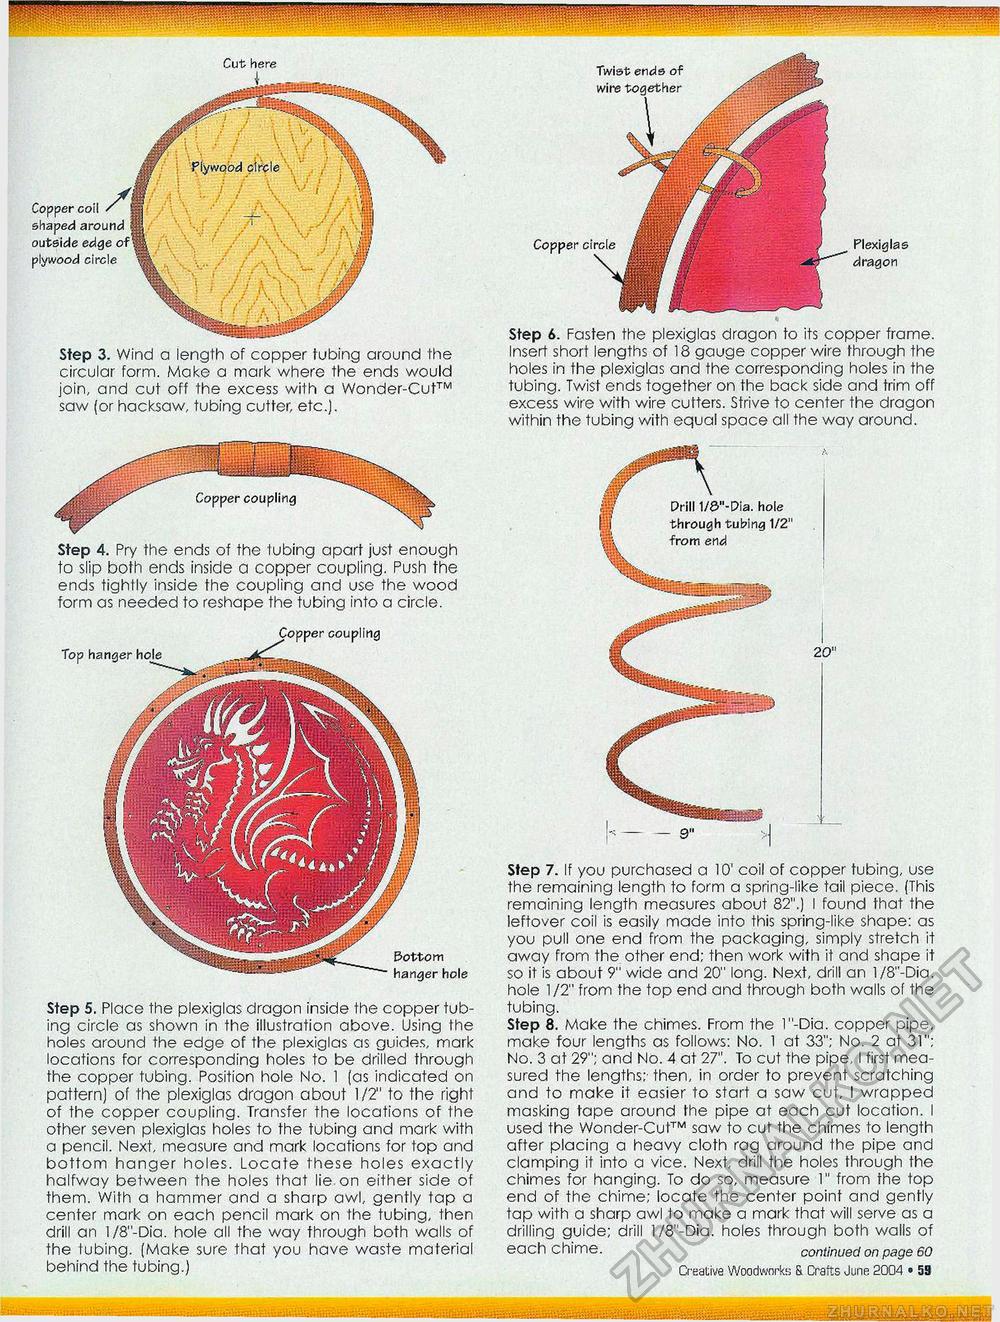
--■ • ■ ■ ' ' ■............ Step 4. Pry the ends of the lubing apart just enough to slip both ends inside a copper coupling. Push the ends tightly inside the coupling and use the wood form as needed to reshape the tubing into a circle. Copper coupling Top hanger hole Bottom hanger hole Step 5. Place the plexiglas dragon inside the copper tubing circle as shown in the illustration above. Using the holes around the edge of the plexiglas as guides, mark locations for corresponding holes to be drilled through the copper tubing. Position hole No. I (as indicated on pattern) of the plexiglas dragon about 1/2" to the right of the copper coupling. Transfer the locations of the other seven plexiglas holes to the tubing and mark with a pencil. Next, measure and mark locations for top and bottom hanger holes. Locate these holes exactly halfway between the holes that lie on either side of them. With a hammer and a sharp awl, gently tap a center mark on each pencil mark on the tubing, then drill an l/8"-Dia. hole all the way through both walls of the tubing. (Make sure that you have waste material behind the tubing.) Twist ends of wire together Copper circle Plexiglas dragon Step 6. Fasten the plexiglas dragon to its copper frame. Insert short lengths of 18 gauge copper wire through the holes in the plexiglas and the corresponding holes in the tubing. Twist ends together on the back side and trim off excess wire with wire cutters. Strive to center the dragon within the tubing with equal space all the way around. Drill 1/S"-Dia. hole through tubing 1/2" 20" Step 7. If you purchased a 10' coil of copper tubing, use the remaining length to form a spring-like tail piece. (This remaining length measures about 82".) I found that the leftover coil is easily made into this spring-like shape: as you pull one end from the packaging, simply stretch it away from the other end; then work with it and shape it so it is about 9" wide and 20" long. Next, drill an l/8"-Dia. hole 1 /2" from the top end and through both walls of the tubing. Step 8, Make the chimes. From the 1"-Dia. copper pipe, make four lengths as follows: No. 1 at 33"; No. 2 at 31"; No. 3 at 29"; and No. 4 at 27". To cut the pipe, I first measured the lengths;- then, in order to prevent scratching and to make it easier to start a saw cut, I wrapped masking tape around the pipe at each cut location. I used the Wonder-Cut™ saw to cut the chimes to length after placing a heavy cloth rag around the pipe and clamping it into a vice. Next, drill the holes through the chimes for hanging. To do so, measure 1" from the top end of the chime; locate the center point and gently tap with a sharp awl to make a mark that will serve as a drilling guide; drill l/8"-Dia. holes through both walls of each chime. continued on page 60 4fi • Creative Woodworks S. Crafts June 2004 Cut here Step 3. Wind a length of copper tubing around the circular form. Make a mark where the ends would join, and cut off the excess with a Wonder-Cut™ saw (or hacksaw, tubing cutter, etc.). Copper coil shaped around outside edge plywood circle |


