Creative Woodworks & crafts 2004-06, страница 60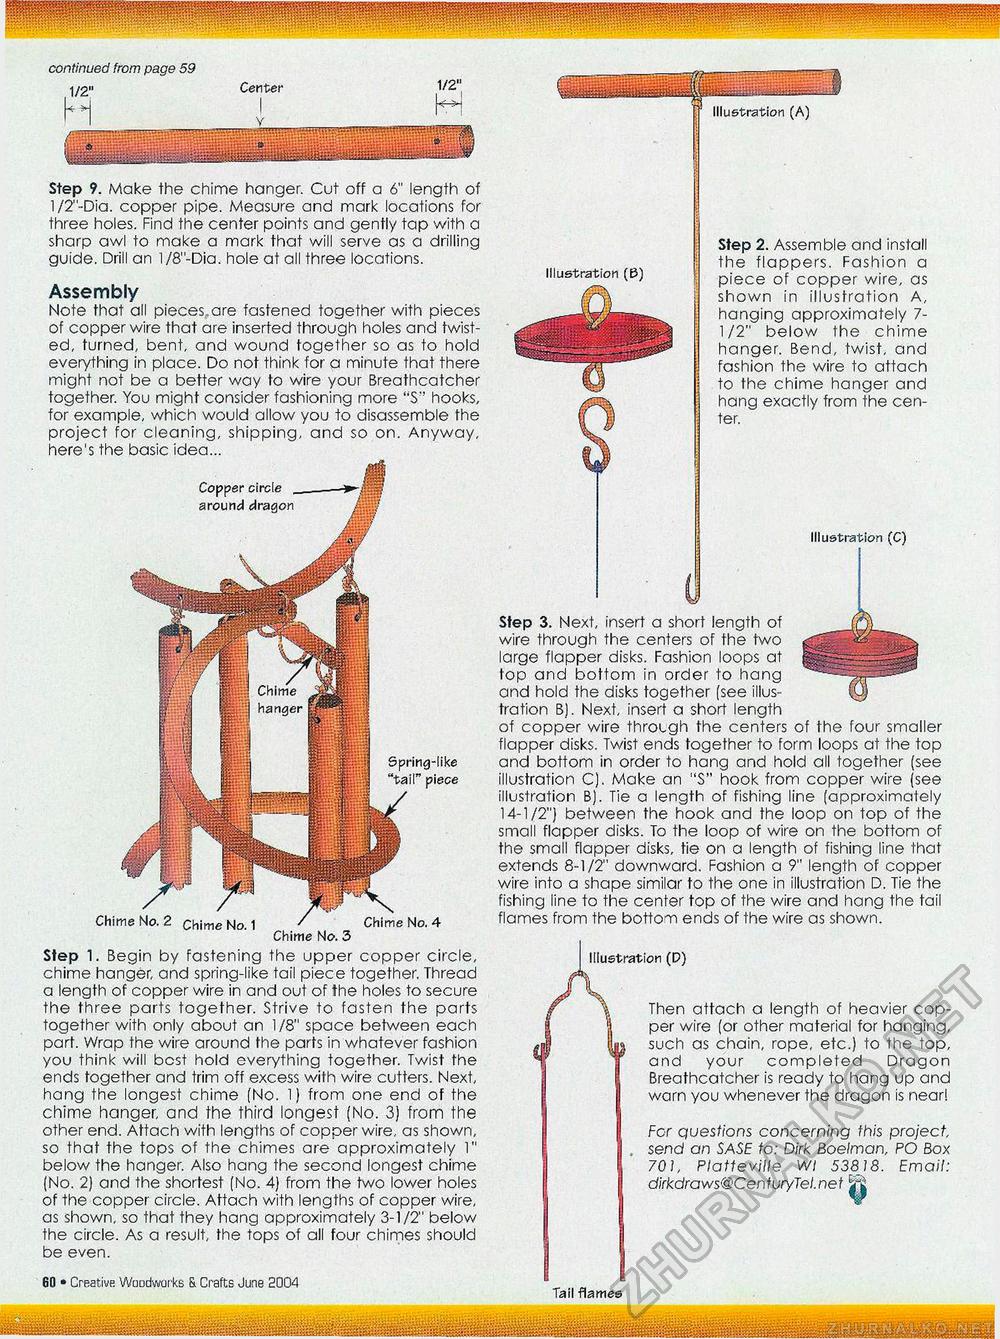
Tail flames Step 9. Make the chime hanger. Cut off a 6" length of l/2"-Dia. copper pipe. Measure and mark locations for three holes. Find the center points and gently tap with a sharp awl to make a mark that will serve as a drilling guide. Drill an l/8"-Dia. hole at all three locations. Assembly Note that all pieces,are fastened together with pieces of copper wire that are inserted through holes and twisted, turned, bent, and wound together so as to hold everything in place. Do not think for a minute that there might not be a better way to wire your Breathcatcher together. You might consider fashioning more "S" hooks, for example, which would allow you to disassemble the project for cleaning, shipping, and so on. Anyway, here's the basic idea... Spring-like "tail" piece 4fi • Creative Woodworks S. Crafts June 2004 Illustration (A) Step 2. Assemble and install the flappers. Fashion a piece of copper wire, as shown in illustration A, hanging approximately 7-1/2" below the chime hanger. Bend, twist, and fashion the wire to attach to the chime hanger and hang exactly from the center. Illustration (C) Illustration (D) Then attach a length of heavier copper wire (or other material for hanging, such as chain, rope, etc.) to the top, and your completed Dragon Breathcatcher is ready to hang up and warn you whenever the dragon is near! For questions concerning this project send an SASE to: Dirk Boelman, PO Box 701, Platteville Wl 53818. Email: dirkdraws@CenturyTel.net ^ Copper circle around dragon Chime No. 2 chime No. 1 ' Chime No. 4 Chime No. 3 Step 1. Begin by fastening the upper copper circle, chime hanger, and spring-like tail piece together. Thread a length of copper wire in and out of the holes to secure the three parts together. Strive to fasten the parts together with only about an 1/8" space between each part. Wrap the wire around the parts in whatever fashion you think will best hold everything together. Twist the ends together and trim off excess with wire cutters. Next, hang the longest chime (No. 1) from one end of the chime hanger, and the third longest (No. 3) from the other end. Attach with lengths of copper wire, as shown, so that the tops of the chimes are approximately 1" below the hanger. Also hang the second longest chime (No. 2) and the shortest (No. 4) from the two lower holes of the copper circle. Attach with lengths of copper wire, as shown, so that they hang approximately 3-1/2" below the circle. As a result, the tops of all four chimes should be even. Illustration (B) Step 3. Next, insert a short length of wire through the centers of the two large flapper disks. Fashion loops at top and bottom in order to hang and hold the disks together (see illustration B). Next, insert a short length of copper wire through the centers of the four smaller flapper disks. Twist ends together to form loops at the top and bottom in order to hang and hold all together (see illustration C). Make an "S" hook from copper wire (see illustration B). Tie a length of fishing line (approximately 14-1/2") between the hook and the loop on top of the small flapper disks. To the loop of wire on the bottom of the small flapper disks, tie on a length of fishing line that extends 8-1/2" downward. Fashion a 9" length of copper wire into a shape similar to the one in illustration D. Tie the fishing line to the center top of the wire and hang the tail flames from the bottom ends of the wire as shown. continued from page 59 1/2" M Center |


