Creative Woodworks & crafts 2004-08, страница 13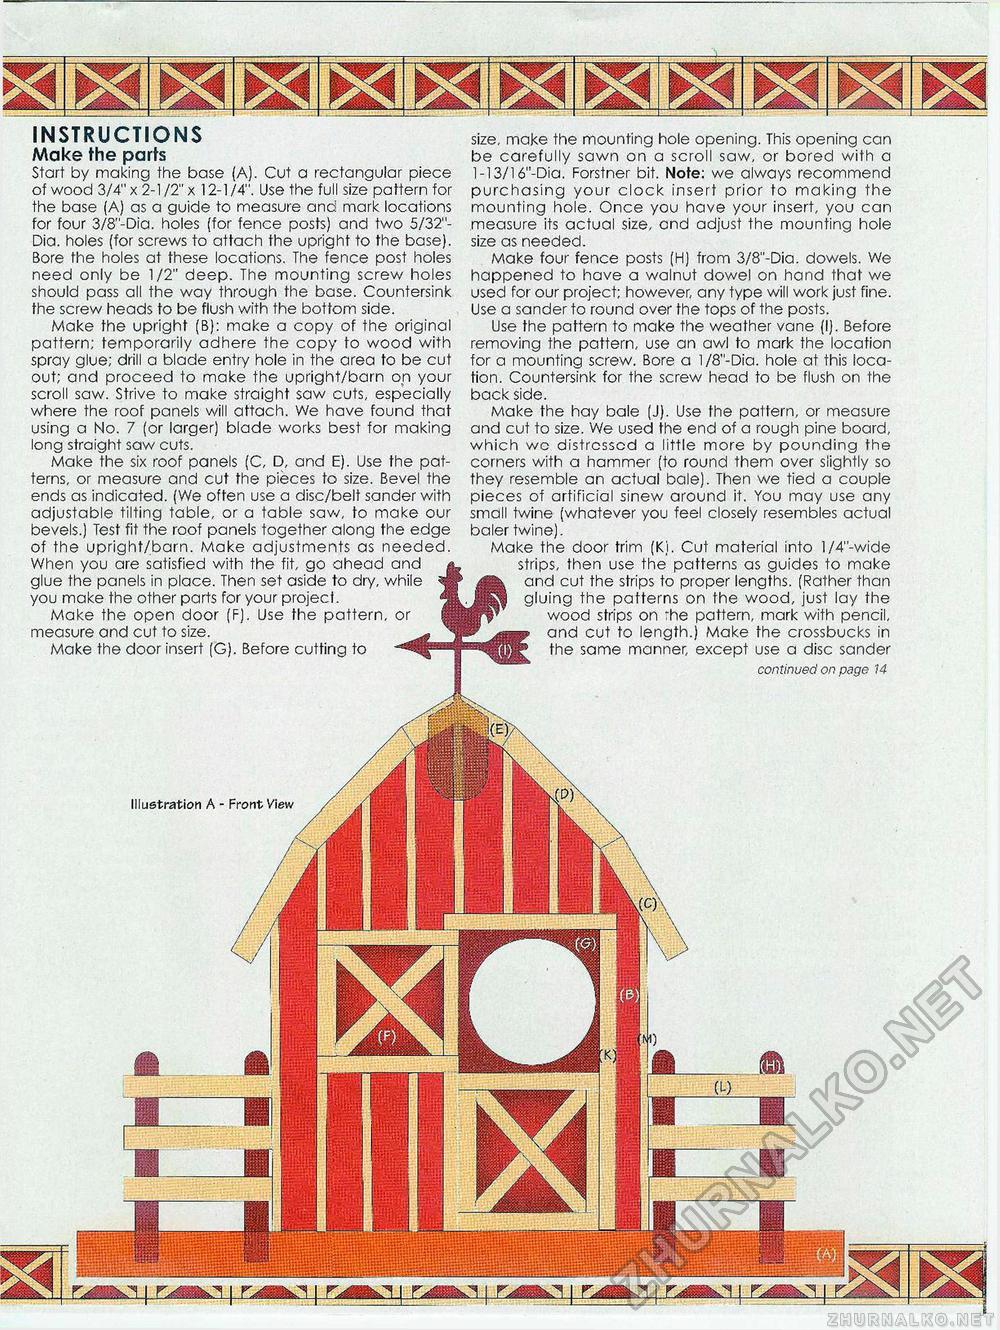
Illustration A - Front View INSTRUCTIONS Make the parts Start by making the base (A). Cut a rectangular piece of wood 3/4" x 2-1 /2" x 12-1/4". Use the full size pattern for the base (A) as a guide to measure and mark locations for four 3/8"-Dia. holes (for fence posts) and two 5/32"-Dia. holes (for screws to attach the upright to the base). Bore the holes at these locations. The fence post holes need only be 1/2" deep. The mounting screw holes should pass all the way through the base. Countersink the screw heads to be flush with the bottom side. Make the upright (B): make a copy of the original pattern; temporarily adhere the copy to wood with spray glue; drill a blade entry hole in the area to be cut out; and proceed to make the upright/barn on your scroll saw. Strive to make straight saw cuts, especially where the roof panels will attach. We have found that using a No. 7 (or larger) blade works best for making long straight saw cuts. Make the six roof panels (C, D, and E). Use the patterns, or measure and cut the pieces to size. Bevel the ends as indicated. (We often use a disc/belt sander with adjustable tilting table, or a table saw, to make our bevels.) Test fit the roof panels together along the edge of the upright/barn. Make adjustments as needed. When you are satisfied with the fit, go ahead and glue the panels in place. Then set aside to dry, while you make the other parts for your project. Make the open door (F). Use the pattern, or measure and cut to size. Make the door insert (G). Before cutting to size, make the mounting hole opening. This opening can be carefully sawn on a scroll saw, or bored with a 1-13/16"-Dia. Forstner bit. Note: we always recommend purchasing your clock insert prior to making the mounting hole. Once you have your insert, you can measure its actual size, and adjust the mounting hole size as needed. Make four fence posts [HJ from 3/8"-Dia. dowels. We happened to have a walnut dowel on hand that we used for our project; however, any type will work just fine. Use a sander to rouna over the tops of the posts. Use the pattern to make the weather vane (I). Before removing the pattern, use an awl to mark the location for a mounting screw. Bore a l/8"-Dia. hole at this location. Countersink for the screw head to be flush on the backside. Make the hay bale (J). Use the pattern, or measure and cut to size. We used the end of a rough pine board, which wc distressed a little more by pounding the corners with a hammer (to round them over slightly so they resemble an actual bale). Then we tied a couple pieces of artificial sinew around it. You may use any small twine (whatever you feel closely resembles actual baler twine). Make the door trim (Ki. Cut material into l/4"-wide strips, then use the patterns as guides to make and cut the strips to proper lengths. (Rather than gluing the patterns on the wood, just lay the wood strips on :he pattern, mark with pencil, ana cut to length.) Make the crossbucks in the same manner, except use a disc sander continued on page 74 |


