Creative Woodworks & crafts 2004-08, страница 19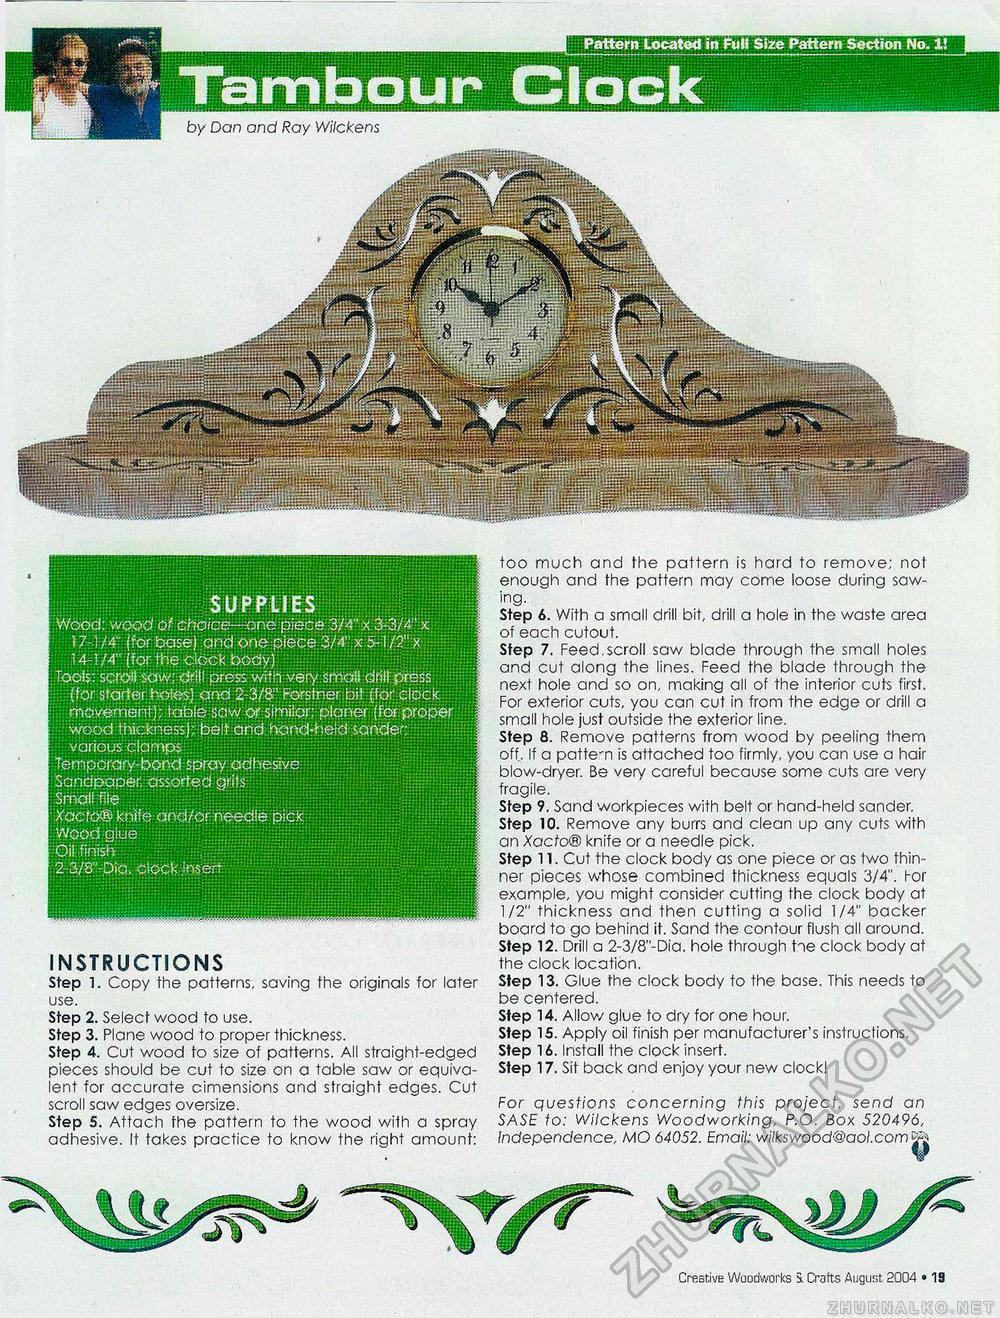
INSTRUCTIONS Step t. Copy the patterns, saving the originals for later use. Step 2. Select wood to use. Step 3. Plane wood to proper thickness. Step 4. Cut wood to size of patterns. All straight-edged pieces should be cut to size on a table saw or equivalent for accurate cimensions and straight edges. Cut scroll saw edges oversize. Step 5. Attach the pattern to the wood with a spray adhesive. It takes practice to know the right amount: too much and the pattern is hard to remove; not enough and the pattern may come loose during sawing. Step 6. With a small drill bit, drill a hole in the waste area of each cutout. Step 7. Feed.scroll saw blade through the small holes ana cut along the lines. Feed the blade through the next hole and so on, making all of the interior cuts first. For exterior cuts, you can cut in from the edge or drill a small hole just outside the exterior line. Step 8. Remove patterns from wood by peeling them off. If a pattern is attached too firmly, you can use a hair blow-dryer. Be very careful because some cuts are very fragile. Step 9. Sand workpieces with belt or hand-held sander. Step 10. Remove any burrs and clean up any cuts with an Xacfo® knife or a needle pick. Step 11. Cut the clock body as one piece or as two thinner pieces whose combined thickness equals 3/4". For example, you might consider cutting the clock body at 1/2" thickness and then cutting a solid 1/4" backer board to go behind if. Sand the contour flush all around. Step 12. Drill a 2-3/8"-Dia. hole through tie clock body at the clock location. Step 13. Glue the clock boay to the base. This needs to be centered. Step 14. Allow glue to dry for one hour. Step IS. Apply oil finish per manufacturer's instructions. Step 16. Install the clock insert. Step 17. Sit back and enjoy your new clock! For questions concerning this project, send an SASE to: Wilckens Woodworking, P.O. Box 520496, Independence, MO 64052. Email: wilkswood@aol.com Creative Woodworks 3. Crafts August 2004 • 18 SUPPLIES Wood: wood of choice—one piece 3/4" x 3-3/4' x 17-1/4" (for base) and one piece 3/4"x5-l/2"x 14-1 /4" (tor the clock body) Tools: scroll saw; cfeiil press with very .small drill'press {for starter holes] and 2 3/8" Forstner bit (for clock movement); tabie saw or similar; planer (for proper wood thickness); belt and hand-held sander; various clamps Temporary-bond spray adhesive Sandpaper, assorted grits Small file Xacto® knife and/or needle Wood glue Oil finish 2 3/8"-Dia. clock insert |


