Creative Woodworks & crafts 2004-08, страница 40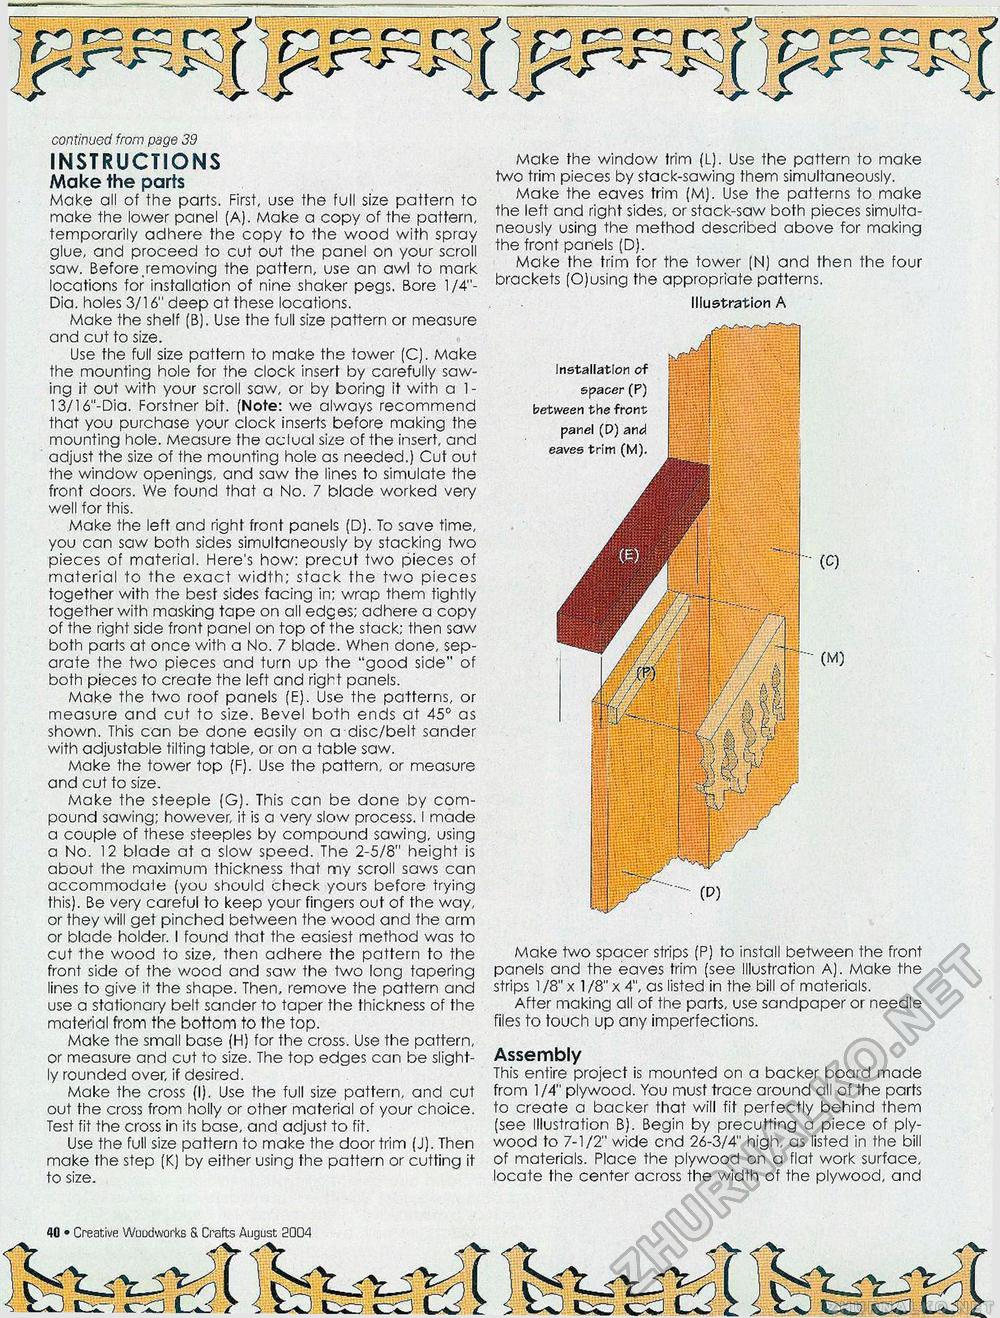
BpHKfFlSjSHS FllSMjl f continued from page 33 INSTRUCTIONS Make the parts Make all of the parts. First, use the full size pattern to make the lower panel (A). Make a copy of the pattern, temporarily adhere the copy to the wood with spray glue, and proceed to cut out the panel on your scroll saw. Before .removing the pattern, use an awl to mark locations for installation of nine shaker pegs. Bore 1/4"-Dia. holes 3/16" deep at these locations. Make the shelf (B). Use the full size pattern or measure and cut to size. Use the full size pattern to make the tower (C). Make the mounting hole for the clock insert by carefully sawing it out with your scroll saw, or by boring it with a 1 -13/16"-Dia. Forstner bit. (Note: we always recommend that you purchase your clock inserts before making the mounting hole. Measure the aclual size of the insert, and adjust the size of the mounting hole as needed.) Cut out the window openings, and saw the lines to simulate the front doors. We found that a No. 7 blade worked very well for this. Make the left and right front panels (D). To save time, you can saw both sides simultaneously by stacking two pieces of material. Here's how: precut two pieces of material to the exact width; stack the two pieces together with the best sides facing in; wrap them tightly together with masking tape on all edges; adhere a copy of the right side front panel on top of the stack; then saw both parts at once with a No. 7 blade. When done, separate the two pieces and turn up the "good side" of both pieces to create the left and right panels. Make the two roof panels (E). Use the patterns, or measure and cut to size. Bevel both ends at 45° as shown. This can be done easily on a disc/belt sander with adjustable tilting table, or on a table saw. Make the tower top (F). Use the pattern, or measure and cut to size. Make the steeple (G). This can be done by compound sawing; however, it is a very slow process. I made a couple of these steeples by compound sawing, using a No. 12 blade at a slow speed. The 2-5/8" height is about the maximum thickness that my scroll saws can accommodate (you should check yours before trying this). Be very careful to keep your fingers out of the way, or they will get pinched between the wood and the arm or blade holder. I found that the easiest method was to cut the wood to size, then adhere the pattern to the front side of the wood and saw the two long tapering lines to give it the shape. Then, remove the pattern and use a stationary belt sander to taper the thickness of the material from the bottom to the top. Make the small base (H) for the cross. Use the pattern, or measure and cut to size. The top edges can be slightly rounded over, if desired. Make the cross (I). Use the full size pattern, and cut out the cross from holly or other material of your choice. Test fit the cross in its base, and adjust to fit. Use the full size pattern to make the door trim (J). Then make the step (K) by either using the pattern or cutting it to size. Make the window trim (L). Use the pattern to make two trim pieces by stack-sawing them simultaneously. Make the eaves trim (M). Use the patterns to make the left and right sides, or stack-saw both pieces simultaneously using the method described above for making the front panels (D). Make the trim for the tower (N) and then the four brackets (O)using the appropriate patterns. Illustration A Make two spacer strips (P) to install between the front panels and the eaves trim (see Illustration A). Make the strips 1/8" x 1/8" x 4", as listed in the bill of materials. After making all of the parts, use sandpaper or needle files to touch up any imperfections. Assembly This entire project is mounted on a backer board made from 1/4" plywood. You must trace around all of the parts to create a backer that will fit perfectly behind them (see Illustration B). Begin by precutting a piece of plywood to 7-1/2" wide end 26-3/4" high, as listed in the bill of materials. Place the plywood on a flat work surface, locate the center across the width of the plywood, and 40 • Creative Wuodvwrks & Crafts August 2004 |


