Creative Woodworks & crafts 2005-01, страница 12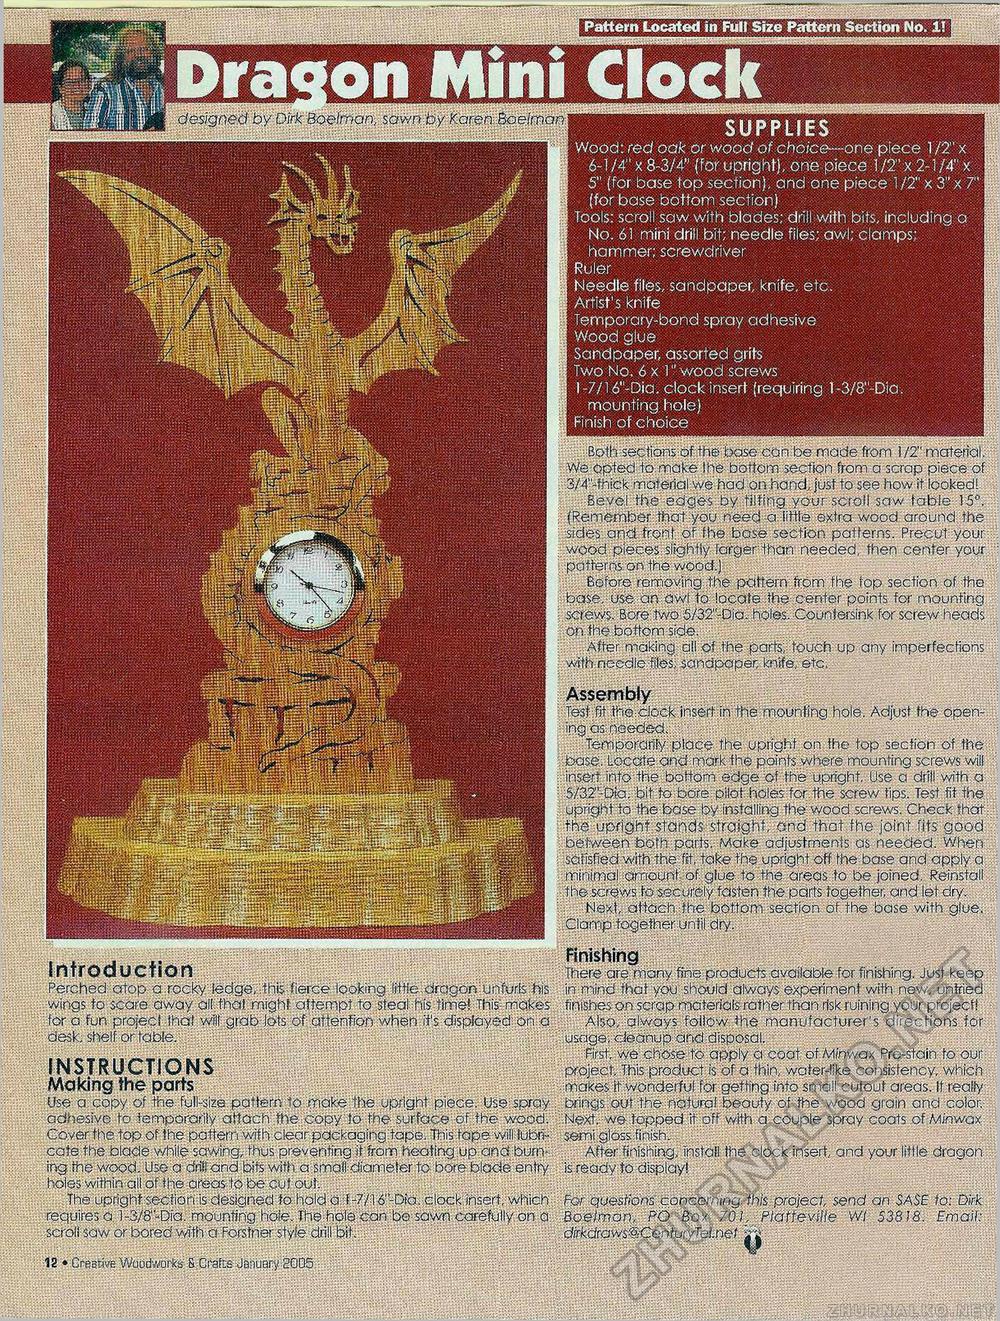
Pattern Located in Full Size Pattern Section No. 1! on Mini ClockSUPPLIES Wood: red oak or wood of.choice—one piece 1 j'T x 6-1 /4" x 8-3/4" (For upright), one piece 1/2" x 2-1/4" x 5" (for base top section), and one piece 1 /2" x 3" x 7 (for base bottom section) Tools: scroll.saw with blades'; drill with bits, including q No. 61 mini drill bit; needle files; awl; clamps; hammer; screwdriver Ruler Needle files, sandpaper, knife, etc. Artist's knife Temporary-bond spray adhesive Wood glue Sandpaper, assorted grits Two No. 6x1" wood screws I -7/16"-Dia. clock insert (requiring 1 -3/8"-Dia. mounting, hole) Finish of choice designed by Dirk Boelman, sawn by Karen Boelman Both sections of the base can be made from 1/2" material. We opted to make Ihe bottom section from a scrap piece of 3/4"-fhic'< material we had on hand, just to see how it looked! Bevel the edges by tilting your scroll saw table 15c'. (Remember that you need a little extra wood around the sides and front of fhe base section patterns. Precut your wood pieces slightly larger than needed, then center your patterns on the wood.} Before removing the pattern from fhe top section of the base, use an awl to locate the center points for mounting screws. Bore: two 5/32"-Dia. holes. Countersink for screw heads on the bottom side. After making all of the parts, touch up any imperfections with neodle-ffesi sandpaper, knife, etc. Assembly Test fit th© clock insert in the mounting hole. Adjust the opening as needed. Temporarily place the upright on the top section of Ihe base, Locate and mark fhe points where mounting screws will insert into the bottom edge of the upright. Use a drill with a 5/32"-Dia. bit to bore pilot holes for the screw tips. Test fit fhe upright to the base by installing the wood screws. Check that the upright stands straight, and that fhe joint fits good between both parts. Make adjustments as needed. When satisfied with the;fit, take the upright off the base and apply a minimal amount of glue to the areas to be joined. Reinstall the screws fo securely fasten the parts together, and let dry. Next, attach -the bottom section of the base with glue. Clamp together until dry. Finishing There are many fine products available for finishing. Just keep in mind that you should always experiment with new, untried finishes on scrap ma terials rather than risk ruining your project! Also, always follow the manufacturer's directions for usage. Cleanup arid disposal. First, we chose to apply a coat of Minwax Pre-stain to our project. This product is of a thin, water-like consistency, which makes it wonderful for getting into small cutout areas. It really brings out the natural beauty of the wood grain and color. Next.; we topped it off with a couple spray coats of Minwcx semi glossdinish. After finishing/install the clock insert, and your little dragon is ready to display! For questions concerning this project, send an $A$E to: Dirk Boelman, PQ Box 701, Platteville Wl 53818. Email: dirkdrows&CenturyTeLnet jra Introduction Perched atop a rocky ledge, ;this fierce looking little dragon unfurls his wings fo scare away all that might attempt to steal his time! This makes lor a fun project thai wilt grab lots of attention when it's displayed on a desk, shelf or table. INSTRUCTIONS Making the parts Use a copy of the full-size pattern 1o make the upright piece. Use spray adhesive fo temporarily attach the copy fo the surface of the wood. Cover the top of Ihe pattern with clear packaging tape. This tape yyf lubricate the blade while sawing, thus preventing it from heating up and burning the wood. Use a drill and bits with a smalt diameter to- bore blade entry holes within all of the areas to be cut out. , The upright section is designed fo hold 0 1-7/16"-Dia. clock insert, which requires a l-3/8"-Dia. mounting hole. The hole can be sawn carefully on a scroll saw or bored with a Forstner style drill bit: 12 • Creative Woudworfcs S Crafcs January 2005 |


