Creative Woodworks & crafts 2005-01, страница 64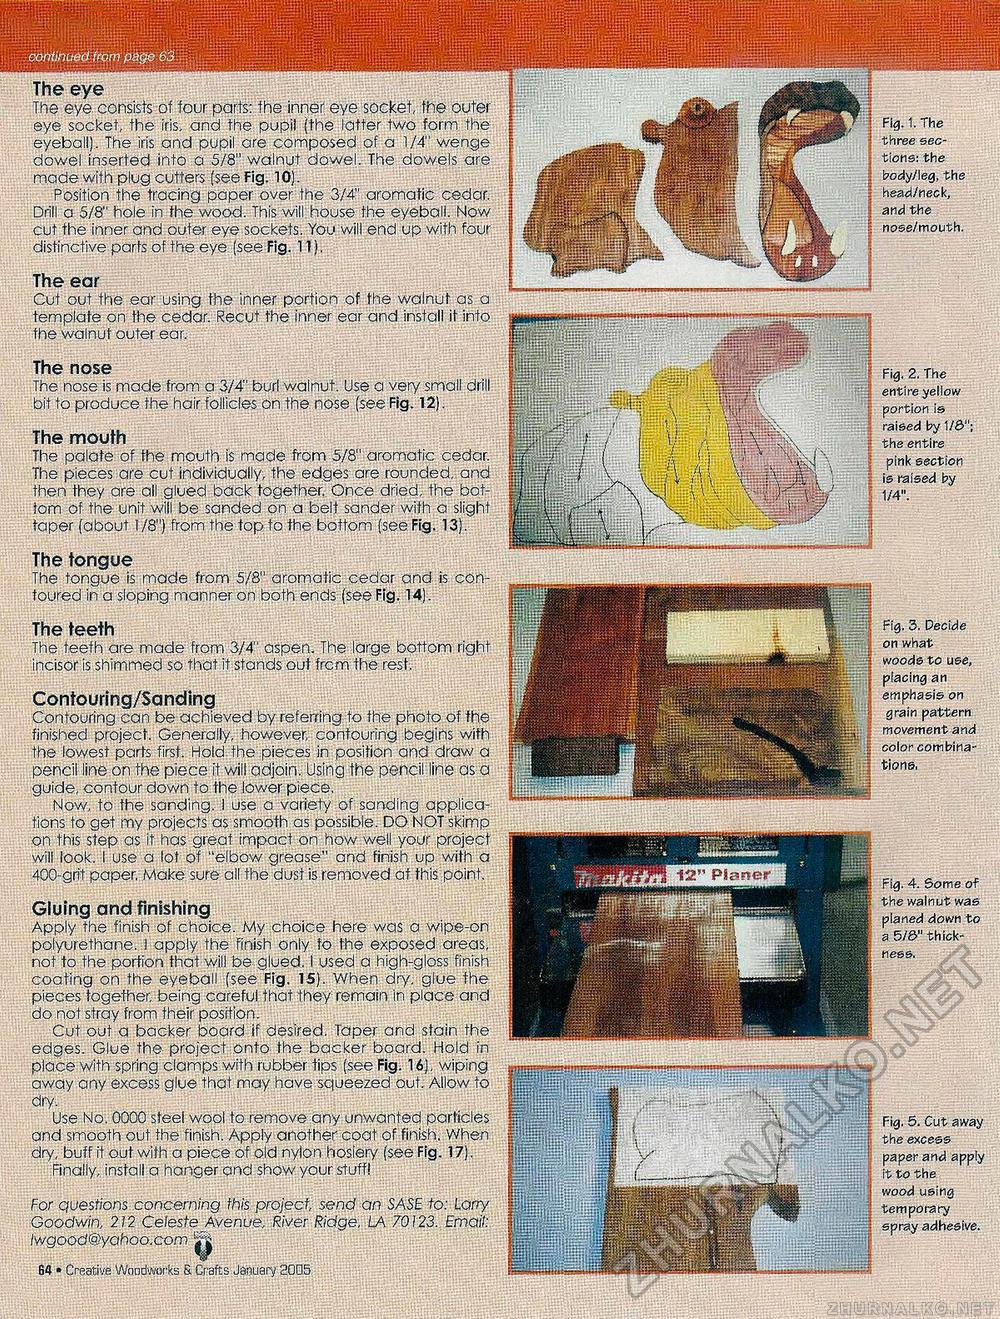
The eye The eye consists of four parts: the inner eye socket, fhe outer eye socket, fhe iris, and the pupii (the latter two form the eyeball). The iris and pupil are composed of a 1/4" wenge dowel inserted into a 5/8" walnut dowel. The dowels are made with plug cutters (see Fig. 10). Position the tracing paper over the 3/4" aromatic cedar. Drill a 5/8" hole in the wood. This will house the eyeball. Now cut the inner and outer eye sockets. You will end up with four distinctive parts of the eye (see Fig. 11). The ear Cut out the ear using the inner portion of the walnut as a template on the cedar. Recut the inner ear and install it into the walnut outer ear. 3 Fig. 1. The | three sec- ; tione: the | body/leg, the ; head/neck, | and the !; nose/mouth. The nose The nose is made from a 3/4" burl walnut. Use a very small drill bit to produce the hair follicles on the nose (see Fig. 12). The mouth The palate of the mouth is made from 5/8" aromatic cedar. The pieces are cut individually, the edges are rounded, and then they are all glued back together. Once dried, the bottom of the unit will be sanded on a belt sander with a slight taper (about 1/8") from the top to the bottom (see Fig. 13). The tongue The tongue is made from 5/8" aromatic cedar and is contoured in a sloping manner on both ends (see Fig. 14). The teeth The teeth are made from 3/4" aspen. The large bottom right incisor is shimmed so that it stands out frcm the rest. Contouring/Sanding Contouring can be achieved by referring to the photo of the finished project. Generally, however, contouring begins with the lowest parts first. Hold the pieces in position and draw a pencil line on the piece it will adjoin. Using the pencil line as a guide, contour down to the lower piece. Now, to the sanding. I use a variety of sanding applications to get my projects as smooth as possible. DO NOT skimp on this step as it has great impact on how well your project will look. I use a lot of "elbow grease" and finish up with a 400-grit paper. Make sure all the dust is removed at this point. Gluing and finishing Apply the finish of choice. My choice here was a wipe-on polyurethane. I apply the finish only fo the exposed areas, not to the portion that will be glued. I used a high-gloss finish coating on the eyeball (see Fig. 15). When dry, glue fhe pieces together, being careful that they remain In place and do not stray from their position. Cut out a backer board if desired. Taper and stain the edges. Glue the project onto the backer board. Hold in place with spring clamps with rubber tips (see Fig. 16), wiping away any excess glue that may have squeezed out. Allow to dry. Use No, 0000 steel wool to remove any unwanted particles and smooth out the finish. Apply another coat of finish. When dry, buff it out with a piece of old nylon hosiery (see Fig. 17). Finally, install a hanger and show your stuff! For questions concerning this project, send an SASE to: Larry Goodwin, 212 Celeste Avenue, River Ridge, LA 70123. Email: lwgood@yahoo.com ^ 84 • Creative Woodworks & Crafts January 2005 i1 Fig. 2. The !i entire yellow |i portion is : raised by 1/3' | the entire : pink section is raised by i 1/4". Fig. 3. Decide on what woods to use, placing an emphasis on grain pattern movement and color combinations. Fig. 4. Some of the walnut was planed down to a 5/3" thickness, Fig, 5. Cut away the excess paper and apply it to the wood using temporary spray adhesive. |


