Creative Woodworks & crafts 2005-04, страница 24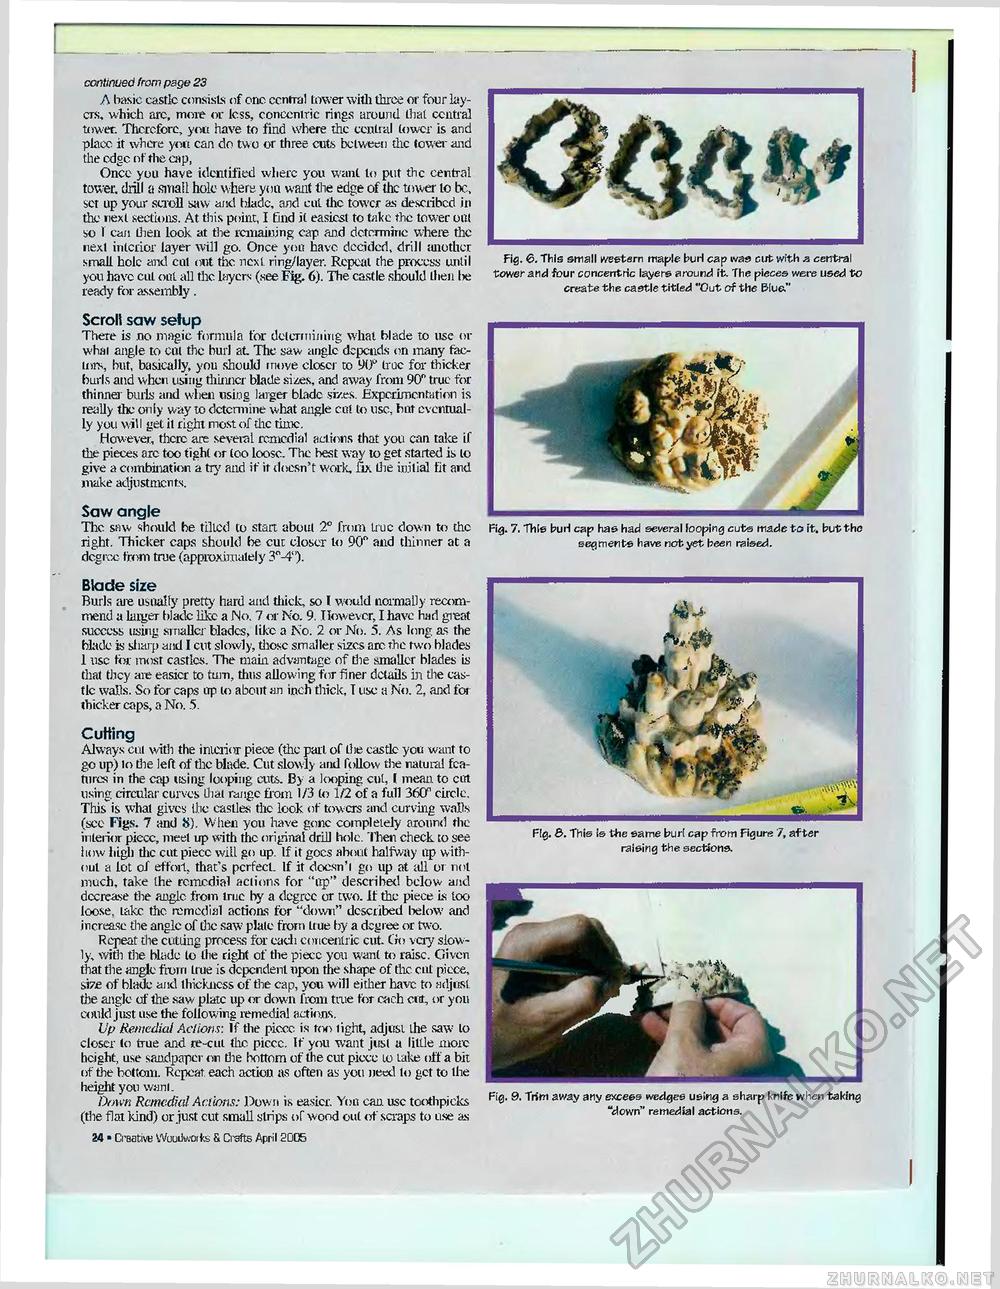
continued from page 23 A basic castlc consists of one central lower with three or four layers, which arc, more or less, concentric rings around dial central tower. Therefore, yon have to find where the central tower is and place it where yon can do two or three cuts between tlic tower and the edge of the cap, Once you have identified where you want to put the central tower, drill a small hole where yon want the edge of the tower to be., set up your scroll saw and blade, and cut the tower as described in the next sections. At this point, I find it easiest to take the tower out so 1 can then look at the remaining cap and determine where the next interior layer will go. Once yon have decided, drill smother small hole and cut out the next ring/layer. Repeat the process until you have cut out all the layers (see Fig. 6). The castle should then I*: ready tor assembly. Scroll saw sefup There is no magic formula for determining what blade to use or whai angle to cut the burl at The saw angle depends on many factors, hut, basically, you should move closer to 90° true for thicker burls and when using thinner blade sizes, and away from 90" true for thinner burls and when using larger blade sizes. Experimentation is really the only way to determine what angle cut to use, but eventually you will get it right most of die time. However, there are several remedial actions that you can take if the pieces arc too tight or too loose. The best way to get started is to give a combination a try and if it doesn't work, fix the initial fit and make adjustments. Saw angle The saw should be tilled to start aboul 2° from true down to the right. Thicker caps should be cur closer to 90" and thinner at a degree from true (approximately 3"-4"). Blade size Burls tire usually pretty hard and thick, so I would normally recommend a larger blade lite a No, 7 or No. 9. However, I have bad great success using smaller blades, like a No. 2 or No. 5. As long as the blade is sharp and I cut slowly, diosc smaller sizes arc the two blades 1 use for most castlcs. The main advantage of the smaller blades is that they are easier to turn, thus allowing for finer details in the castlc walls. So for caps up lo about an inch thick, I use a No. 2, and for thicker caps, a No. 5. Cutting Always cut with the interior piece (the pari of the castlc you want fo go up) lo the left of the blade. Cut slowly and follow the natural fca-ntres in the cap using looping aits. By a looping cut, I mean to cut using circular curves thai range from 1/3 lo 1/2 of a full 36CP circle. This is what gives the castles the look of towers and curving walls (see Figs. 7 and S). When you have gone completely around the interior piecc, meet up with the original drill hole. 'Ihen check to see how high the cut piecc will go up. If it goes about halfway up without a lot of effort, that's pcrfect. If it docsn'i go up at all or not much, take the remedial actions for "up" described below and decrease the angle from true by a degree or two. If the piece is too loose, lake the remedial actions for "down" described below and increase the angle of die saw plate from true by a degr ee or two. Repeat the cutung process for cadi concentric cut. Go very slowly, with the blade to llie right of the piecc you wanl to raise. Given that the angle from true is dependent upon the shape of the cut piece, size of blade and thickness of the cap, you will either have to adjust, the angle of the saw plate up or down from true tor cach cut, or yon could just use the following remedial actions. Up Remedial Actions'. If the piccc is too tight, adjust the saw lo closer lo true and re-cut the piccc. If you want just a little more height, use sandpaper on die bottom of the cut piecc to late off a bit of the bottom. Repeat each action as often as you need to get to the height you want. Down Remedial Actions: Dow n is easier. Yon can. use toothpicks (the flat kind) or just cut small strips of w ood out of scraps to use as 7*Tk Fig. 6. This small western maple burl cap was cut with a central tower and four concentric layers around it. The pieces were used to create the castle titled "Out of the Blue." Fig. 7. This burl cap has had several looping cuts made to it. but the segments have not yet been raised. WV^V Fig. &. This is the same burl cap from Figure 7, after raising the sections. Fig. 9. Trim away any excess wedges using a sharp knife when taking "down" remedial actions. 24 ■ Ci'BativB Wuuilworks S Crafts April 2005 |


