Creative Woodworks & crafts 2005-06, страница 76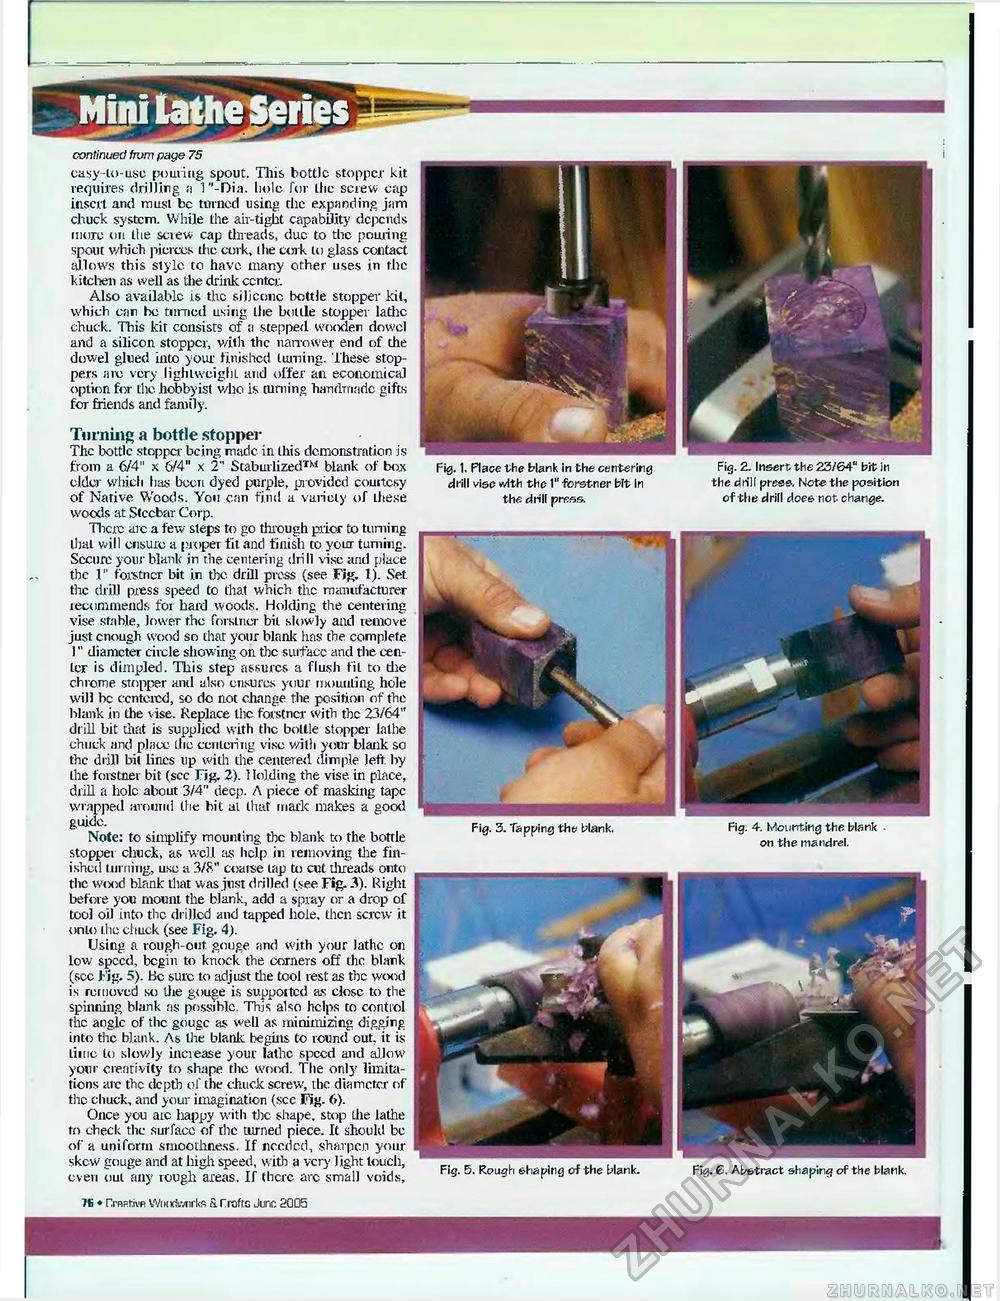
continued fmm page 75 easy-to-use pouring spout. Tins bottle stopper kit requires drilling a T'-Dia. bole for the screw cap insert and must be turned using the expanding jam chuck system. While the air-tight capability depends more on the screw cap threads, due to the pouring spout which pierces the cork, the cork to glass contact allows this style to have many other uses in the kitchen as well as the drink center. Also available i,s the silicone bottle stopper kit, which can he turned using the bottle stopper lathe chuck. This kit consists of a stepped wooden dowel and a silicon stopper, with the narrower end of the dowel glued into your finished turning. These stoppers are very lighlweighL and offer ail economical option for the hobbyist who is turning handmade gifts for friends and family. Turning a bottle stopper The bottle stopper being made in this demonstration is from a 6/4" x 6/4" x 2" Stabilized™ blank of box elder which litis been dyed purple, provided couitcsy of Native Woods. You can find a variety of these woods at Stccbar Corp. There arc a few steps to go through pior to turning thai will ensure a proper fit and finish to your turning. Secure your blank in the centering dri II vise and place the 1" forstner bit in the drill press (see Fir. 1). Set the drill press speed to that which the manufacturer recommends for hard woods. Holding the centering vise stable, lower the forstner bit slowly and remove just enough wood so that your blank has the complete !" diameter circle showing on the surface and the center is dimpled. This step assures a flush fit to die chrome stopper and also ensures your mounting hole will be centered, so do not change the position of the blank in the vise. Replace Ihe forstner with the 23/64" drill bit that is supplied with the bottle stopper lathe chuck and place the centering vise with your blank so the drill bit lines lip with the centered dimple left by Ihe forstner bit (see Fig. 2). 1 lolding the vise in place, drill a hole about 3/4" deep. A piece of masking tape wrapped around the bit at that mark makes a good guide- Note: to simplify mounting the blank to the bottle stopper chuck, as w ell as help in removing the finished turning, use a 3/8" coaise lap to cut threads onto the wood blank that was just drilled (see Fig. 3). Right before you mount the blank, add a spray or a drop of tool oil into the drilled and tapped hole, then screw it onto ihe chuck (see Fig. 4). Using a rough-out gouge and with your lathe on low speed, begin to knock the corners off the blank (sec Fig. 5). Be sure to adjust die tool rest as the wood is removed so the gouge is supported as close to the spinning blank as possible. This also helps to control the angle of the gouge as well as minimizing digging into the blank. As the blank begins to round out, it is time lo slowly increase your lathe speed and allow your creativity to shape the wood. The only limitations arc the depth of the chuck screw, the diameter of the chuck, and your imagination (see Fig. (>). Once you arc liappy with the shape, stop the lathe to check the surface of the turned piece. It should be of a uniform smoothness. If needed, sharpen your skew gouge and at high speed, with a very light touch, even oul any rough areas. If there arc small voids, Fig. I. Place the blank in the centering drill vise with the 1" forstner bit in the drill press. Fig. 2. Insert the 23/64" bit in the drill press. Note the position of the drill does not change. Fig. 3. Tapping the blank. Fig. 4. Mounting the blank on the mandrel. Fig. 5. Rough shaping of the blank. Fig. 0. Abstract shaping of the blank. 7S ♦ HrRRtivR WiitKiiviirks S. CroftG Jure. 2Q05 |


