Creative Woodworks & crafts 2005-08, страница 50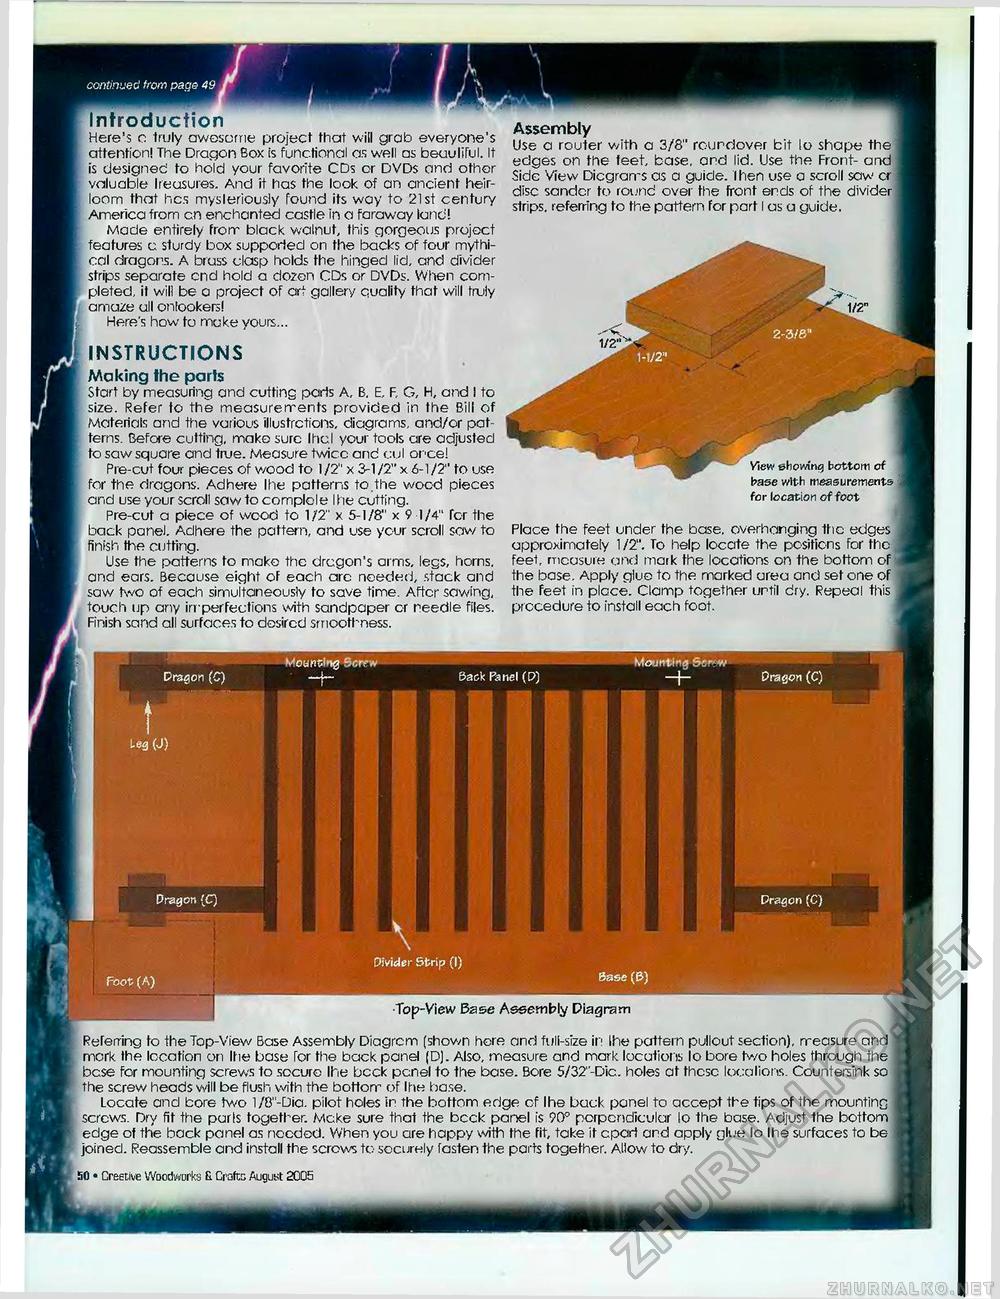
t continued from page 49 Introduction Here's c truly awesome project that will grab everyone's attention! The Dragon Box is functional as well as beuuliful. It is designed to hold your favorite CDs or DVDs and other voluable Ireusures. And it has the look of an ancient heirloom that hes mysleriously found its way to 21st century America from cn enchanted castle in a faraway land! Made entirely from black walnut, this gorgeous projoct features c sturdy box supported on the backs of four mythical dragons. A brass clasp holds the hinged lid, and divider strips separate end hold a dozen CDs or DVDs. When completed, it will be a project of art gallery quality that will truly amaze all onlookers! Here's how to make yours... INSTRUCTIONS Making the parts Start by measuring and cutting parts A, B. E, F, G, H, and I to size. Refer to the measurements provided in Ihe Bill of Materials and the various illustrations, diagrams, and/or patterns. Before cutting, make sure Ihcl your tools are adjusted to saw square and true. Measure twicc and cul once! Pre-cut four pieces of wood to 1/2" x 3-1/2" x 6-1/2" to use for the dragons. Adhere Ihe patterns to.the wood pieces and use your scroll saw to complole Ihe cutting. Pre-cut a piece of wood to 1/2" x 5-1/8" x 9 1/4" for the back panel. Adhere the pattern, and use ycur scroll saw to finish the cutting. Use the patterns to make the dragon's arms, legs, horns, and ears. Because eight of each arc needed, stack and saw two of each simultaneously to save time. After sawing, touch up any imperfections with sandpaper or needle files. Finish sand all surfaces to desired smoothness. Dragon (C) Mounting Scrrw Assembly Use a router with a 3/8" roundover bit lo shape the edges on the feet base, ard lid. Use the Front- and Side View Diagrams as a guide, then use a scroll saw cr disc sander to round over the front ends of the divider | strips, referring to the pattern for part I as a guide. 1/2" View eh owing bottom of base with measurements j for location of foot Place the feet under the base, overhanging the edges approximately 1 /2". To help locate the positions for the feet, measure ond mark the locations on the bottom of the base. Apply gluo to the marked area and set one of the feet in place. Clamp together until dry. Repeal this procedure to install each foot. Back Panel (P) Mounting Se""W Dragon (C) Dragon [C] Dragon (C) \ Divider Strip (I) Foot (A) Base(B) Top-View Base Assembly Diagram Referring to the Top-View Base Assembly Diagrcm (shown here and full-size in Ihe pattern pullout section), measure and mcrk the location on Ihe base Tor the back panel (D). Also, measure and mark locations lo bore two holes through the bese for mounting screws to socurc Ihe bcck pcnel to the base. Bore 5/32"-Dic. holes at these locations. Countersink so the screw heads will be flush with the bottom of I tie base. Locate and bore two l/0"-Dia. pilot holes in the bottom edge of Ihe buck panel to accept the tips of the mounting screws. Dry fit the parls together. Mcke sure that the bcck panel is 90° porpcndicular lo the base. Adjust the bottom edge of the back panel as needed. When you are happy with the fit, take it cpart and apply glue lo Ihe surfaces to be joined. Reassemble and install the scrows to socurely fasten the parts together. Allow to dry. 50 • Creetive Woodwurks & Crafts August 2005 |


