Creative Woodworks & crafts 2005-08, страница 52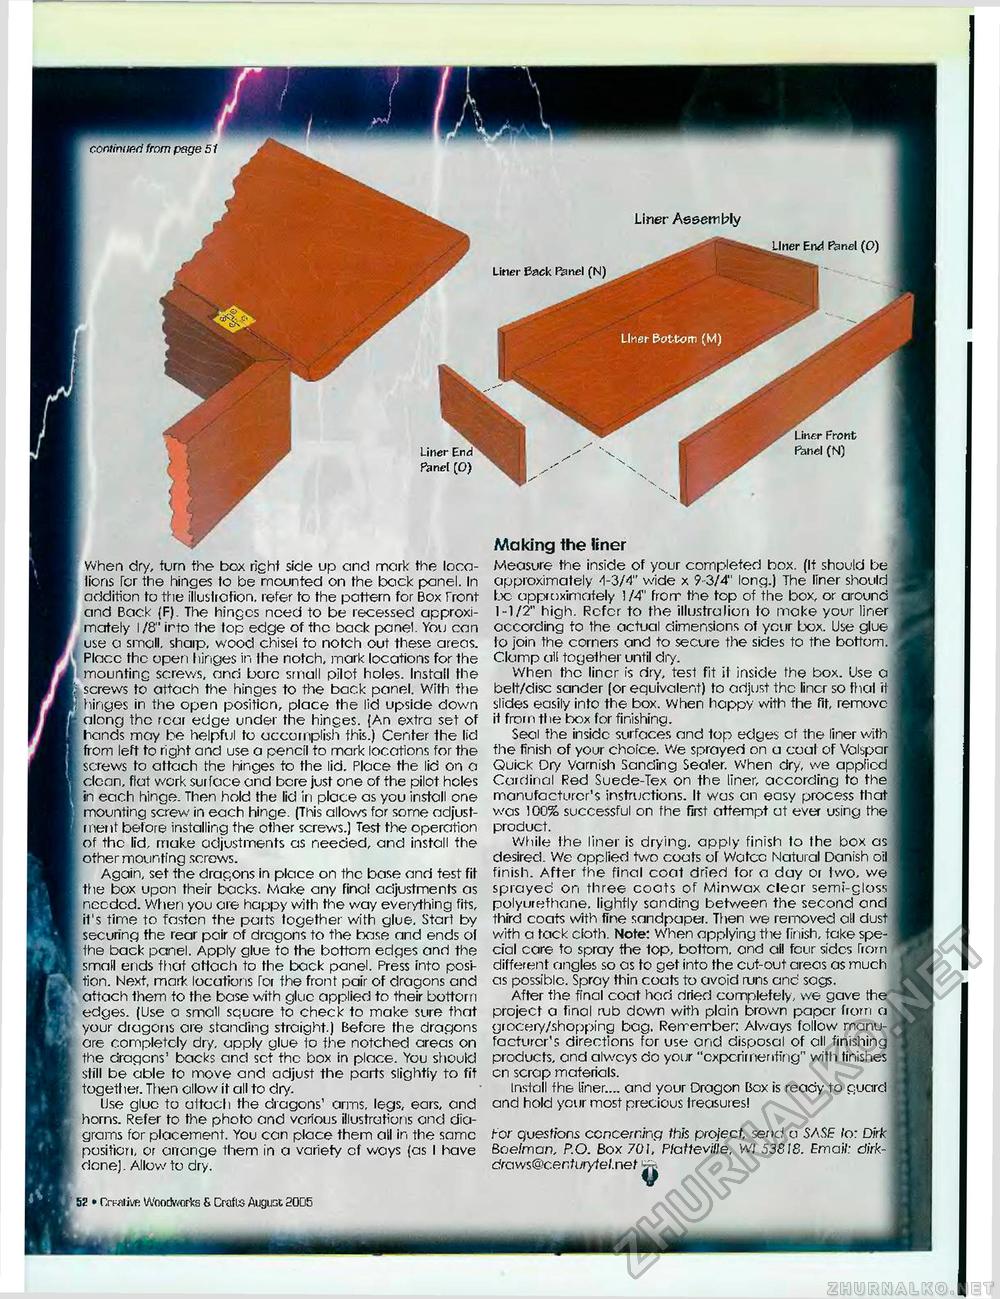
Liner Assembly Liner End Panel (0) Liner Back Ranel (N) Liner Bottom (M) When dry, turn the box right side up and mark the localions Icr the hinges to be mounted on the bock panel. In addition to ttie illustration, refer to the pattern for Box front and Back (F). The hinges need to be recessed approximately 1/8" irto the top edge of the back panel. You can use a small, shaip, wood chisel to notch out these areas. Place the open hinges in Ihe notch, mark locations for the | mounting screws, and bore small pilot holes. Install the screws to attach the hinges to the back panel. With the hinges in the open position, place the lid upside down along the rear edge under fhe hinges. (An extra set of hands may be helpful to accomplish this.) Center the lid from left to right and use a pencil to mark locations for the screws to attach the hinges to the lid. Place the lid on a clean, flat work surface and bore just one of the pilot holes in each hinge. Then hold the lid in place as you install one mounting screw in each hinge. (This allows for some adjustment before installing fhe other screws.) Test the operation of the lid, make adjustments as needed, and install fhe other mounting screws. Again, set the dragons in place on the base and test fit the box upon their backs. Make any final adjustments as needed. When you are happy with the way everything fits, it's time to fasten fhe parts together with glue. Start by securing fhe rear pair of dragons to the base and ends ot the back panel. Apply glue fo the bottom edges and the small ends that atfach to the back panel. Press into position. Next, mark locations Tor the front pair of dragons and attach them fo the base with glue applied to their bottom edges. (Use a small square to check to make sure that your dragons are standing straight.) Before the dragons are completely dry, apply glue to fhe notched areas on the dragons' backs and set the box in place. You should still be able to move and adjust the parts slightly to fit together. Then allow it all to dry. Use glue to attach the dragons' arms, legs, ears, and horns. Refer to the photo and various illustrations and diagrams for placement. You can place them all in the same position, or anange them in a variety of ways (as I have donej. Allow to dry. 52 • nrMilivR Woodworks 6 Crafts August 2005 Liner Front Ranel (N) Making ihe liner Measure the inside of your completed box. (It should be approximately -1-3/4" wide x 9-3/4" long.) The liner should be approximately 1/4" from the top of the box, or around 1-1/2" high. Refer to the illustralicri to make your liner according to the actual dimensions ot your box. Use glue to join the corners and to secure the sides to the bottom. Clamp all together until dry. When the liner is dry, test fit it inside the box. Use a belt/disc sander (or equivalent) to adjust the liner so thai it slides easily into the box. When happy with the fit, remove if from the box for finishing. Seal fhe inside surfaces and top edges cf the liner with flie finish of your choice. We sprayed on a coal of Vol spar Quick Dry Varnish Sanding Sealer. When dry, we appficd Cardinal Red Suede-Tex on the liner, according to the manufacturer's instructions. It was an easy process that was 100% successful on fhe first attempt at ever using the product. While ihe liner is drying, apply finish to the box as desired. We applied two coats or Watcc Natural Danish oil finish. After fhe final coat dried for a day or two, we sprayed on three coats of Minwax clear semi-glass polyurefhane. lightly sanding between the second and third coats with fine sandpaper. Then we removed all dust with a tack cloth. Note: When applying the finish, fake special care to spray fhe top, bottom, and all four sides from different angles so as fo get into the cut-out areas as much as possible. Spray thin coats to avoid runs anc sags. After fhe final coat had dried completely, we gave the project a tinal rub down with plain brown paper from a grocery/shopping bag. Remember: Always follow manufacturer's directions for use and disposal of all finishing products, and always do your "experimenting" with finishes cn scrap materials. Install fhe liner.... and your Dragon Bex is ready to guard and hold your most precious treasures! for questions concerning this project, send a SASE lo: Dirk Baelman, P.O. Box 701, Platteville, Wl 53818. Email: dirk-draws@centurytel.net |


