Creative Woodworks & crafts 2005-08, страница 51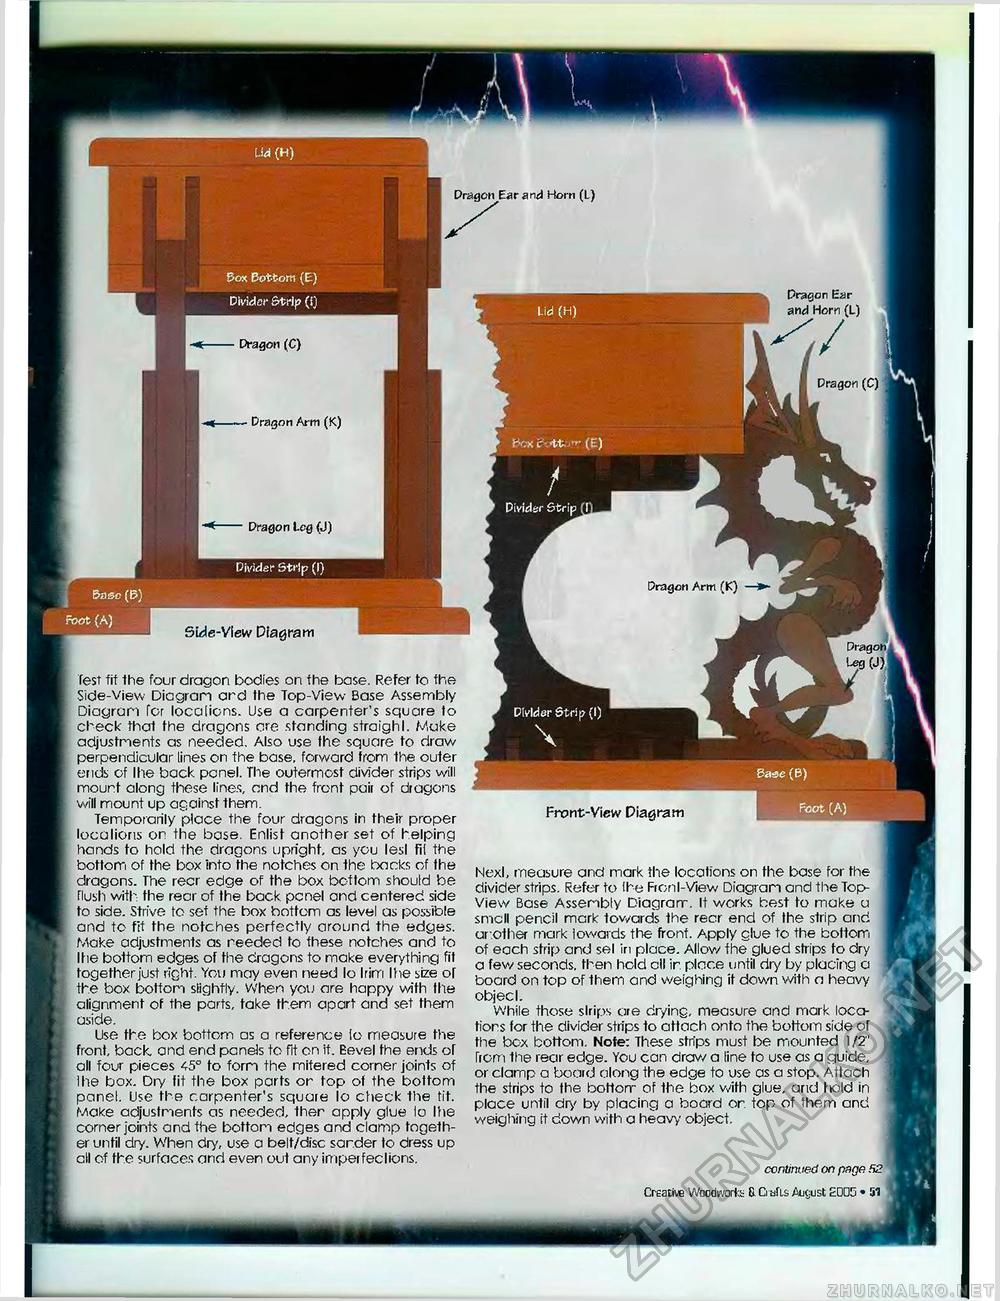
lid (H) Divider Strip (I) Base (E>) Foot {A) Pox Bottom (E) Divider Strip (ij Dragon Ear and Horn (L) Dragon (C) ■ Dragon Arm (K) Dragon Leg (J) Test fit the four dragon bodies on fhe base. Refer to the Side-View Diagran ard the Top-View Base Assembly Diagram for localions. Use a carpenter's square to check that the dragons ore standing straighl. Make adjustments as needed. Also use the square to draw perpendicular lines on fhe base, forward from the outer ends of Ihe back panel. The outermost divider strips will mount along these lines, end the front pair of dragons will mount up against them. Temporarily place the four dragons in their proper localions on the base. Enlist another set of helping hands to hold the dragons upright, as you lesl fit the bottom of the box into fhe notches an Ihe backs of the dragons. The recr edge of the box bottom should be flush with the recr of the back pcnel and centered side to side. Strive to set the box bottom as level as possible and to fit the notches perfectly around the edges. Make adjustments as reeded to these notches and to Ihe bottom edges of the dragons to make everything fit together just right. You may even need lo Irim Ihe size of the box bottom slightly. When you are happy with fhe alignment of the parts, take them apart and set them aside. Use the box bottom as a reference io measure the front, back, and end panels to fit an if. Bevel the ends or all four pieces <5° to forn the rnitered corner joints of Ihe box. Dry fit the box parts or top ot the bottom panel. Use the carpenter's square lo check the tit. Make adjustments as needed, ther apply glue lo Ihe corner joints and fhe bottom edges and clamp together until dry. When dry, use a belt/disc sarder to dress up ell of the surfaces and even out any imperfeclions. Front-View Diagram Nexl, measure and mark the locations on fhe base for the divider strips. Refer to Ihe Fronl-View Diagram and the Top-View Base Assembly Diagram. It works best to make a smell pencil mark towards the recr end of the strip and or other mark lowards the front. Apply glue to the bottom of each strip and sel iri place. Allow fhe glued strips to dry a few seconds, then hold ell ir. place until dry by placing a board on top of them and weighing if down with n heavy objecl. While those slrips are rir/inc, measure and mark locations for the divider strips to attach onto the bottom side or the box bottom. Note: These strips must be mounted 1/2" From the rear edge. You can draw a line to use as a guide, or clamp a board along the edge to use as a stop. Attach the strips to fhe bottom of the box with glue, and tiold in place until dry by placing a board or top of them and weighing it down with a heavy object. continued on page: 82 CrEatiVG Woodworks & Crafts .adjust £005 « 51 |


