Creative Woodworks & crafts 2005-08, страница 75
SUPPLIES Wocd: wood of choice* sized to fit bill of materials Tools: scroll sow; drill press wilh very small drill bit for starter holes: table saw or similar saw; planer for proper wood thickness; belt sender or hcnd-held sandet; assorted clamps Temporary-bond sproy adhesive Sondpoper, assorted grits X-Acto™ knite and/or needle pick Wood glue Oil finish Micro-Mini 15/16" clock insert*" used contrasting wood for fhe floor and crown pieces. **Available from Klockit, &00-556-2548, www.Wccfc'f.com I
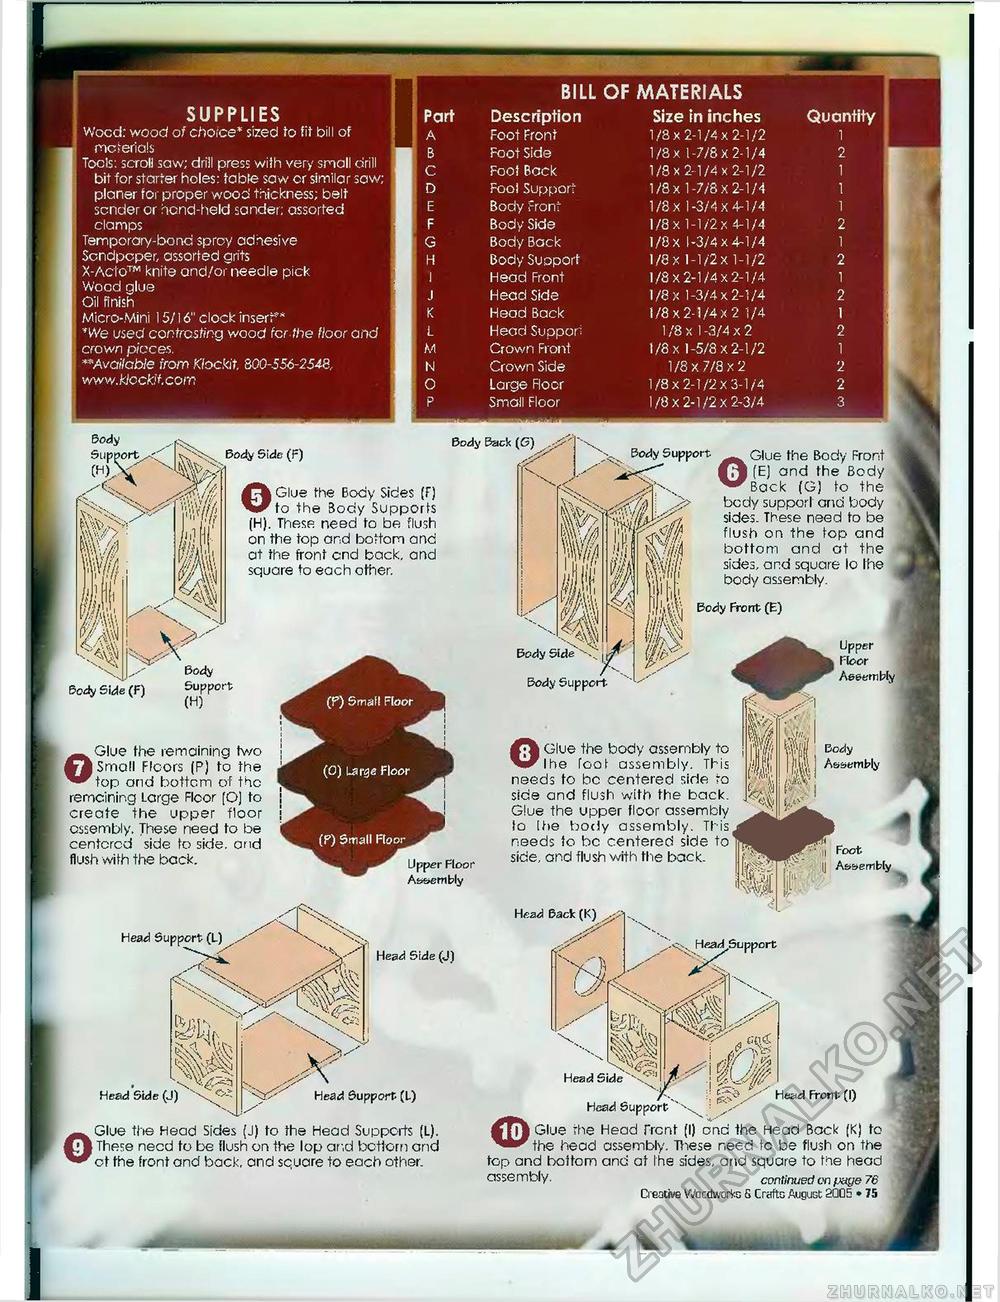
Back (G) Back (G) Body Support Glue the Body Front (EJ and the Body Back (G) to the bedy support and body sides. These need to be flush on the top and bottom and at the sides, and square lo Ihe body assembly. Body Front (E) Bedy Side Body Support OGlue the body assembly to Ihe foot assembly. This needs to be centered side ro sice and flush with fhe back. Glue the upper floor assembly to Ihe body assembly. This needs to bo centered side to sice, and flush with the back- Head Back(K) Upper Floor Assembly Body Assembly Foot Assembly Head Support Head Side Head Support If Glue the Head Trent (I) Head Front (I) and the Head Back (K) to ' the head assembly. These need tc be flush on the top and boltom and at Ihe sides, and square to the head assembly. continued on /jaye 76 Creative Wocdworte 5 CraftG August 2QQ5 » 75 Glue the Head Sides (J) to the Head Supports (L). } These need to be flush on the lop and bottom and ot the front and back, and square to each other. Body Side (F) Body Support (H) OGlue the remaining two Small Floors (PJ to the top arid bottom of the remcining Large Floor (O) to create the upper floor ossembly. These need to be centered side to side, and flush with the back. Head Head Side (J Head Support (I) Body Side (F) OGlue the Body Sides (f) to the Body Supports (H). These need to be flush on the top and bottom and at the front end back, and square to each other. Upper Floor Assembly |
||||||||||||||||||||||||||||||||||||||||||||||||||||||||||||||||||||||||


