Creative Woodworks & crafts 2005-08, страница 74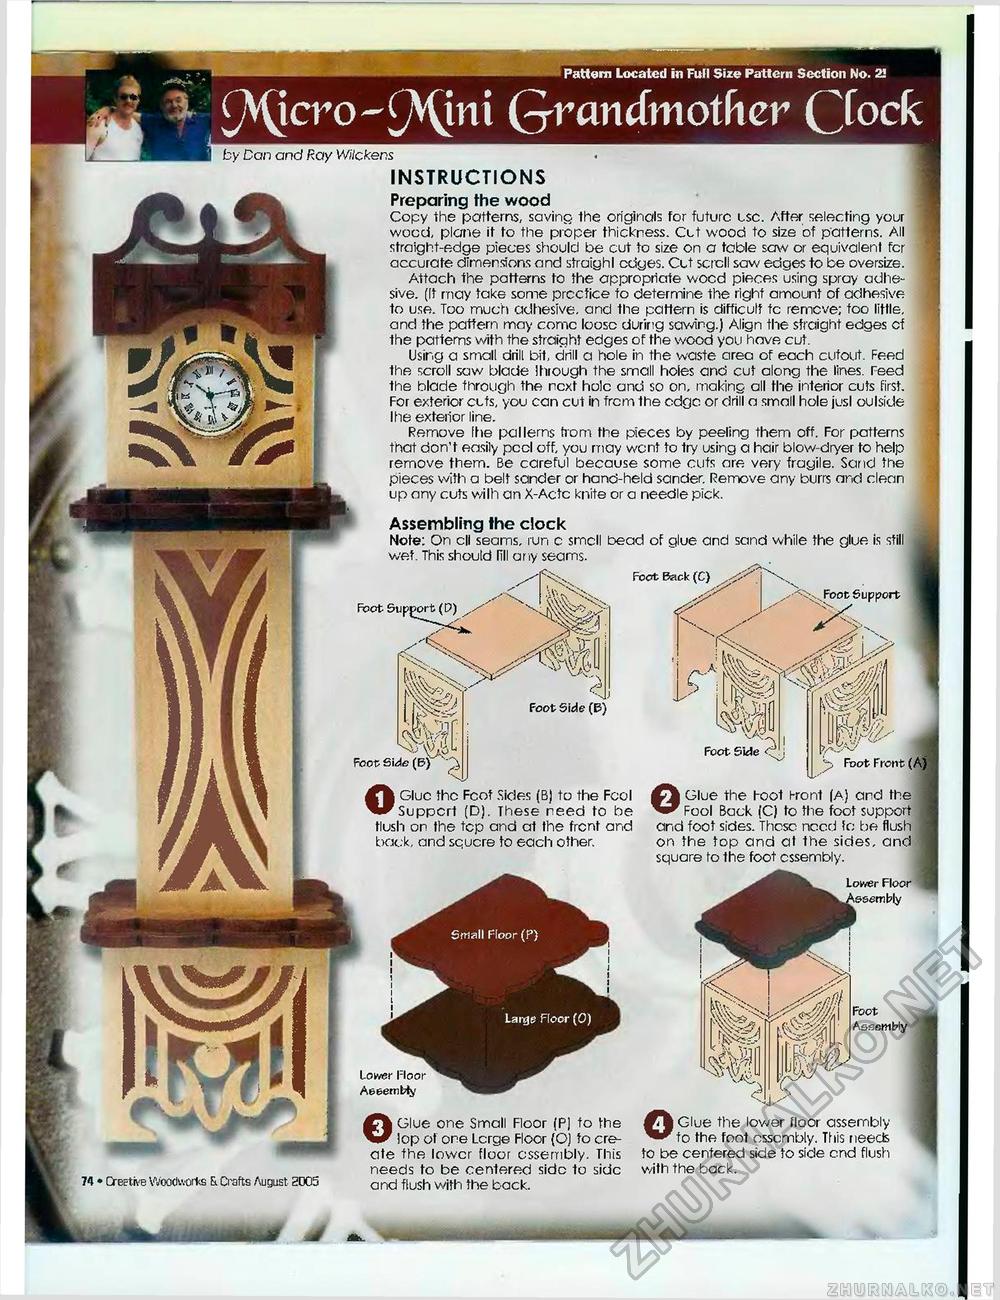
Preparing the wood Copy the patterns, saving 1he originals for future use. After selecting your wood, plane it to the proper thickness. Cut wood to size of patterns. All straight-edge pieces should be cut to size on a table saw or equivalent for accurate dimensions and straight edges. Cut scroll saw edges to be oversize. Attach the patterns to the appropriate wocd pieces using spray adhesive. (It may take some prcctice to determine the right amount of adhesive to use. Too much adhesive, and the pattern is difficult tc remove; too little, and the pattern moy come loose during sawing.) Align the straight edges cf the patterns with the straight edges of the wood you have cut. Using a small drill bit, drill a hole in the waste area of each cutout. Feed the scroll saw blade Ihrough the small holes and cut along the lines. Feed the blade through the next hole and so on, making all the interior cuts first. For exterior cuts, you can cut in from the edge or drill a small hole jusl oulside Ihe exteiior line. Remove fhe pallerns hom the pieces by peeling them off. For patterns that don't easily peel off, you may went to 1ry using a hair blow-dryer to help remove them. Be careful because some cuts are very fragile. Sand the pieces with a belt sander or hand-held sander. Remove any burrs and clean up any cuts wilh an X-Actc knite or a needle pick. Assembling fhe clock Note: On ell seams, run c smell bead of glue and sand while the glue is still wet. This should lill any seams. Foot Back (C) Foot Side (B) Foot Side (B) OGluc the Fcot Sides (B) to the Fcol Support (D). These need to be flush on the top and at the front and back, and squcre to each other. Foot Support X JS^lf mm. Foot Side Foot Front (A) OGlue the foot i-ront (A.) and the Fool Back (C) to the foot support and foot sides. These need fo be flush on the top and at the sides, and square to the foot cssembly. Lower Floor issembly Loivsr Floor AeeemWy OGlue one Small Floor (Pj to fhe lop of one Lcrge Floor (O) to create the lower floor cssembly. This needs to be centered side to side and flush with the back. Foot Assembly OGlue the lower floor assembly to the foot assembly. This needs to be centered side to side end flush with the back. |


