Creative Woodworks & crafts 2009-04, страница 32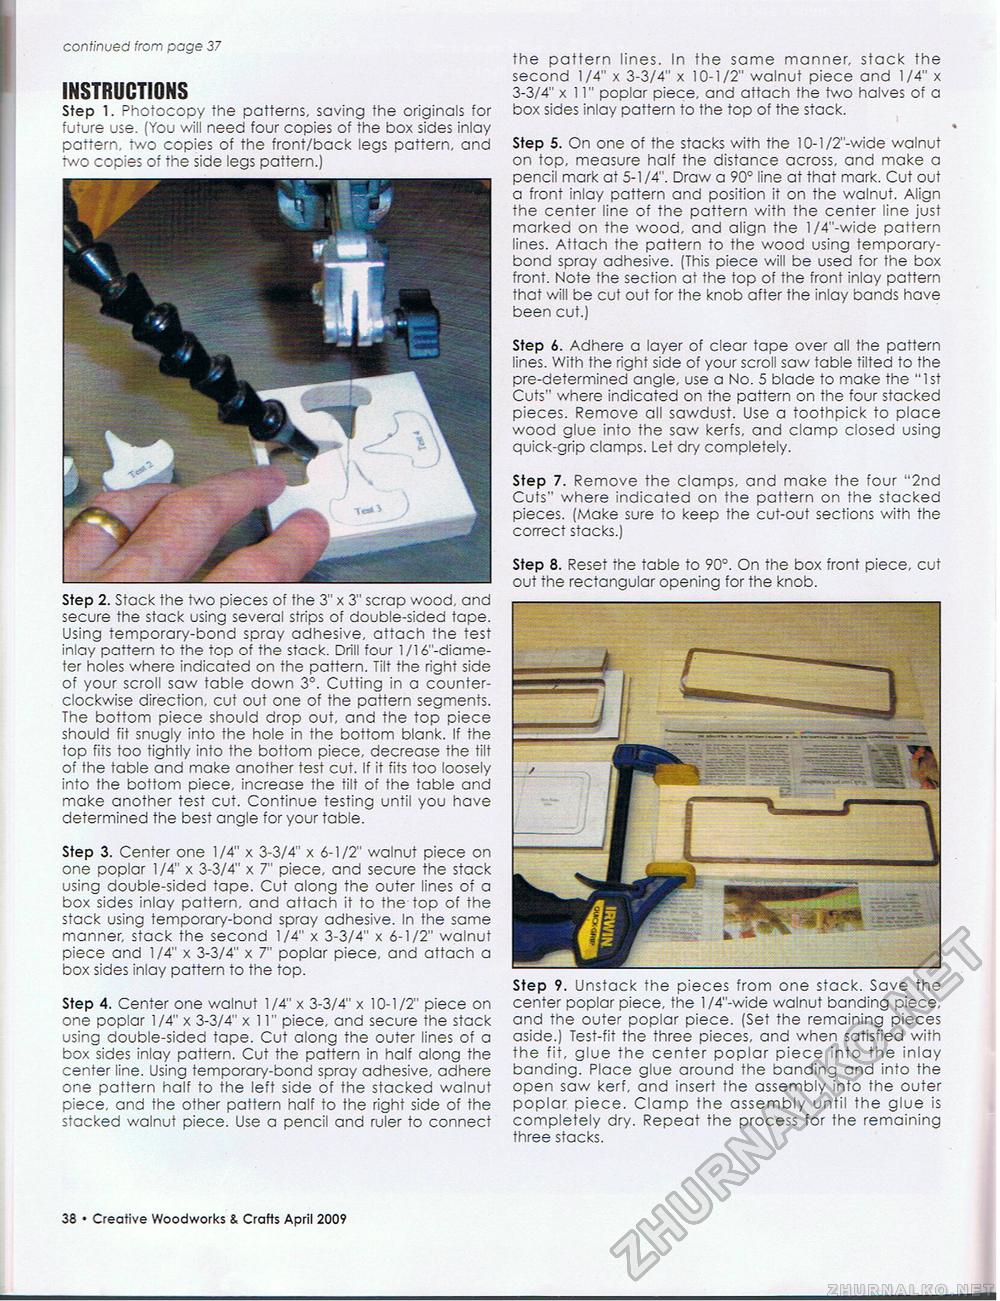
continued from page 38 INSTRUCTIONS Step 1. Photocopy the patterns, saving the originals for future use. (You will need four copies of the box sides inlay pattern, two copies of the front/back legs pattern, and two copies of the side legs pattern.) Step 2. Stack the two pieces of the 3" x 3" scrap wood, and secure the stack using several strips of double-sided tape. Using temporary-bond spray adhesive, attach the test inlay pattern to the top of the stack. Drill four l/16"-diame-ter holes where indicated on the pattern. Tilt the right side of your scroll saw table down 3°. Cutting in a counterclockwise direction, cut out one of the pattern segments. The bottom piece should drop out, and the top piece should fit snugly into the hole in the bottom blank. If the top fits too tightly into the bottom piece, decrease the tilt of the table and make another test cut. If it fits too loosely into the bottom piece, increase the tilt of the table and make another test cut. Continue testing until you have determined the best angle for your table. Step 3. Center one 1/4" x 3-3/4" x 6-1/2" walnut piece on one poplar 1/4" x 3-3/4" x 7" piece, and secure the stack using double-sided tape. Cut along the outer lines of a box sides inlay pattern, and attach it to the top of the stack using temporary-bond spray adhesive. In the same manner, stack the second 1/4" x 3-3/4" x 6-1/2" walnut piece and 1/4" x 3-3/4" x 7" poplar piece, and attach a box sides inlay pattern to the top. Step 4. Center one walnut 1/4" x 3-3/4" x 10-1/2" piece on one poplar 1/4" x 3-3/4" x 11" piece, and secure the stack using double-sided tape. Cut along the outer lines of a box sides inlay pattern. Cut the pattern in half along the center line. Using temporary-bond spray adhesive, adhere one pattern half to the left side of the stacked walnut piece, and the other pattern half to the right side of the stacked walnut piece. Use a pencil and ruler to connect the pattern lines. In the same manner, stack the second 1/4" x 3-3/4" x 10-1/2" walnut piece and 1/4" x 3-3/4" x 11" poplar piece, and attach the two halves of a box sides inlay pattern to the top of the stack. Step 5. On one of the stacks with the 10-l/2"-wide walnut on top, measure half the distance across, and make a pencil mark at 5-1/4". Draw a 90° line at that mark. Cut out a front inlay pattern and position it on the walnut. Align the center line of the pattern with the center line just marked on the wood, and align the l/4"-wide pattern lines. Attach the pattern to the wood using temporary-bond spray adhesive. (This piece will be used for the box front. Note the section at the top of the front inlay pattern that will be cut out for the knob after the inlay bands have been cut.) Step 6. Adhere a layer of clear tape over all the pattern lines. With the right side of your scroll saw table tilted to the pre-determined angle, use a No. 5 blade to make the "1st Cuts" where indicated on the pattern on the four stacked pieces. Remove all sawdust. Use a toothpick to place wood glue into the saw kerfs, and clamp closed using quick-grip clamps. Let dry completely. Step 7. Remove the clamps, and make the four "2nd Cuts" where indicated on the pattern on the stacked pieces. (Make sure to keep the cut-out sections with the correct stacks.) Step 8. Reset the table to 90°. On the box front piece, cut out the rectangular opening for the knob. Step 9. Unstack the pieces from one stack. Save the center poplar piece, the 1/4"-wide walnut banding piece, and the outer poplar piece. (Set the remaining pieces aside.) Test-fit the three pieces, and when satisfied with the fit, glue the center poplar piece into the inlay banding. Place glue around the banding and into the open saw kerf, and insert the assembly into the outer poplar piece. Clamp the assembly until the glue is completely dry. Repeat the process for the remaining three stacks. 78 • Creative Woodworks & Crafts April 2009 |


