Creative Woodworks & crafts 2009-04, страница 46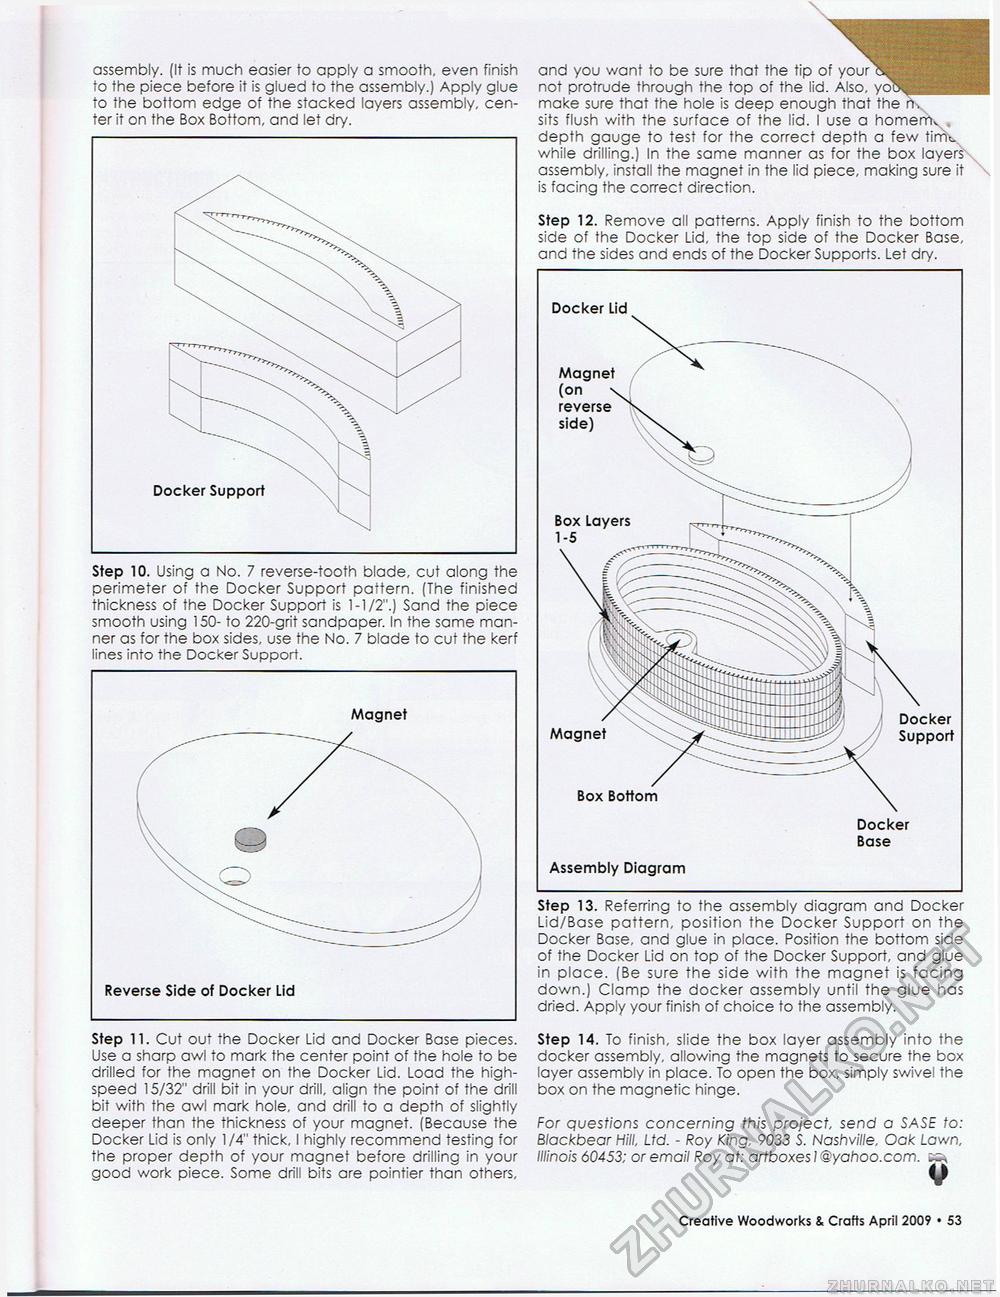
assembly. (It is much easier to apply a smooth, even finish to the piece before it is glued to the assembly.) Apply glue to the bottom edge of the stacked layers assembly, center it on the Box Bottom, and let dry. Step 10. Using a No. 7 reverse-tooth blade, cut along the perimeter of the Docker Support pattern. (The finished thickness of the Docker Support is 1-1/2".) Sand the piece smooth using 150- to 220-grit sandpaper. In the same manner as for the box sides, use the No. 7 blade to cut the kerf lines into the Docker Support. Step 11. Cut out the Docker Lid and Docker Base pieces. Use a sharp awl to mark the center point of the hole to be drilled for the magnet on the Docker Lid. Load the highspeed 15/32" drill bit in your drill, align the point of the drill bit with the awl mark hole, and drill to a depth of slightly deeper than the thickness of your magnet. (Because the Docker Lid is only 1/4" thick, I highly recommend testing for the proper depth of your magnet before drilling in your good work piece. Some drill bits are pointier than others, and you want to be sure that the tip of your not protrude through the top of the lid. Also, make sure that the hole is deep enough that the rk sits flush with the surface of the lid. I use a homerriv depth gauge to test for the correct depth a few tirrk while drilling.) in the same manner as for the box layers assembly, install the magnet in the lid piece, making sure it is facing the correct direction. Step 12. Remove all patterns. Apply finish to the bottom side of the Docker Lid, the top side of the Docker Base, and the sides and ends of the Docker Supports. Let dry. Step 13. Referring to the assembly diagram and Docker Lid/Base pattern, position the Docker Support on the Docker Base, and glue in place. Position the bottom side of the Docker Lid on top of the Docker Support, and glue in place. (Be sure the side with the magnet is facing down.) Clamp the docker assembly until the glue has dried. Apply your finish of choice to the assembly. Step 14. To finish, slide the box layer assembly into the docker assembly, allowing the magnets to secure the box layer assembly in place. To open the box, simply swivel the box on the magnetic hinge. For questions concerning this project, send a SASE to: Blackbear Hill, Ltd. - Roy King, 9033 S. Nashville, Oak Lawn, Illinois 60453: or ema/7 Roy at: artboxes 1 @yahoo.com. Box Layers 1-5 Docker Lid Magnet (on reverse Magnet Docker Support Box Bottom Assembly Diagram Docker Base Creative Woodworks & Crafts April 2009 • 11 |


