Popular Woodworking 2000-02 № 113, страница 11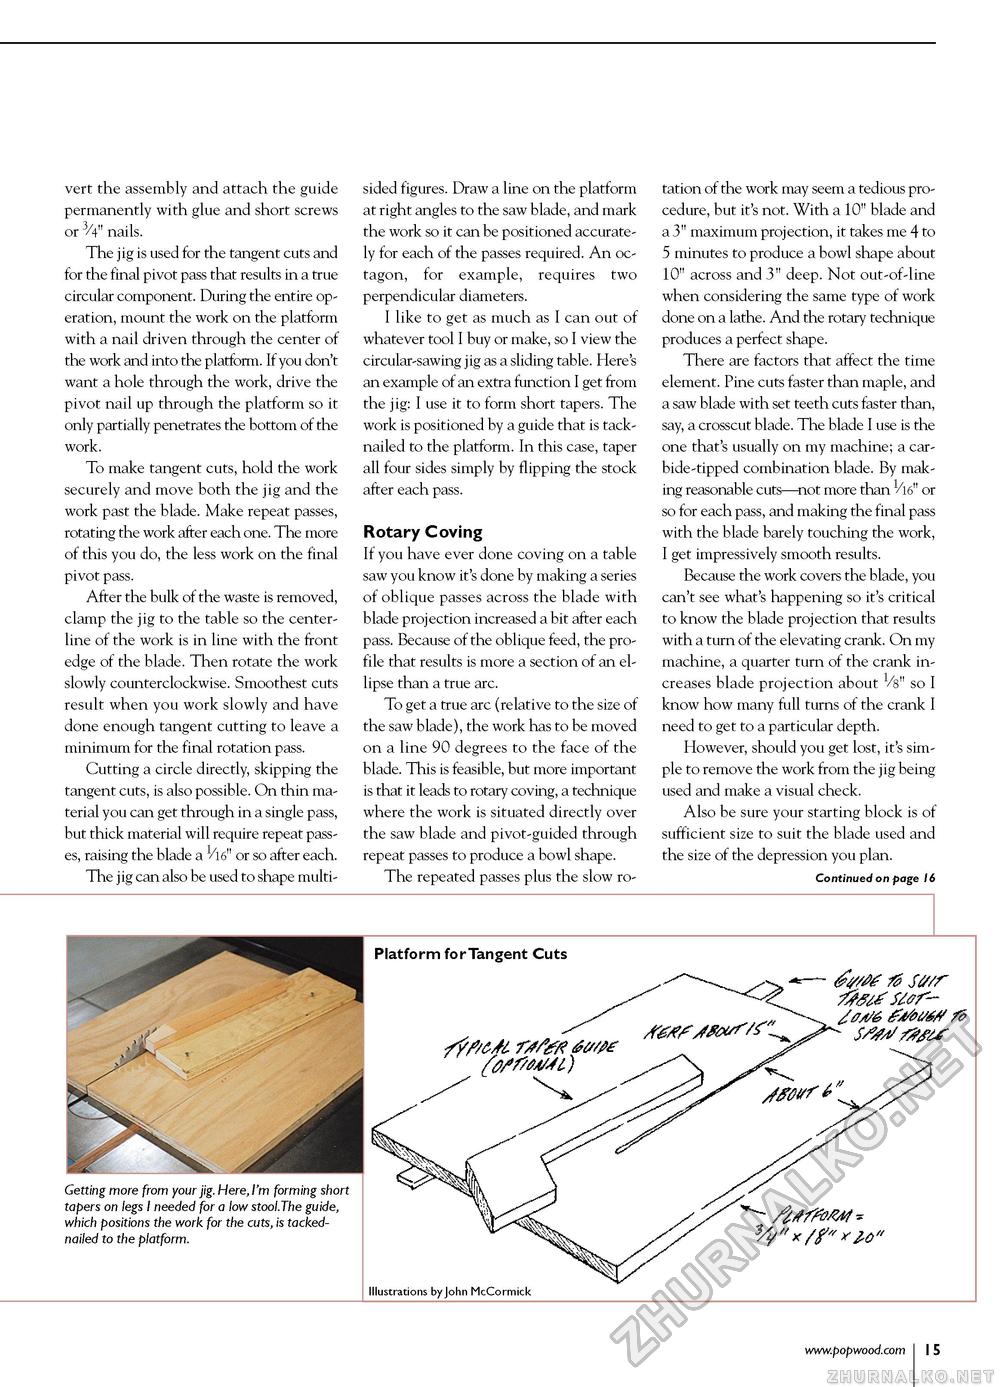
vert the assembly and attach the guide permanently with glue and short screws or 3/4" nails. The jig is used for the tangent cuts and for the final pivot pass that results in a true circular component. During the entire operation, mount the work on the platform with a nail driven through the center of the work and into the platform. If you don't want a hole through the work, drive the pivot nail up through the platform so it only partially penetrates the bottom of the work. To make tangent cuts, hold the work securely and move both the jig and the work past the blade. Make repeat passes, rotating the work after each one. The more of this you do, the less work on the final pivot pass. After the bulk of the waste is removed, clamp the jig to the table so the center-line of the work is in line with the front edge of the blade. Then rotate the work slowly counterclockwise. Smoothest cuts result when you work slowly and have done enough tangent cutting to leave a minimum for the final rotation pass. Cutting a circle directly, skipping the tangent cuts, is also possible. On thin material you can get through in a single pass, but thick material will require repeat passes, raising the blade a 1/16" or so after each. The jig can also be used to shape multi- sided figures. Draw a line on the platform at right angles to the saw blade, and mark the work so it can be positioned accurately for each of the passes required. An octagon, for example, requires two perpendicular diameters. I like to get as much as I can out of whatever tool I buy or make, so I view the circular-sawing jig as a sliding table. Here's an example of an extra function I get from the jig: I use it to form short tapers. The work is positioned by a guide that is tack-nailed to the platform. In this case, taper all four sides simply by flipping the stock after each pass. Rotary Coving If you have ever done coving on a table saw you know it's done by making a series of oblique passes across the blade with blade projection increased a bit after each pass. Because of the oblique feed, the profile that results is more a section of an ellipse than a true arc. To get a true arc (relative to the size of the saw blade), the work has to be moved on a line 90 degrees to the face of the blade. This is feasible, but more important is that it leads to rotary coving, a technique where the work is situated directly over the saw blade and pivot-guided through repeat passes to produce a bowl shape. The repeated passes plus the slow ro tation of the work may seem a tedious procedure, but it's not. With a 10" blade and a 3" maximum projection, it takes me 4 to 5 minutes to produce a bowl shape about 10" across and 3" deep. Not out-of-line when considering the same type of work done on a lathe. And the rotary technique produces a perfect shape. There are factors that affect the time element. Pine cuts faster than maple, and a saw blade with set teeth cuts faster than, say, a crosscut blade. The blade I use is the one that's usually on my machine; a carbide-tipped combination blade. By making reasonable cuts—not more than 1/l6" or so for each pass, and making the final pass with the blade barely touching the work, I get impressively smooth results. Because the work covers the blade, you can't see what's happening so it's critical to know the blade projection that results with a turn of the elevating crank. On my machine, a quarter turn of the crank increases blade projection about Vs" so I know how many full turns of the crank I need to get to a particular depth. However, should you get lost, it's simple to remove the work from the jig being used and make a visual check. Also be sure your starting block is of sufficient size to suit the blade used and the size of the depression you plan. Continued on page 16 Platform for Tangent Cuts Getting more from your jig. Here, I'm forming short tapers on legs I needed for a low stool.The guide, which positions the work for the cuts, is tacked-nailed to the platform. Illustrations by John McCormick |


