Popular Woodworking 2000-04 № 114, страница 21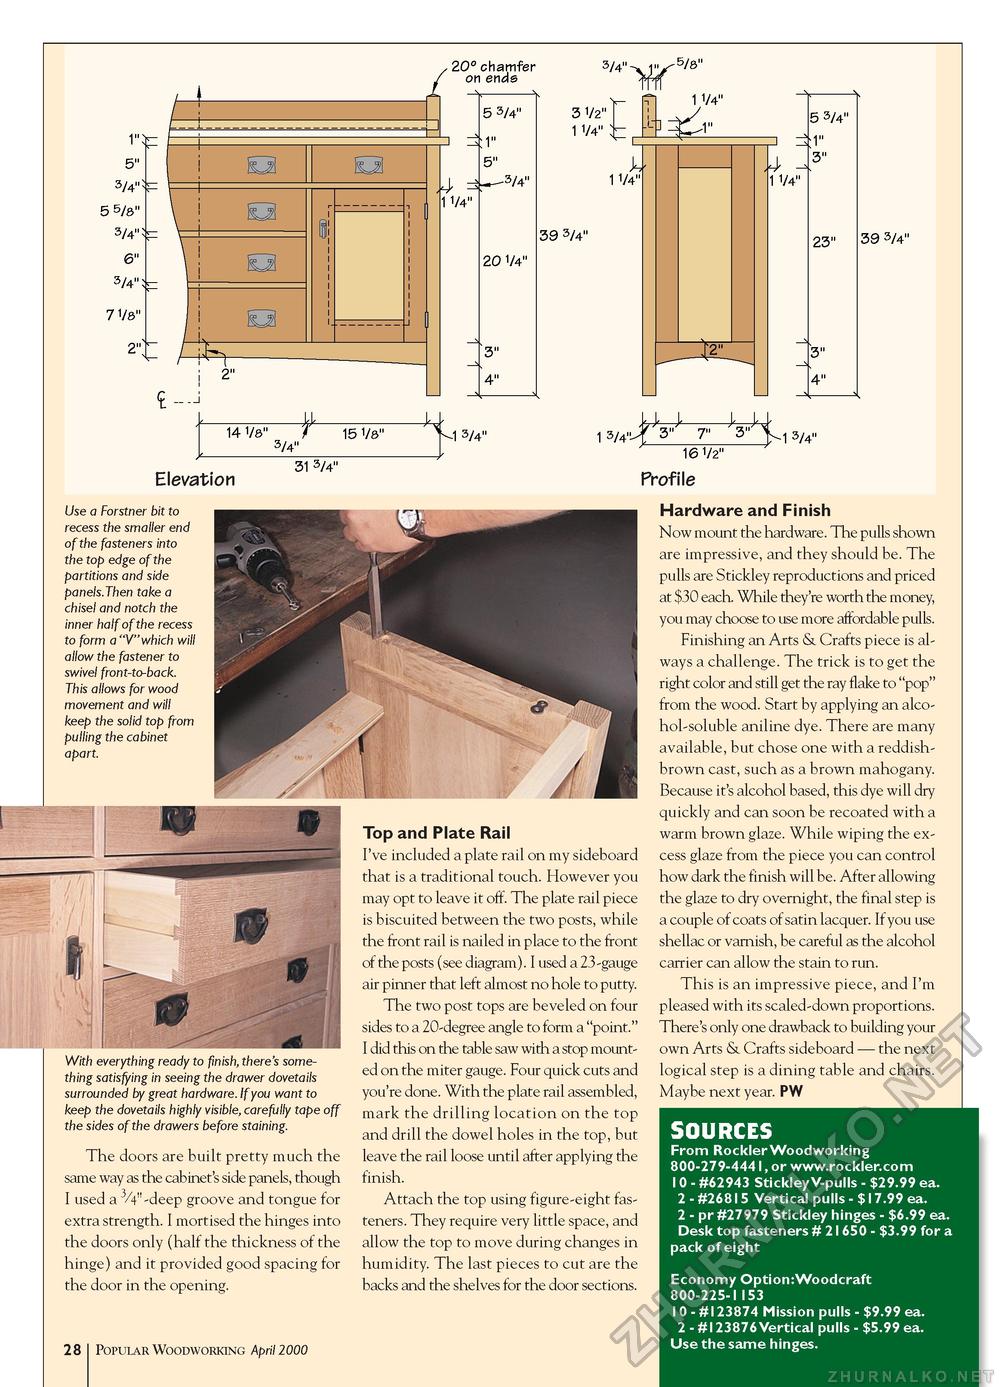
14 1/8" 7 3/4" 15 1/8" ^v.1 3/4" 1 3/4" ^V V j 1 3/4" Elevation 31 3/4" 16 1/2" Profile Use a Forstner bit to recess the smaller end of the fasteners into the top edge of the partitions and side panels.Then take a chisel and notch the inner half of the recess to form a "V"which will allow the fastener to swivel front-to-back. This allows for wood movement and will keep the solid top from pulling the cabinet apart. With everything ready to finish, there's something satisfying in seeing the drawer dovetails surrounded by great hardware. If you want to keep the dovetails highly visible, carefully tape off the sides of the drawers before staining. The doors are built pretty much the same way as the cabinet's side panels, though I used a 3/4"-deep groove and tongue for extra strength. I mortised the hinges into the doors only (half the thickness of the hinge) and it provided good spacing for the door in the opening. Top and Plate Rail I've included a plate rail on my sideboard that is a traditional touch. However you may opt to leave it off. The plate rail piece is biscuited between the two posts, while the front rail is nailed in place to the front of the posts (see diagram). I used a 23-gauge air pinner that left almost no hole to putty. The two post tops are beveled on four sides to a 20-degree angle to form a "point." I did this on the table saw with a stop mounted on the miter gauge. Four quick cuts and you're done. With the plate rail assembled, mark the drilling location on the top and drill the dowel holes in the top, but leave the rail loose until after applying the finish. Attach the top using figure-eight fasteners. They require very little space, and allow the top to move during changes in humidity. The last pieces to cut are the backs and the shelves for the door sections. 12 Popular Woodworking April 2000 Hardware and Finish Now mount the hardware. The pulls shown are impressive, and they should be. The pulls are Stickley reproductions and priced at $30 each. While they're worth the money, you may choose to use more affordable pulls. Finishing an Arts & Crafts piece is always a challenge. The trick is to get the right color and still get the ray flake to "pop" from the wood. Start by applying an alcohol-soluble aniline dye. There are many available, but chose one with a reddish-brown cast, such as a brown mahogany. Because it's alcohol based, this dye will dry quickly and can soon be recoated with a warm brown glaze. While wiping the excess glaze from the piece you can control how dark the finish will be. After allowing the glaze to dry overnight, the final step is a couple of coats of satin lacquer. If you use shellac or varnish, be careful as the alcohol carrier can allow the stain to run. This is an impressive piece, and I'm pleased with its scaled-down proportions. There's only one drawback to building your own Arts & Crafts sideboard — the next logical step is a dining table and chairs. Maybe next year. PW SOURCES From Rockler Woodworking 800-279-444I, or www.rockler.com I0 - #62943 Stickley V-pulls - $29.99 ea. 2 - #26815 Vertical pulls - $17.99 ea. 2 - pr #27979 Stickley hinges - $6.99 ea. Desk top fasteners # 2I650 - $3.99 for a pack of eight Economy Option:Woodcraft 800-225-II53 I0 - #I23874 Mission pulls - $9.99 ea. 2 - #I23876 Vertical pulls - $5.99 ea. Use the same hinges. |


