Popular Woodworking 2000-04 № 114, страница 39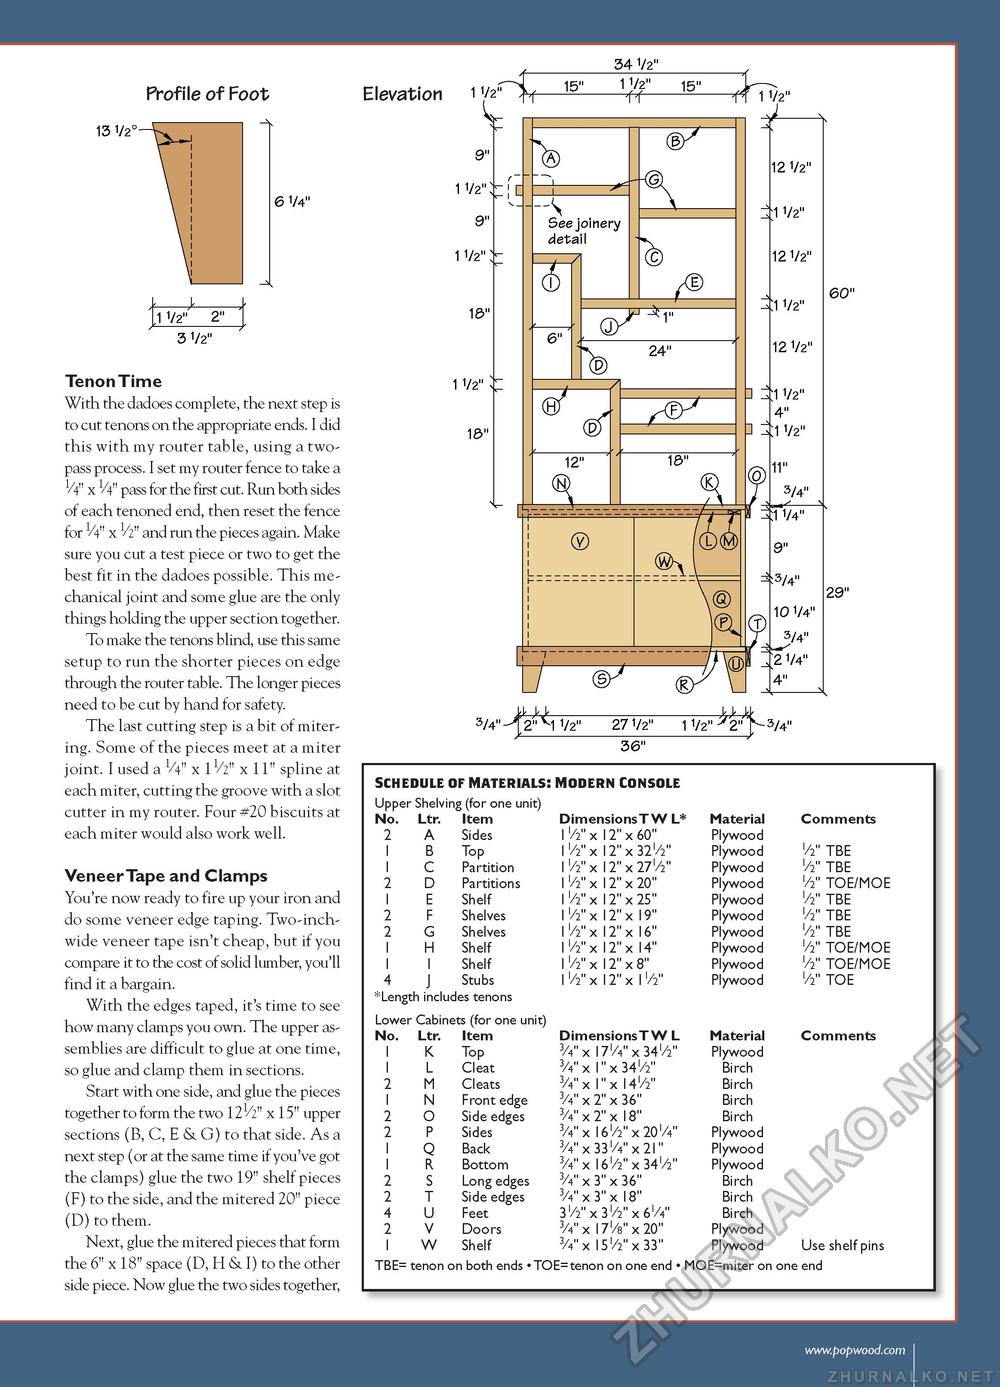
Profile of Foot 34 1/2" Elevation 11/2" ^—15-^-— 2" 13 1/2< 6 1/4" 'l 1/2^ 2" { 3 1/2" Tenon Time With the dadoes complete, the next step is to cut tenons on the appropriate ends. I did this with my router table, using a two-pass process. I set my router fence to take a 1/4" x 1/4" pass for the first cut. Run both sides of each tenoned end, then reset the fence for 1/4" x 1/2" and run the pieces again. Make sure you cut a test piece or two to get the best fit in the dadoes possible. This mechanical joint and some glue are the only things holding the upper section together. To make the tenons blind, use this same setup to run the shorter pieces on edge through the router table. The longer pieces need to be cut by hand for safety. The last cutting step is a bit of miter-ing. Some of the pieces meet at a miter joint. I used a V4" x 1V2" x 11" spline at each miter, cutting the groove with a slot cutter in my router. Four #20 biscuits at each miter would also work well. Veneer Tape and Clamps You're now ready to fire up your iron and do some veneer edge taping. Two-inch-wide veneer tape isn't cheap, but if you compare it to the cost of solid lumber, you'll find it a bargain. With the edges taped, it's time to see how many clamps you own. The upper assemblies are difficult to glue at one time, so glue and clamp them in sections. Start with one side, and glue the pieces together to form the two 121/2" x 15" upper sections (B, C, E & G) to that side. As a next step (or at the same time if you've got the clamps) glue the two 19" shelf pieces (F) to the side, and the mitered 20" piece (D) to them. Next, glue the mitered pieces that form the 6" x 18" space (D, H & I) to the other side piece. Now glue the two sides together, u B- >i_>> 3/4" 2 1 1/2" 27 1/2" 1 1/2" y'2^- 3/4" u B- >i_>> 3/4" 2 1 1/2" 27 1/2" 1 1/2" y'2^- 3/4"
|
||||||||||||||||||||||||||||||||||||||||||||||||||||||||||||||||||||||||||||||||||||||||||||||||||||||||||||||||||||||||||||||||||||||||||||||||||||||||||||||||||||||||||||||||||||||||||||||||||||||||||||||||||||||||||||||||||||||||||||||||||||||||||||||||||||||||||||||


