Popular Woodworking 2000-10 № 117, страница 33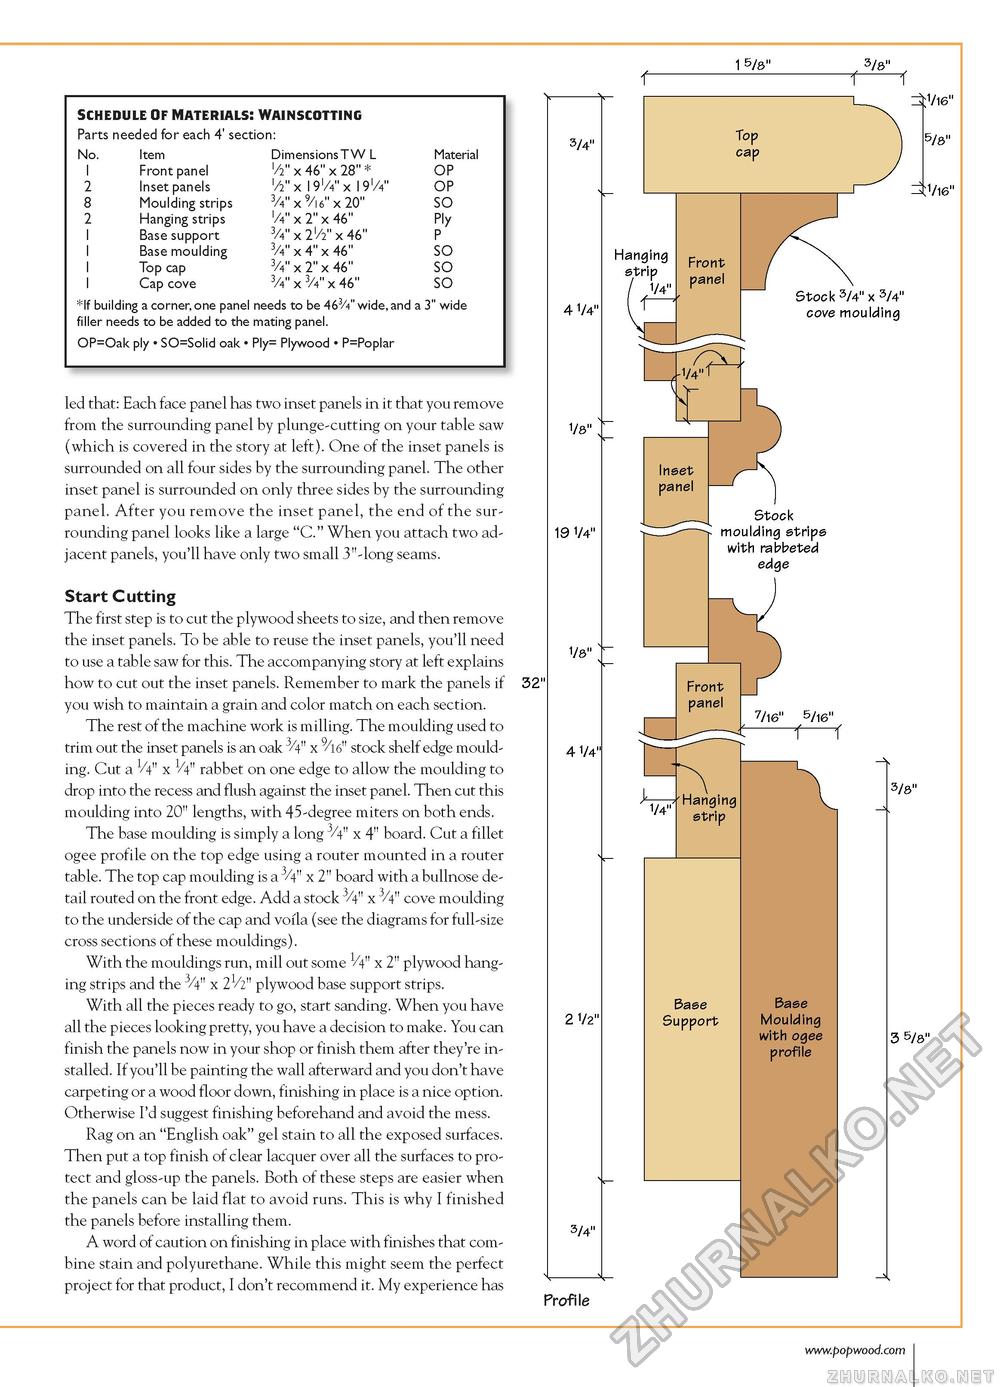
SCHEDULE OF MATERIALS! WAINSCOTTINC Parts needed for each 4' section:
*If building a corner, one panel needs to be 463/4" wide, and a 3" wide filler needs to be added to the mating panel. *If building a corner, one panel needs to be 463/4" wide, and a 3" wide filler needs to be added to the mating panel. OP=Oak ply • SO=Solid oak • Ply= Plywood • P=Poplar led that: Each face panel has two inset panels in it that you remove from the surrounding panel by plunge-cutting on your table saw (which is covered in the story at left). One of the inset panels is surrounded on all four sides by the surrounding panel. The other inset panel is surrounded on only three sides by the surrounding panel. After you remove the inset panel, the end of the surrounding panel looks like a large "C." When you attach two adjacent panels, you'll have only two small 3"-long seams. Start Cutting The first step is to cut the plywood sheets to size, and then remove the inset panels. To be able to reuse the inset panels, you'll need to use a table saw for this. The accompanying story at left explains how to cut out the inset panels. Remember to mark the panels if you wish to maintain a grain and color match on each section. The rest of the machine work is milling. The moulding used to trim out the inset panels is an oak 3/4" x stock shelf edge moulding. Cut a 1/4" x 1/4" rabbet on one edge to allow the moulding to drop into the recess and flush against the inset panel. Then cut this moulding into 20" lengths, with 45-degree miters on both ends. The base moulding is simply a long 3/4" x 4" board. Cut a fillet ogee profile on the top edge using a router mounted in a router table. The top cap moulding is a 3/4" x 2" board with a bullnose detail routed on the front edge. Add a stock 3/4" x 3/4" cove moulding to the underside of the cap and vofla (see the diagrams for full-size cross sections of these mouldings). With the mouldings run, mill out some 1/4" x 2" plywood hanging strips and the 3/4" x 21/2" plywood base support strips. With all the pieces ready to go, start sanding. When you have all the pieces looking pretty, you have a decision to make. You can finish the panels now in your shop or finish them after they're installed. If you'll be painting the wall afterward and you don't have carpeting or a wood floor down, finishing in place is a nice option. Otherwise I'd suggest finishing beforehand and avoid the mess. Rag on an "English oak" gel stain to all the exposed surfaces. Then put a top finish of clear lacquer over all the surfaces to protect and gloss-up the panels. Both of these steps are easier when the panels can be laid flat to avoid runs. This is why I finished the panels before installing them. A word of caution on finishing in place with finishes that combine stain and polyurethane. While this might seem the perfect project for that product, I don't recommend it. My experience has 1 5/8" 3/8" f-T-f |


