Popular Woodworking 2000-10 № 117, страница 54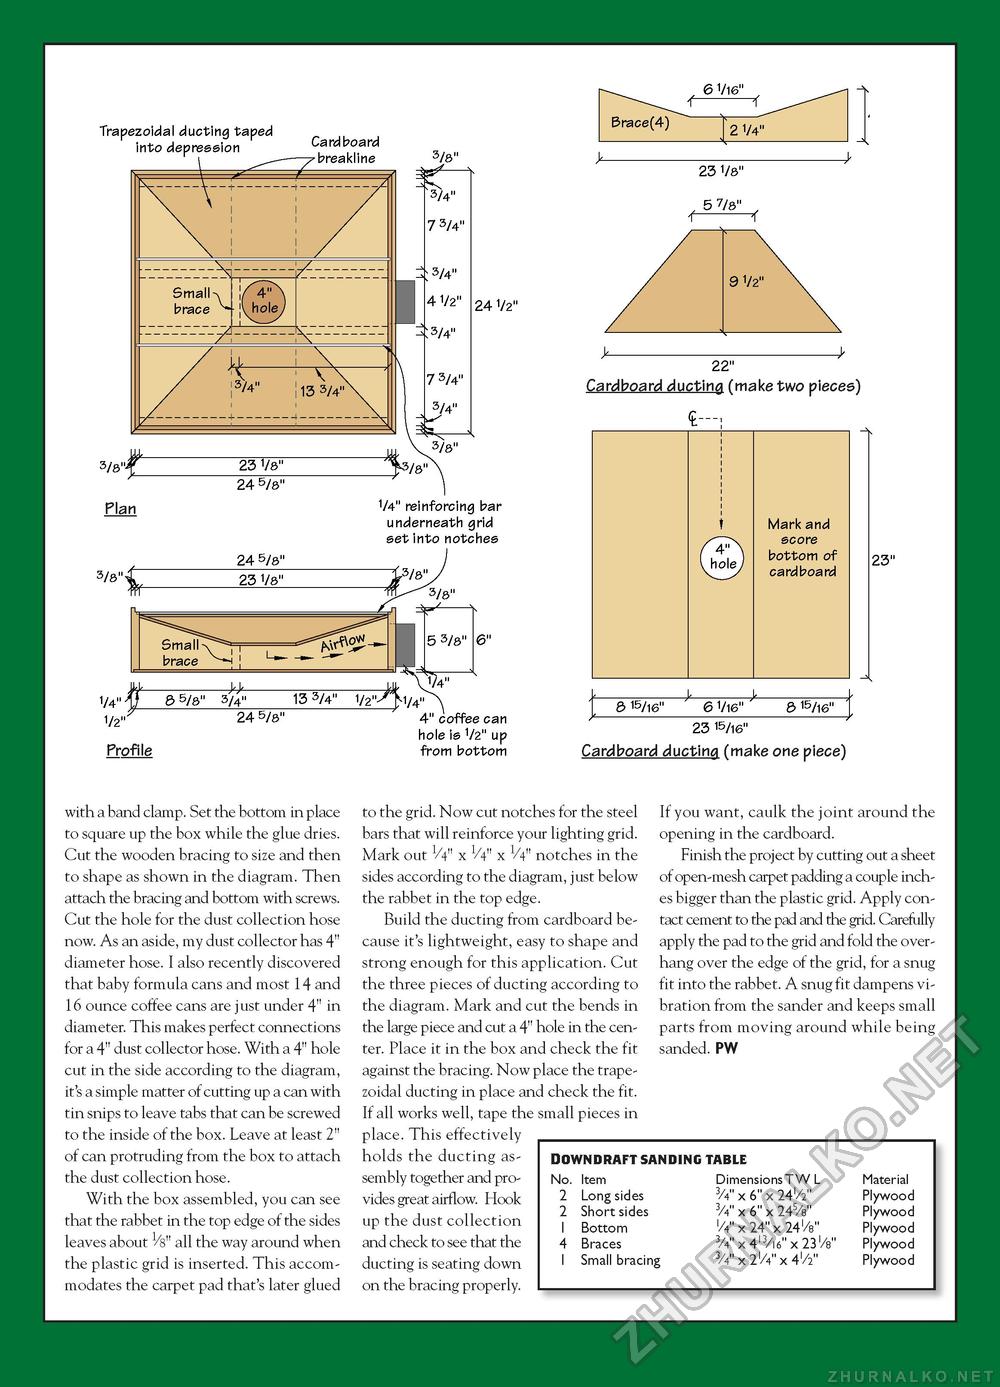
6 1/16" Trapezoidal ducting taped into depression Cardboard Cardboard
23 1/8" 3/8"- 23 1/8" Plan 3/8" 24 5/8" 24 5/8" 3/8" ^_ 3/4" 7 3/4" 3/4" 4 1/2" 3/4" 7 3/4" 3/4" 23 1/8" 24 1/2" 1/4" reinforcing bar underneath grid set into notches 24 5/8" Profile 1/4" 1/4" 4" coffee can hole is 1/2" up from bottom J- 22" Cardboard ducting (make two pieces)
23" 8 15/16" 6 1/16" 8 15/16" 23" 8 15/16" 6 1/16" 8 15/16" 23 15/16" Cardboard ducting (make one piece) with a band clamp. Set the bottom in place to square up the box while the glue dries. Cut the wooden bracing to size and then to shape as shown in the diagram. Then attach the bracing and bottom with screws. Cut the hole for the dust collection hose now. As an aside, my dust collector has 4" diameter hose. I also recently discovered that baby formula cans and most 14 and 16 ounce coffee cans are just under 4" in diameter. This makes perfect connections for a 4" dust collector hose. With a 4" hole cut in the side according to the diagram, it's a simple matter of cutting up a can with tin snips to leave tabs that can be screwed to the inside of the box. Leave at least 2" of can protruding from the box to attach the dust collection hose. With the box assembled, you can see that the rabbet in the top edge of the sides leaves about Vs" all the way around when the plastic grid is inserted. This accommodates the carpet pad that's later glued to the grid. Now cut notches for the steel bars that will reinforce your lighting grid. Mark out V4" x V4" x V4" notches in the sides according to the diagram, just below the rabbet in the top edge. Build the ducting from cardboard because it's lightweight, easy to shape and strong enough for this application. Cut the three pieces of ducting according to the diagram. Mark and cut the bends in the large piece and cut a 4" hole in the center. Place it in the box and check the fit against the bracing. Now place the trapezoidal ducting in place and check the fit. If all works well, tape the small pieces in place. This effectively holds the ducting assembly together and provides great airflow. Hook up the dust collection and check to see that the ducting is seating down on the bracing properly. If you want, caulk the joint around the opening in the cardboard. Finish the project by cutting out a sheet of open-mesh carpet padding a couple inches bigger than the plastic grid. Apply contact cement to the pad and the grid. Carefully apply the pad to the grid and fold the overhang over the edge of the grid, for a snug fit into the rabbet. A snug fit dampens vibration from the sander and keeps small parts from moving around while being sanded. PW
|
|||||||||||||||||||||||||||||||||||||||||||||||||||||||||||||


