Popular Woodworking 2000-10 № 117, страница 51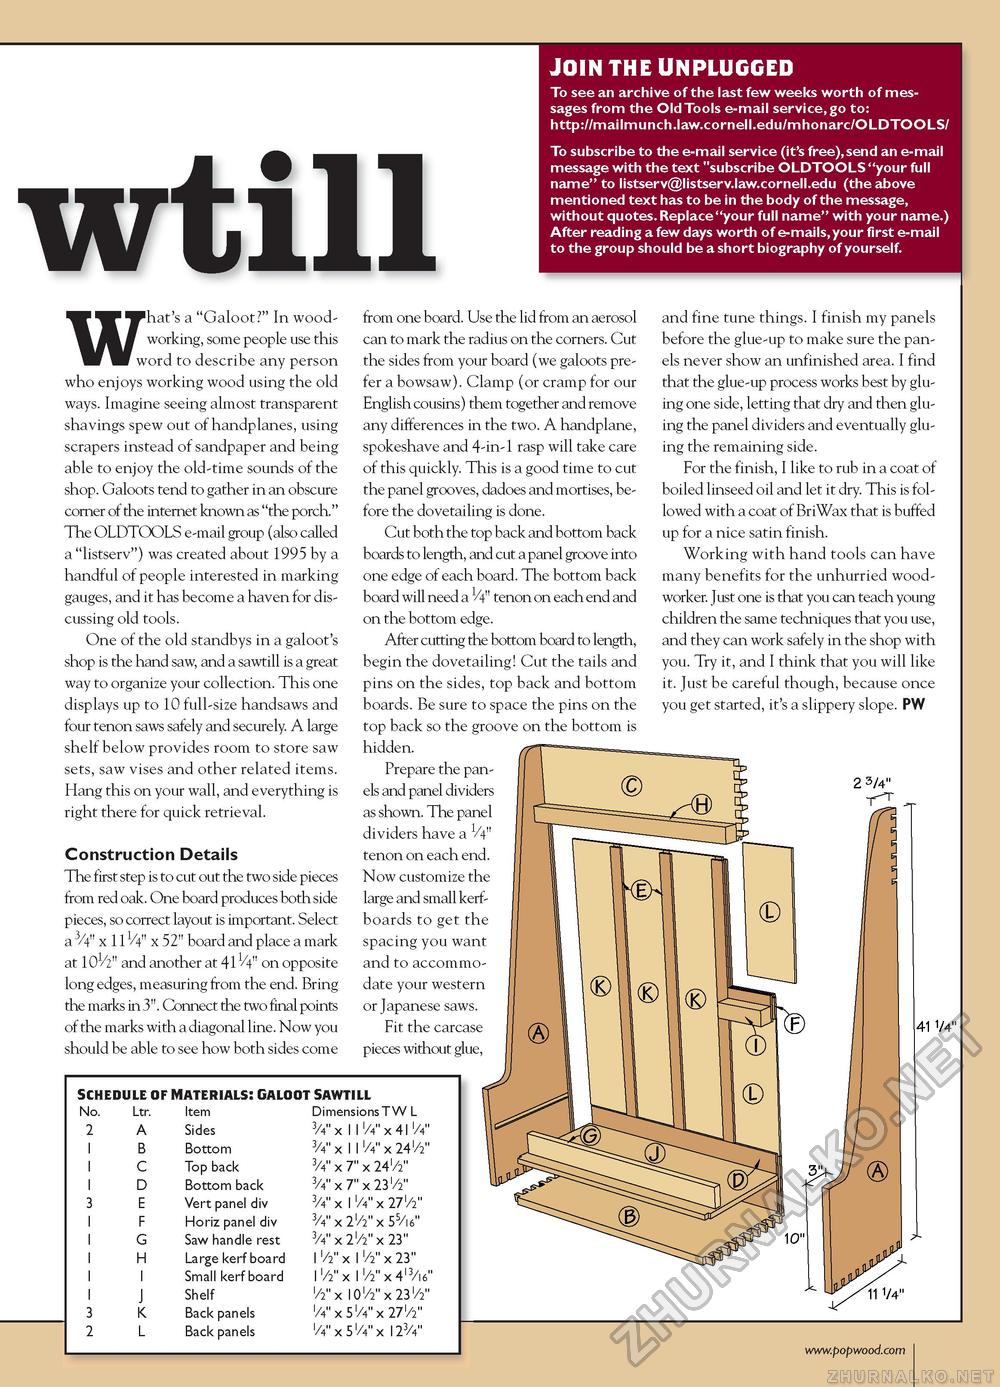
JOIN THE UNPLUGGED To see an archive of the last few weeks worth of messages from the Old Tools e-mail service, go to: http://mailmunch.law.cornell.edu/mhonarc/OLDTOOLS/ To subscribe to the e-mail service (it's free),send an e-mail message with the text "subscribe OLDTOOLS "your full name" to listserv@listserv.law.cornell.edu (the above mentioned text has to be in the body of the message, without quotes. Replace "your full name" with your name.) After reading a few days worth of e-mails,your first e-mail to the group should be a short biography of yourself. wtill WFhat's a "Galoot?" In woodworking, some people use this word to describe any person who enjoys working wood using the old ways. Imagine seeing almost transparent shavings spew out of handplanes, using scrapers instead of sandpaper and being able to enjoy the old-time sounds of the shop. Galoots tend to gather in an obscure corner of the internet known as "the porch." The OLDTOOLS e-mail group (also called a "listserv") was created about 1995 by a handful of people interested in marking gauges, and it has become a haven for discussing old tools. One of the old standbys in a galoot's shop is the hand saw, and a sawtill is a great way to organize your collection. This one displays up to 10 full-size handsaws and four tenon saws safely and securely. A large shelf below provides room to store saw sets, saw vises and other related items. Hang this on your wall, and everything is right there for quick retrieval. Construction Details The first step is to cut out the two side pieces from red oak. One board produces both side pieces, so correct layout is important. Select a /4" x 11V4" x 52" board and place a mark at 101/2" and another at 411/4" on opposite long edges, measuring from the end. Bring the marks in 3". Connect the two final points of the marks with a diagonal line. Now you should be able to see how both sides come
from one board. Use the lid from an aerosol can to mark the radius on the corners. Cut the sides from your board (we galoots prefer a bowsaw). Clamp (or cramp for our English cousins) them together and remove any differences in the two. A handplane, spokeshave and 4-in-1 rasp will take care of this quickly. This is a good time to cut the panel grooves, dadoes and mortises, before the dovetailing is done. Cut both the top back and bottom back boards to length, and cut a panel groove into one edge of each board. The bottom back board will need a 1/4" tenon on each end and on the bottom edge. After cutting the bottom board to length, begin the dovetailing! Cut the tails and pins on the sides, top back and bottom boards. Be sure to space the pins on the top back so the groove on the bottom is hidden. Prepare the panels and panel dividers as shown. The panel dividers have a V4" tenon on each end. Now customize the large and small kerf-boards to get the spacing you want and to accommodate your western or Japanese saws. Fit the carcase pieces without glue, J and fine tune things. I finish my panels before the glue-up to make sure the panels never show an unfinished area. I find that the glue-up process works best by gluing one side, letting that dry and then gluing the panel dividers and eventually gluing the remaining side. For the finish, I like to rub in a coat of boiled linseed oil and let it dry. This is followed with a coat of BriWax that is buffed up for a nice satin finish. Working with hand tools can have many benefits for the unhurried woodworker. Just one is that you can teach young children the same techniques that you use, and they can work safely in the shop with you. Try it, and I think that you will like it. Just be careful though, because once you get started, it's a slippery slope. PW 2 3/4" |
||||||||||||||||||||||||||||||||||||||||||||||||||||||||


