Popular Woodworking 2000-10 № 117, страница 9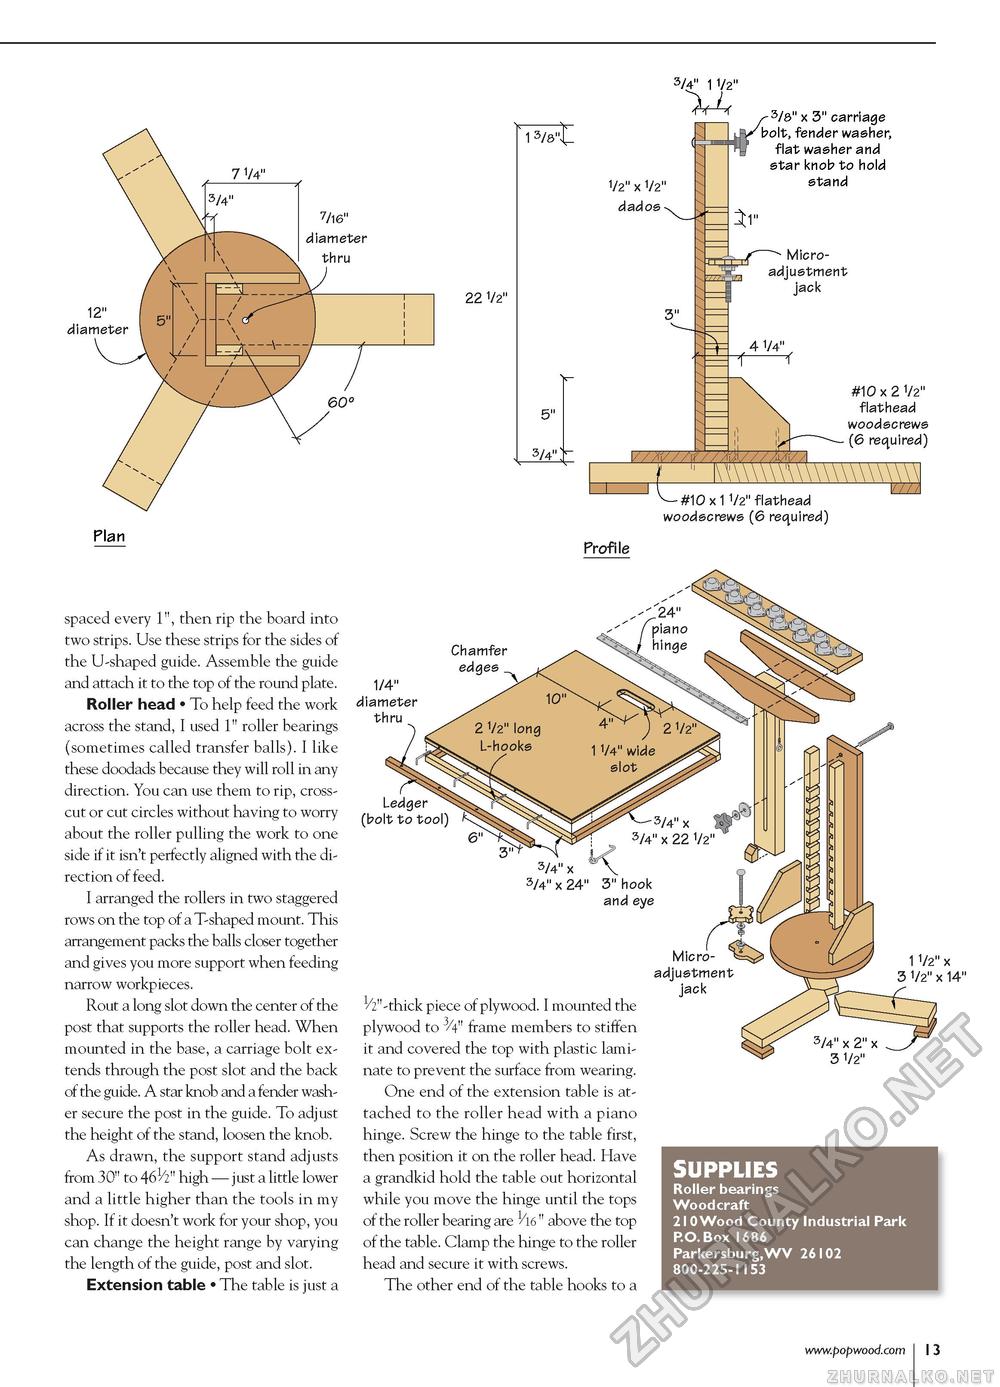
3/4" 1 1/2" 7 1/4" 7/16" diameter thru 12" diameter 7/16" diameter thru
22 1/2" 60° 1 3/8"tl 1/2" X 1/2" dados 3/8" x 3" carriage bolt, fender washer, flat washer and star knob to hold stand Micro-adjustment jack 5" 3/4" #10 x 2 1/2" flathead woodscrews (6 required) Plan spaced every 1", then rip the board into two strips. Use these strips for the sides of the U-shaped guide. Assemble the guide and attach it to the top of the round plate. Roller head • To help feed the work across the stand, I used 1" roller bearings (sometimes called transfer balls). I like these doodads because they will roll in any direction. You can use them to rip, crosscut or cut circles without having to worry about the roller pulling the work to one side if it isn't perfectly aligned with the direction of feed. I arranged the rollers in two staggered rows on the top of a T-shaped mount. This arrangement packs the balls closer together and gives you more support when feeding narrow workpieces. Rout a long slot down the center of the post that supports the roller head. When mounted in the base, a carriage bolt extends through the post slot and the back of the guide. A star knob and a fender washer secure the post in the guide. To adjust the height of the stand, loosen the knob. As drawn, the support stand adjusts from 30" to 461/2" high — just a little lower and a little higher than the tools in my shop. If it doesn't work for your shop, you can change the height range by varying the length of the guide, post and slot. Extension table • The table is just a #10 x 1 1/2" flathead woodscrews (6 required) Profile Chamfer edges 1/4" diameter thru Ledger (bolt to tool) 1 1/2" x 3 1/2" x 14" 1/2"-thick piece of plywood. I mounted the plywood to 3/4" frame members to stiffen it and covered the top with plastic laminate to prevent the surface from wearing. One end of the extension table is attached to the roller head with a piano hinge. Screw the hinge to the table first, then position it on the roller head. Have a grandkid hold the table out horizontal while you move the hinge until the tops of the roller bearing are 116" above the top of the table. Clamp the hinge to the roller head and secure it with screws. The other end of the table hooks to a 3/4" x 2" x 3 1/2" SUPPLIES Roller bearings Woodcraft 210 Wood County Industrial Park P.O.Box 1686 Parkersburg,WV 26102 800-225-1153 |
||||||||||||||


