Popular Woodworking 2000-12 № 119, страница 25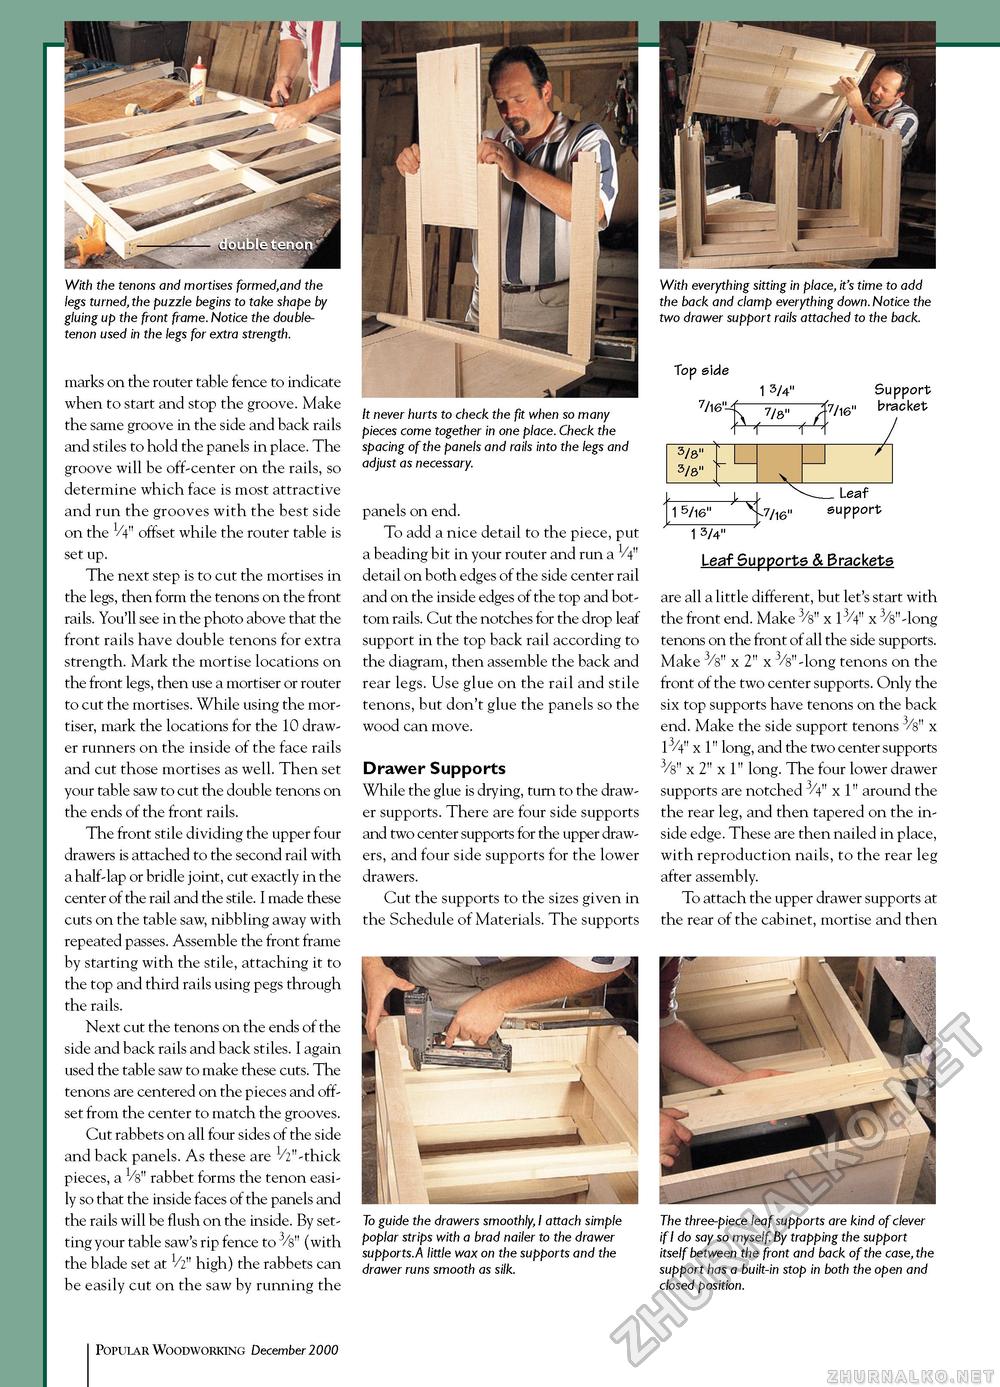
With the tenons and mortises formed,and the legs turned, the puzzle begins to take shape by gluing up the front frame. Notice the double-tenon used in the legs for extra strength. marks on the router table fence to indicate when to start and stop the groove. Make the same groove in the side and back rails and stiles to hold the panels in place. The groove will be off-center on the rails, so determine which face is most attractive and run the grooves with the best side on the V4" offset while the router table is set up. The next step is to cut the mortises in the legs, then form the tenons on the front rails. You'll see in the photo above that the front rails have double tenons for extra strength. Mark the mortise locations on the front legs, then use a mortiser or router to cut the mortises. While using the mor-tiser, mark the locations for the 10 drawer runners on the inside of the face rails and cut those mortises as well. Then set your table saw to cut the double tenons on the ends of the front rails. The front stile dividing the upper four drawers is attached to the second rail with a half-lap or bridle joint, cut exactly in the center of the rail and the stile. I made these cuts on the table saw, nibbling away with repeated passes. Assemble the front frame by starting with the stile, attaching it to the top and third rails using pegs through the rails. Next cut the tenons on the ends of the side and back rails and back stiles. I again used the table saw to make these cuts. The tenons are centered on the pieces and offset from the center to match the grooves. Cut rabbets on all four sides of the side and back panels. As these are ^"-thick pieces, a Vs" rabbet forms the tenon easily so that the inside faces of the panels and the rails will be flush on the inside. By setting your table saw's rip fence to 3/s" (with the blade set at 1/2" high) the rabbets can be easily cut on the saw by running the With everything sitting in place, it's time to add the back and clamp everything down. Notice the two drawer support rails attached to the back. It never hurts to check the fit when so many pieces come together in one place. Check the spacing of the panels and rails into the legs and adjust as necessary. panels on end. To add a nice detail to the piece, put a beading bit in your router and run a H" detail on both edges of the side center rail and on the inside edges of the top and bottom rails. Cut the notches for the drop leaf support in the top back rail according to the diagram, then assemble the back and rear legs. Use glue on the rail and stile tenons, but don't glue the panels so the wood can move. Drawer Supports While the glue is drying, turn to the drawer supports. There are four side supports and two center supports for the upper drawers, and four side supports for the lower drawers. Cut the supports to the sizes given in the Schedule of Materials. The supports Top side 7/16'"- 1 3/4" 7/8" A '( f n Support 7/16" bracket Top side 7/16'"- 7/8" A '( f n
1 3/4" Leaf Supports & Brackets 1 3/4" Leaf Supports & Brackets are all a little different, but let's start with the front end. Make 3/s" x 13/4" x 3/s"-long tenons on the front of all the side supports. Make 3/s" x 2" x 3/s" -long tenons on the front of the two center supports. Only the six top supports have tenons on the back end. Make the side support tenons 3/s" x 13/4" x 1" long, and the two center supports 3/s" x 2" x 1" long. The four lower drawer supports are notched 3/4" x 1" around the the rear leg, and then tapered on the inside edge. These are then nailed in place, with reproduction nails, to the rear leg after assembly. To attach the upper drawer supports at the rear of the cabinet, mortise and then To guide the drawers smoothly, I attach simple poplar strips with a brad nailer to the drawer supports.A little wax on the supports and the drawer runs smooth as silk. The three-piece leaf supports are kind of clever if I do say so myself. By trapping the support itself between the front and back of the case, the support has a built-in stop in both the open and closed position. 25 Popular Woodworking December 1000 |
||||||||||


