Popular Woodworking 2000-12 № 119, страница 27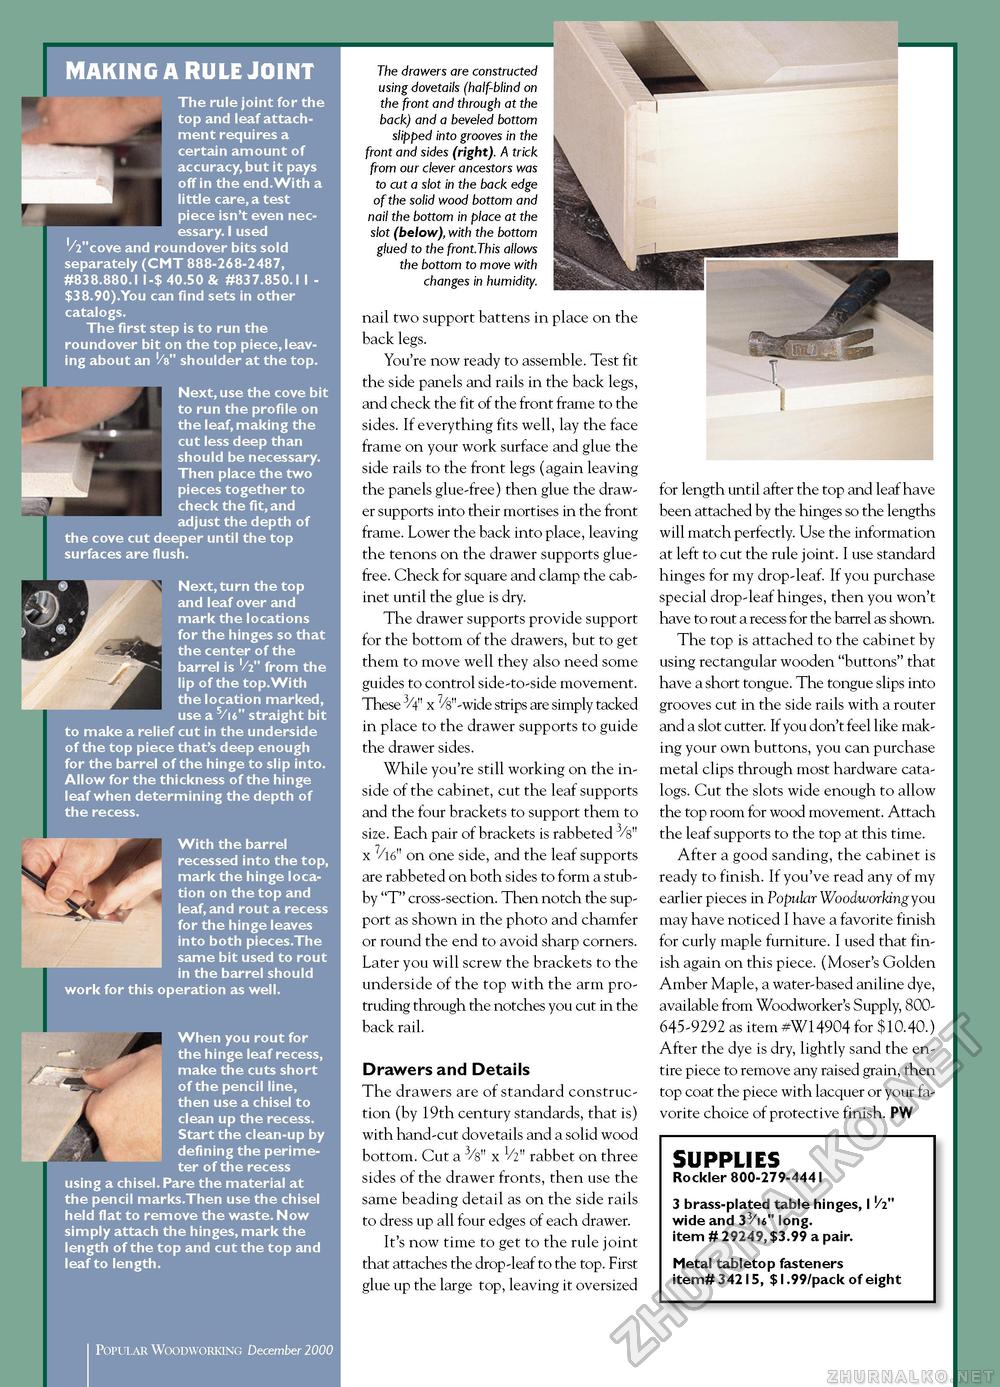
making a rule joint The rule joint for the top and leaf attachment requires a ■ certain amount of accuracy, but it pays off in the end.With a little care, a test piece isn't even necessary. I used '/2"cove and roundover bits sold separately (CMT 888-268-2487, #838.880.11-$ 40.50 & #837.850.11 -$38.90).You can find sets in other catalogs. The first step is to run the roundover bit on the top piece, leaving about an '/s" shoulder at the top. Next, use the cove bit to run the profile on the leaf, making the I cut less deep than should be necessary. Then place the two pieces together to check the fit, and adjust the depth of the cove cut deeper until the top surfaces are flush. • Next, turn the top jk' and leaf over and t mark the locations *' for the hinges so that ^C the center of the barrel is Vi" from the i'tlip of the top.With the location marked, use a 5/i6" straight bit to make a relief cut in the underside of the top piece that's deep enough for the barrel of the hinge to slip into. Allow for the thickness of the hinge leaf when determining the depth of the recess. BWith the barrel recessed into the top, mark the hinge location on the top and leaf, and rout a recess for the hinge leaves into both pieces.The same bit used to rout in the barrel should work for this operation as well. When you rout for the hinge leaf recess, make the cuts short of the pencil line, then use a chisel to clean up the recess. Start the clean-up by defining the perimeter of the recess using a chisel. Pare the material at the pencil marks.Then use the chisel held flat to remove the waste. Now simply attach the hinges, mark the length of the top and cut the top and leaf to length. The drawers are constructed using dovetails (half-blind on the front and through at the back) and a beveled bottom slipped into grooves in the front and sides (right). A trick from our clever ancestors was to cut a slot in the back edge of the solid wood bottom and nail the bottom in place at the slot (below), with the bottom glued to the front.This allows the bottom to move with changes in humidity. nail two support battens in place on the back legs. You're now ready to assemble. Test fit the side panels and rails in the back legs, and check the fit of the front frame to the sides. If everything fits well, lay the face frame on your work surface and glue the side rails to the front legs (again leaving the panels glue-free) then glue the drawer supports into their mortises in the front frame. Lower the back into place, leaving the tenons on the drawer supports glue-free. Check for square and clamp the cabinet until the glue is dry. The drawer supports provide support for the bottom of the drawers, but to get them to move well they also need some guides to control side-to-side movement. These 3/4" x 7/s" -wide strips are simply tacked in place to the drawer supports to guide the drawer sides. While you're still working on the inside of the cabinet, cut the leaf supports and the four brackets to support them to size. Each pair of brackets is rabbeted 3/s" x 7/l6" on one side, and the leaf supports are rabbeted on both sides to form a stubby "T" cross-section. Then notch the support as shown in the photo and chamfer or round the end to avoid sharp corners. Later you will screw the brackets to the underside of the top with the arm protruding through the notches you cut in the back rail. Drawers and Details The drawers are of standard construction (by 19th century standards, that is) with hand-cut dovetails and a solid wood bottom. Cut a 3/s" x Vz" rabbet on three sides of the drawer fronts, then use the same beading detail as on the side rails to dress up all four edges of each drawer. It's now time to get to the rule joint that attaches the drop-leaf to the top. First glue up the large top, leaving it oversized for length until after the top and leaf have been attached by the hinges so the lengths will match perfectly. Use the information at left to cut the rule joint. I use standard hinges for my drop-leaf. If you purchase special drop-leaf hinges, then you won't have to rout a recess for the barrel as shown. The top is attached to the cabinet by using rectangular wooden "buttons" that have a short tongue. The tongue slips into grooves cut in the side rails with a router and a slot cutter. If you don't feel like making your own buttons, you can purchase metal clips through most hardware catalogs. Cut the slots wide enough to allow the top room for wood movement. Attach the leaf supports to the top at this time. After a good sanding, the cabinet is ready to finish. If you've read any of my earlier pieces in Popular Woodworking you may have noticed I have a favorite finish for curly maple furniture. I used that finish again on this piece. (Moser's Golden Amber Maple, a water-based aniline dye, available from Woodworker's Supply, 800645-9292 as item #W14904 for $10.40.) After the dye is dry, lightly sand the entire piece to remove any raised grain, then top coat the piece with lacquer or your favorite choice of protective finish. PW supplies Rockler 800-279-4441 3 brass-plated table hinges, I '/V wide and 33//6" long. item # 29249, $3.99 a pair. Metal tabletop fasteners item# 342I5, $I.99/pack of eight PopularWoodworking December2000 |


