Popular Woodworking 2000-12 № 119, страница 51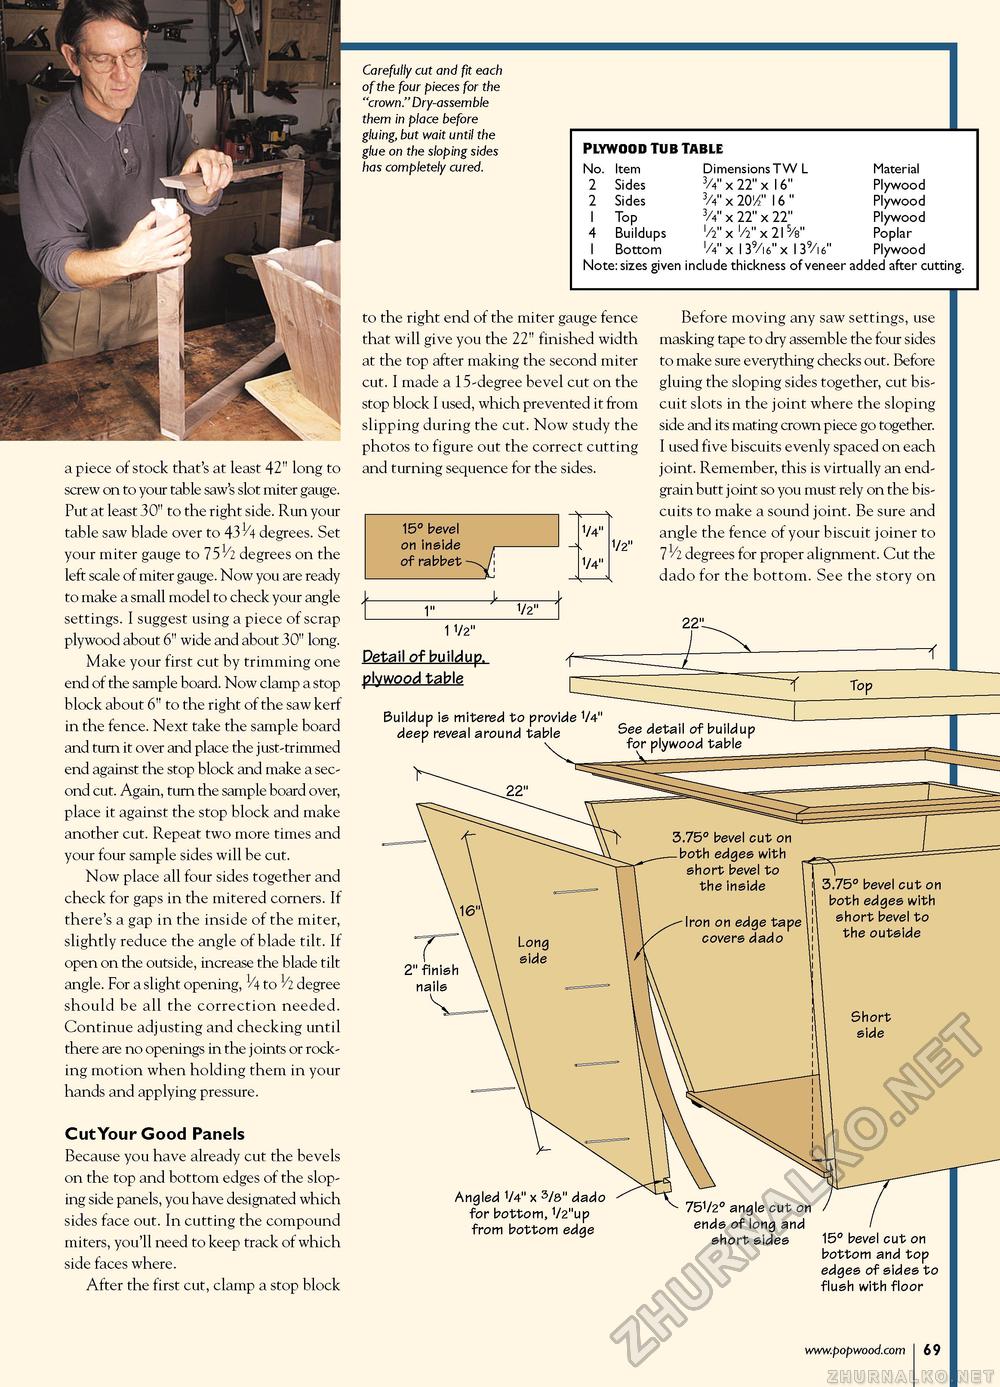
Carefully cut and fit each of the four pieces for the "crown." Dry-assemble them in place before gluing, but wait until the glue on the sloping sides has completely cured. PLYWOOD TUB TABLE No. Item 2 Sides 2 Sides I Top 4 Buildups I Bottom Dimensions T W L 3/4" 3/4' 3/V x 22" x I6" x 20I2" I6 " x 22" x 22" x I/2" x 2I5/8" x I39/I6" x I39/I6" Material Plywood Plywood Plywood Poplar Plywood Note: sizes given include thickness of veneer added after cutting. a piece of stock that's at least 42" long to screw on to your table saw's slot miter gauge. Put at least 30" to the right side. Run your table saw blade over to 431/4 degrees. Set your miter gauge to 751/2 degrees on the left scale of miter gauge. Now you are ready to make a small model to check your angle settings. I suggest using a piece of scrap plywood about 6" wide and about 30" long. Make your first cut by trimming one end of the sample board. Now clamp a stop block about 6" to the right of the saw kerf in the fence. Next take the sample board and turn it over and place the just-trimmed end against the stop block and make a second cut. Again, turn the sample board over, place it against the stop block and make another cut. Repeat two more times and your four sample sides will be cut. Now place all four sides together and check for gaps in the mitered corners. If there's a gap in the inside of the miter, slightly reduce the angle of blade tilt. If open on the outside, increase the blade tilt angle. For a slight opening, 1/4 to 1/2 degree should be all the correction needed. Continue adjusting and checking until there are no openings in the joints or rocking motion when holding them in your hands and applying pressure. Cut Your Good Panels Because you have already cut the bevels on the top and bottom edges of the sloping side panels, you have designated which sides face out. In cutting the compound miters, you'll need to keep track of which side faces where. After the first cut, clamp a stop block to the right end of the miter gauge fence that will give you the 22" finished width at the top after making the second miter cut. I made a 15-degree bevel cut on the stop block I used, which prevented it from slipping during the cut. Now study the photos to figure out the correct cutting and turning sequence for the sides. 15° bevel on inside of rabbet 1/4" 1/4" 1/2" Before moving any saw settings, use masking tape to dry assemble the four sides to make sure everything checks out. Before gluing the sloping sides together, cut biscuit slots in the joint where the sloping side and its mating crown piece go together. I used five biscuits evenly spaced on each joint. Remember, this is virtually an end-grain butt joint so you must rely on the biscuits to make a sound joint. Be sure and angle the fence of your biscuit joiner to 71/2 degrees for proper alignment. Cut the dado for the bottom. See the story on Angled 1/4" x 3/8" dado for bottom, 1/2"up from bottom edge 751/2° angle cut on ends of long and short sides 15° bevel cut on bottom and top edges of sides to flush with floor |


