Popular Woodworking 2000-12 № 119, страница 50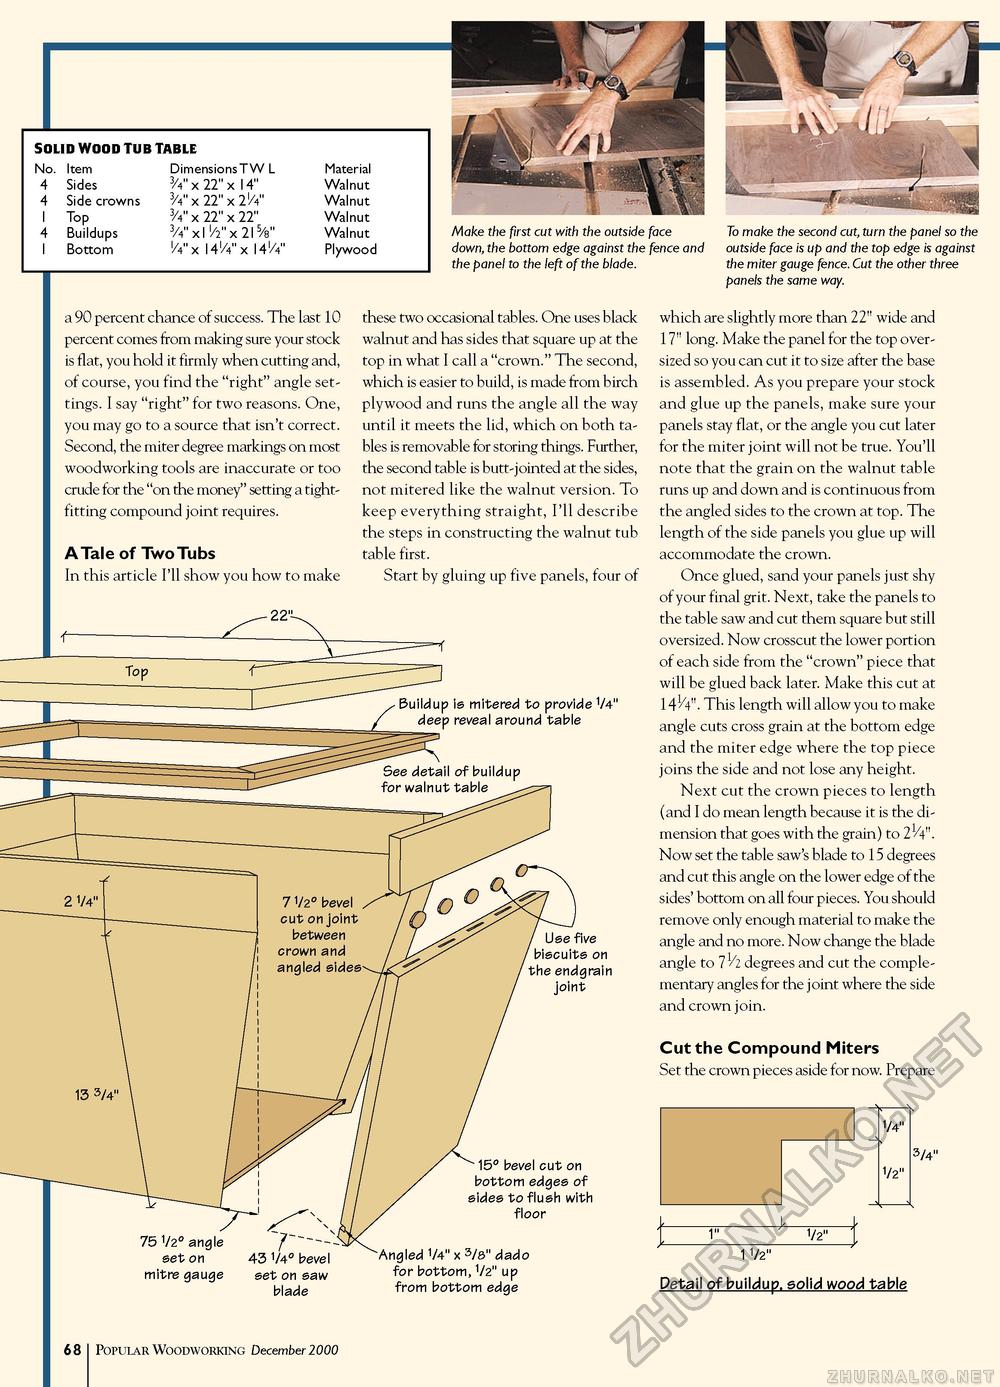
SOLID WOOD TUB TABLE SOLID WOOD TUB TABLE
Make the first cut with the outside face down, the bottom edge against the fence and the panel to the left of the blade. a 90 percent chance of success. The last 10 percent comes from making sure your stock is flat, you hold it firmly when cutting and, of course, you find the "right" angle settings. I say "right" for two reasons. One, you may go to a source that isn't correct. Second, the miter degree markings on most woodworking tools are inaccurate or too crude for the "on the money" setting a tight-fitting compound joint requires. A Tale of Two Tubs In this article I'll show you how to make Buildup is mitered to provide 1/4" deep reveal around table Use five biscuits on the endgrain joint 15° bevel cut on bottom edges of sides to flush with floor Angled 1/4" x 3/8" dado for bottom, 1/2" up from bottom edge To make the second cut, turn the panel so the outside face is up and the top edge is against the miter gauge fence. Cut the other three panels the same way. these two occasional tables. One uses black walnut and has sides that square up at the top in what I call a "crown." The second, which is easier to build, is made from birch plywood and runs the angle all the way until it meets the lid, which on both tables is removable for storing things. Further, the second table is butt-jointed at the sides, not mitered like the walnut version. To keep everything straight, I'll describe the steps in constructing the walnut tub table first. Start by gluing up five panels, four of which are slightly more than 22" wide and 17" long. Make the panel for the top oversized so you can cut it to size after the base is assembled. As you prepare your stock and glue up the panels, make sure your panels stay flat, or the angle you cut later for the miter joint will not be true. You'll note that the grain on the walnut table runs up and down and is continuous from the angled sides to the crown at top. The length of the side panels you glue up will accommodate the crown. Once glued, sand your panels just shy of your final grit. Next, take the panels to the table saw and cut them square but still oversized. Now crosscut the lower portion of each side from the "crown" piece that will be glued back later. Make this cut at . This length will allow you to make angle cuts cross grain at the bottom edge and the miter edge where the top piece joins the side and not lose any height. Next cut the crown pieces to length (and I do mean length because it is the dimension that goes with the grain) to 21/4". Now set the table saw's blade to 15 degrees and cut this angle on the lower edge of the sides' bottom on all four pieces. You should remove only enough material to make the angle and no more. Now change the blade angle to 71/2 degrees and cut the complementary angles for the joint where the side and crown join. Cut the Compound Miters Set the crown pieces aside for now. Prepare 1/4" 1/2" 3/4" 1/2" 1 1/2" Detail of buildup, solid wood table 68 Popular Woodworking December 1000 |


