Popular Woodworking 2001-02 № 120, страница 47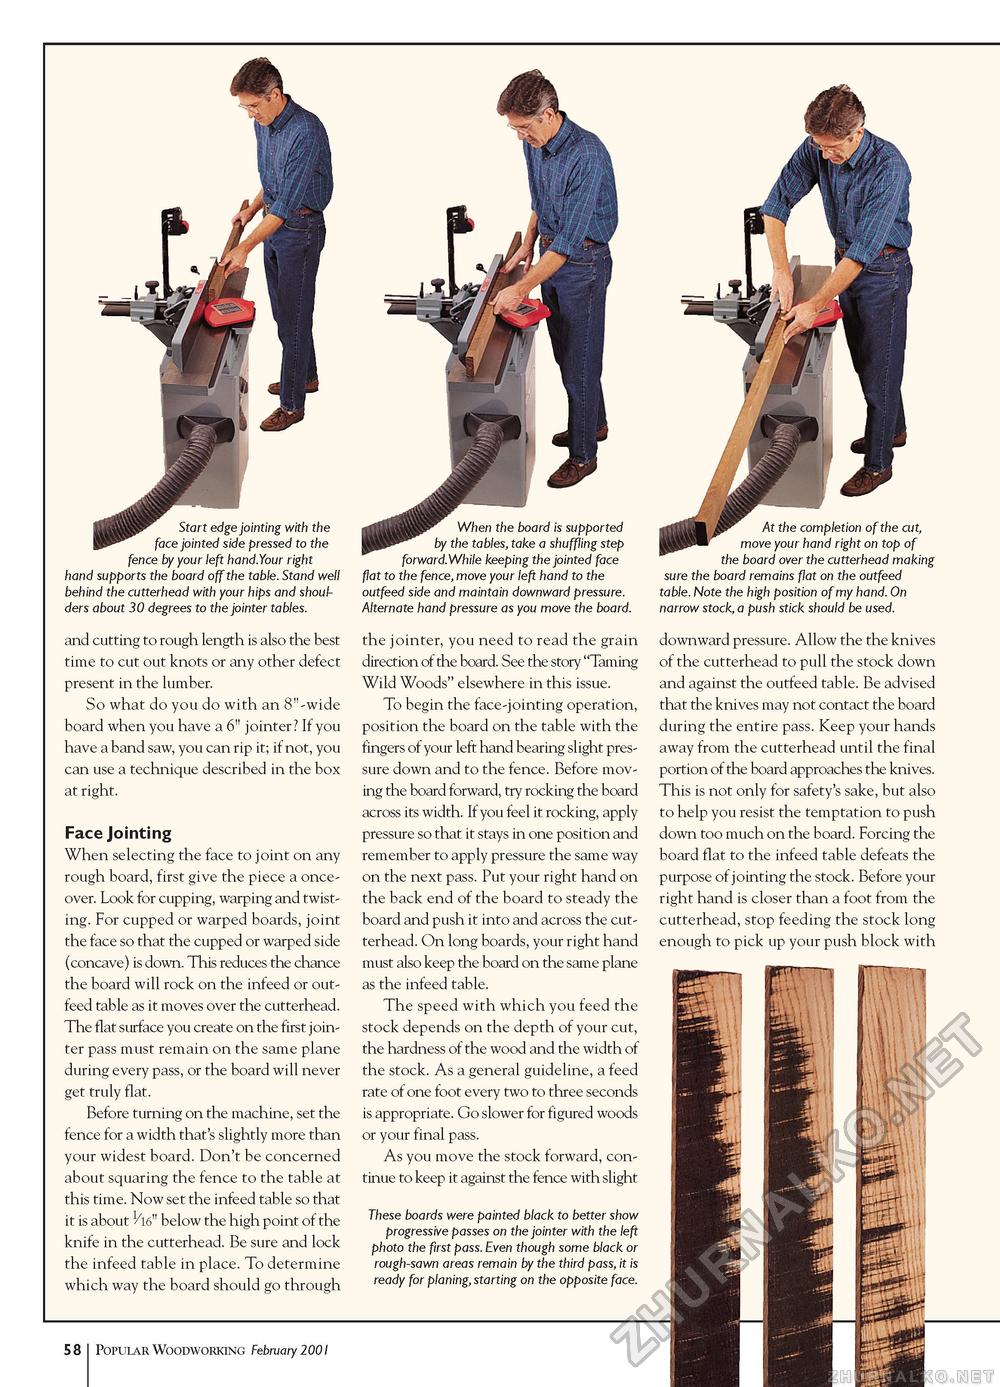
Start edge jointing with the face pinted side pressed to the fence by your left hand.Your right hand supports the board off the table. Stand well behind the cutterhead with your hips and shoulders about 30 degrees to the jointer tables. and cutting to rough length is also the best time to cut out knots or any other defect present in the lumber. So what do you do with an 8"-wide board when you have a 6" jointer? If you have a band saw, you can rip it; if not, you can use a technique described in the box at right. Face Jointing When selecting the face to joint on any rough board, first give the piece a onceover. Look for cupping, warping and twisting. For cupped or warped boards, joint the face so that the cupped or warped side (concave) is down. This reduces the chance the board will rock on the infeed or out-feed table as it moves over the cutterhead. The flat surface you create on the first jointer pass must remain on the same plane during every pass, or the board will never get truly flat. Before turning on the machine, set the fence for a width that's slightly more than your widest board. Don't be concerned about squaring the fence to the table at this time. Now set the infeed table so that it is about 1/l6" below the high point of the knife in the cutterhead. Be sure and lock the infeed table in place. To determine which way the board should go through When the board is supported by the tables, take a shuffling step forward.While keeping the jointed face flat to the fence, move your left hand to the outfeed side and maintain downward pressure. Alternate hand pressure as you move the board. the jointer, you need to read the grain direction of the board. See the story "Taming Wild Woods" elsewhere in this issue. To begin the face-jointing operation, position the board on the table with the fingers of your left hand bearing slight pressure down and to the fence. Before moving the board forward, try rocking the board across its width. If you feel it rocking, apply pressure so that it stays in one position and remember to apply pressure the same way on the next pass. Put your right hand on the back end of the board to steady the board and push it into and across the cut-terhead. On long boards, your right hand must also keep the board on the same plane as the infeed table. The speed with which you feed the stock depends on the depth of your cut, the hardness of the wood and the width of the stock. As a general guideline, a feed rate of one foot every two to three seconds is appropriate. Go slower for figured woods or your final pass. As you move the stock forward, continue to keep it against the fence with slight These boards were painted black to better show progressive passes on the jointer with the left photo the first pass. Even though some black or rough-sawn areas remain by the third pass, it is ready for planing, starting on the opposite face. At the completion of the cut, move your hand right on top of the board over the cutterhead making sure the board remains flat on the outfeed table. Note the high position of my hand. On narrow stock, a push stick should be used. downward pressure. Allow the the knives of the cutterhead to pull the stock down and against the outfeed table. Be advised that the knives may not contact the board during the entire pass. Keep your hands away from the cutterhead until the final portion of the board approaches the knives. This is not only for safety's sake, but also to help you resist the temptation to push down too much on the board. Forcing the board flat to the infeed table defeats the purpose of jointing the stock. Before your right hand is closer than a foot from the cutterhead, stop feeding the stock long enough to pick up your push block with 58 Popular Woodworking February 2001 |


